1st ECONOWAVE Build in India (Clone) - BLITZ

Hari655

Active Member
Joined
Oct 2, 2012
Messages
101
Points
28
Location
Hyderabad
Hello All,

After the 5.1 build with MTM's and Bookshelf's build with peerless speakers and dayton tweeters.

This time I wanted to raise a bar myself in the field of Audio and DIY.

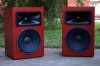
So I have taken up the project to Clone the Econowave Design. I named this as "BLITZ".

And as always this time as well my mentor is Goldy Rathore, the design was also suggested by him :). Thanks for your help Goldy Sir(Really lot and lot of help) But still need a lot of help to close the project successfully.

The goals of selecting the design:

1. Constant directivity.
2. Keep the build expenses to least possible extent.
3. Use locally available parts in hyderabad.

Couple of sites on the Econowave design:

http://www.gedlee.com/downloads/directivity.pdf

Gainphile: S15 - Econowave DSP

Red Spade Audio: Introducing the Econowave speaker


Drivers used:

1. Compression Driver - P Audio thailand BM-D450S(Rs2000)
P.Audio | BM-D Series : BM-D450S
From Pro Audio vision in Paradise Sec'bad.

2. Ahuja 12 Inch Woofer(MID) - L12 - MB200(Rs1900) (New but same specs as its predecessor (L12 - MB150).
Ahuja Sound Solutions
From Ahuja Dealer in Koti.

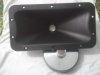
Waveguide: Conical wave guide. The clone of JBL horn. Similar horn was copied by pyle and now in india we can see with dynamite for Rs.1000/-
DM 6512

But still i got the wave guide in hyderabad gujrati galli market made of plastic for Rs.500/-

Will keep you posted on the progress.

Thanks,
Yashwanth
 
Last edited:
The begining of this project

I was approached by Yashwanth for a new speaker build. Since I place a lot of importance to narrow constant directivity, I chose one such design. To keep the build simple and low cost, I suggested that we clone an Econowave which uses pro audio drivers. The design uses a 90 waveguide on a compression driver for the highs and directvity matched woofer for the lows.
For lower bass stereo subs were suggested.
 
About the Econowave design

The Econowave uses a 90x45 waveguide to achieve 90 constant horizontal directivty. Horizontally, the waveguide forms a beam that is 90 degrees wide. If the on axis SPL of the waveguide is 0 dB then at two horizontal 45 degrees angles, the SPL is down by 6dB. The waveguide is able to achieve this 90 beamwidth for frequencies from very high to a point where wavelength equals the mouth size. The mouth of the waveguide is about 12 inches wide which means that it can control the beamwidth down to about 1143Hz. The woofer too is 12" wide so it too has similar beamwidth at 1143 Hz and so can be crossed at this frequency. Below this frequency the directivty falls rapidly. As you can see, the waveguide and woofer are directivty matched ie they are crossed over at a frequency where both have same directivty. So tentative crossover was decided to be 1kHz
 

Attachments

  • Econowave.jpg
    Econowave.jpg
    20.7 KB · Views: 571
Last edited:
The constant directivity is used as follows

To have good sounstage and imaging a speaker must have low early reflection and more late reflections. To achieve this a narrow directivty speaker is placed with high toe in as shown in the attached figure (taken from pispeakers). For explanation, consider the left speaker only, when toed in, its beam is directed towards the right wall. The listener, when in center, is sitting quite a bit off-axis (towards left of on axis). The closest wall, left wall, is far off axis so there is very less sound going to left wall. Even though the right wall is far away from the left speaker, yet because the beam is directed to the right wall the sound from left speaker first reaches the listener directly and then reaches the listener after reflecting from the right wall and thus after sufficient delay. This late reflection and subsequent reflections from the room reverberation add ambience/soundstage. The key point is that the first reflection is delayed so that imaging is not cmpromised.

When the listener is moving to the right he is going more closer to the on axis of the left speaker and so the SPL is increasing from left speaker. Yes, even though the listener is moving away from it (see the diagram again). And the listener is also moving more off axis of the right speaker and increasingly there is less SPL from it even though he/she is moving closer to it. Thus the right movement is adjusting the relative SPLs of the speakers to have equal SPls from both the speakers. The same thing happens once the listener is moving to the left. Such a design thus has better imaging and a wider sweet spot and better centre image of mono (vocals etc). Only constant directivty designs can do this. Thus such a design has no need for room treatment, atleast not in the mids and highs. Lows are a different matter altogether.
 

Attachments

  • ConstantDirectivity.jpg
    ConstantDirectivity.jpg
    12.1 KB · Views: 555
The drivers

The tweeter is a medium format Compression Driver. It has 1.75" coil/diaphragm with a sensitivity of 105 dB/watt. Only a watt or two would be needed even in the most demanding home listening situations. In fact, the tweeter would be loafing most of the time. The woofer again is a pro audio unit with a sensitivity of 97 dB /watt and mid Qts of about 0.45 which results in good bass extension. Good pro audio drivers are no nonsense units which sound very clean, dynamic and show no strain at all even when the volume is turned up.
 
Last edited:
The crossover

A good passive crossover has a steep learning curve and would need many iterations so and an active xover was decided.
 
The enclosure

Again for simplicity, a sealed enclosure was chosen since the very lows would be handled by separate subs anyway. So a sealed enclosure of 18mm MDF with double thickness front baffle was chosen for less cabinet vibration with sufficient bracing and stuffing.
 
Goldy Sir i could not come on this Sunday as agreed..due to personal emergency..will meet soon to finalise the project.


Thanks for the other details on the project. Which helps other members thanks!
 
Now that DIY AV rack is done...!

And i am also on the JOB for DIY amp chasis which is running fine..!

So i thought why not use the carpenter to veeneer the econowaves also..

he has done the veneering of the ECONOWAVES on sunday 07/12/14.

So as usual tomorrow morning before i go to work i will try to polish them and re assamble them...!

Just waiting for the amplifier to get completed and the active cross over to make them sound.


Thanks,
Yashwanth
 
Here are the completed Econowaves...!

Polished in contrast with the diy av rack....more darker than the rack

IMG_0413.jpg


Now pending is the DIY AMP and active xover and the subs and diy class d amp....

OMG so much to do still


Note: I know just five feet rack is not a good to put up the econowaves....but space constraint in the room....right side the door.... left side the mirror :-( but anyways i have to live with it...but at least in near future 1-1.5 years i will add a penthouse and that will be final HT where these will be placed.


Thanks,
Yashwanth
 
Last edited:
Hi Hari,
any updates on this?

was just curious about the enclosure design for the econowave - I am not able to find any info on this?

Are these sealed/vented/TL?
 
hi..

As told by Goldy earlier..this is a sealed enclosure.

Again for simplicity, a sealed enclosure was chosen since the very lows would be handled by separate subs anyway. So a sealed enclosure of 18mm MDF with double thickness front baffle was chosen for less cabinet vibration with sufficient bracing and stuffing.

Thanks,
Yashwanth
 
I know, had skimmed through it, found most of the discussion centred around driver & horn selection & integration - nothing on enclosure design, hence me asking
 
Back
Top