Grundig V5000 - German Masterclass

reubensm

Well-Known Member
Joined
May 26, 2010
Messages
5,016
Points
113
Location
Trivandrum, India
Hi all, some time last year, I had the opportunity to lay my hands on a Grundig V5000 stereo amplifier, courtesy our forum memember coaltrain. It was part of a electronics give-away. The original owner (not coaltrain) had attempted to get this amplifier fixed (it was obviously not working) and was told by the technician that its not worth getting this fixed.

I always had great respect for the Grundig brand as we grew up listening to a Grundig CR485 tape recorder which was miles ahead of the Sonys, the Panasonics and other Japanese tape recorders in its class. Here is a snap of that lovely tape recorder

Grundig Radio Boy - Grundig CR485 Stereo cassette recorder

Anyway, back to the topic. The Grundig amp was in good cosmetic condition and had some interesting features (not found on regular integrated amps) and hence it got me interested straight away. Looked like a good restoration project (if I could find the time).

After bringing this amp back with me to Trivandrum, it lay in storage for some time as we had got busy with its matching cassette deck (which was also obtained as part of the give away). The cassette deck restoration was a grand success. The time was right to take the amp out of storage and start restoring it.

On opening it up, we were amazed to see the inside, typical German engineering. Solid and heavy, a huge filter cap bank, a huge power transformer, a huge heat sink and loads of components. The amp was as dead as it gets, only the power indicator would light up but nothing else worked, dead preamp, dead poweramp, absolutely dead!!

As we discovered with the Grundig Deck which we restored earlier, finding information about the V5000 on the internet was a huge challenge as most of it was in German. Long hours spent on using google translate to make it understandable in some form. Even the schematic which we got was in German and had to be translated.

This project was handled fully by my brother as I could not spare any time on it, due to work committments and the construction of my home. The last 4 months or so were spent on fault finding, root cause analysis, component identification, component sourcing, component replacement and testing. Finally after a lot of back breaking work, the amp has started singing last week. What a journey of discovery it has been for my brother, fixing this amp. There is still more work to be done on the pots, caps and connectors but overall, the amp sounds magnificent, true to the reputation of late 1970s and early 1980s equipment. This amplifier is from the year 1981.

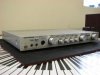
Here is a stock picture of the amp for reference. More on the actual restoration process with pictures, to follow over the weekend.
 
Last edited:
I use to have to Grundig SVX6000 High Definition Preamp some 10 yrs ago. I know how good the German engineering was then back in 80s.

Nice to see your restoration project coming to life.
 

Attachments

  • d2eee154ba47842b.jpg
    d2eee154ba47842b.jpg
    14.9 KB · Views: 571
Last edited:
Congratulation reubensm to you and your brother for this fantastic work. Looks as good as new!

I must pay you guys a visit (if you would allow me to) when I come to Trivandrum next - my parents stay there, and I do visit them every year.

Best,
APK.
 
Congratulation reubensm to you and your brother for this fantastic work. Looks as good as new!

I must pay you guys a visit (if you would allow me to) when I come to Trivandrum next - my parents stay there, and I do visit them every year.

Best,
APK.

Thanks APK, the picture attached is a stock picture and is not that of the original amp. However the original amp too looks in pristine condition, for its age and has been cleaned up and is sparkling.

You are most welcome, let me know when you are coming down. Both my brother and I stay in the same locality.

Thanks reubensm for the offer. Will let you know once my trip is finalized. Am thinking sometime in June/July.

Best,
APK
 
Sorry for the delays, latest update is that we are waiting for 2 wire wound resistors to come in from the UK. These are important components for speaker and power-rail short-circuit protection. Without these, the relays won't kick in and the amplifier won't start. Had the amp working by by-passing the existing on-board blown resistors (which is not a safe thing to do, but ok i guess, under test conditions)
 
Finally the resistors arrived from UK this morning, they were wired in and bingo, the amp is back to how it should be. Just got a call form my brother confirming the great news. He'll have the amp all fitted back and cleaned up and he's going to bring it over to my place late tonight for us to sit down and listen to it. Shall post the pics and a detailed write up later tonight. Fixing this amp has been a real journey which took many months or hard work and discovery. Intial auditions suggest that the amp sounds fantastic. But I must listen for myself. More later tonight.
 
ok, so here goes. At sharp 9:30pm my door bell rang, and brother walked in carrying this massive integrated amp, all cleaned up, shiny and sparkling. I had to wait a bit as I was on the watch out for Mr. Kuruvilla's program on Jeevan TV. Once that was done with (was not aired today), we wired up the amp and eagerly went for vinyl first. My technics sl3200 (M44-7 cart) was all set. The LP of choice was James Last's Instrumentals Forever (chose this LP as the pressing is simply outstanding for a Indian Polydor LP). When the LP started spinning, gently turned up the volume control and there it was, for the first time I personally heard this amp sing...listened to a whole side and then switched to cd. The cd of choice was Pink Floyd's division bell. Sounded magnificent even though the CD was one, burnt out of downloaded mp3s. While sitting down and listening, I fondly recollected the day I first saw this amp on our forum. Member coaltrain had advertised this amp, its matching cassette deck and an Akai R2R. As I was interested in the r2r, he offered to give these to me for free it I wanted them. He was not sure about the working condition but I thought, here goes my luck. Grundig has always been a brand I've admired and experienced too, knew I would be in for some good stuff. Ran a check on the internet and realized that this deck and amp were high-end European equipment and big players in their day. Thought it would be a good challenge trying to restore these pieces but was not sure what to expect. Anyways, I collected them when I visited Bangalore. This was sometime in mid-2012. The deck was restored and is now in use with one of our forum members. It was a big deal as restoration was very difficult and challenging. Then came the turn of the amp. I still remember what coaltrain told me. The owner attempted to fix this amp but the service technician (after looking it up) stated that it was not worth attempting to fix it anyways.

Initial Condition of the Amp:

The amp was in decent cosmetic shape, a bit dusty but well stored. It was in its original packaging, and it belonged to an Airforce officer. The original amplifier box had some interesting stickers on it, indicating that the amp was purchased in Germany, used in Iraq and then shipped to India. On wiring it up and turning it on, noticed that it was stone-dead, only the power LED lit up. On looking at photos on the internet, realized that a custom heatsink with some local transistors was added to the rear exterior of the amp. This was a frightening sight and it immediately dawned on me that some techie cowboy had tampered with the original circuitry and attempted to alter the amp in an effort to fix it. On opening it up, my fear turned out to be true. The pre-driver and the output stage of the power amplifier section were completely ruined (physically damaged), over and above that, a lot of wiring was just pulled out and dumped into the amp (it cannot get worse than this).

We chose the cassette deck for restoration first:

The amp was set a side and we started with the cassette deck. The main reason was that my brother and I were so fascinated by that cassette deck, CF-5500F, what a piece of electronics!! After some back-breaking work and sourcing of spares from all over the place, that deck got back on its feet and started singing so wonderfully well. Its now doing duty with a fellow forum member. The very thought of getting at the amplifier was frightening as it was in such bad shape, electronically. However, that they challenge we crave for and so we finally unscrewed the lid on a Sunday morning after Church and got started.

The cassette deck story: http://www.hifivision.com/cassette-...cf5500-2-cassette-deck-first-impressions.html

Diagnosis:

Step-1 was to download the service manual from the internet and re-wire the amp, connecting back those wires which were disconnected. Came to understand that the amp design was far ahead of its time and had a modular based interior. The power supply was amazing, with a huge transformer and capacitor bank. From this it was evident that this amp was going to be a monster when it gets back on its feet. The next step was to check whether the preamp and poweramp modules were being powered by the PSU. Both were, thank god for this as PSUs are expensive to fix. We tested the preamp and poweramp separately, the preamp with my NAD 216thx poweramp, the result stone dead, then the poweramp, it was dead anyways, no sound.

The Preamp first:

The amp has a complex preamp complete with an inbuilt 4-band graphic equalizer. Luckily the preamp boards were not tampered with and on checking, we detected 5 faulty transistors. However we did note that the phono stage of the preamp was functional (great news so it could remain untouched and as original as can be). Next came the painful wait for the transistors to arrive from the UK. Some leaky electrolytic caps also needed replacement and they were duly replaced with spares that arrived on the same consignment. After making the switch of components with the ones that arrived, bingo, we had a working preamp!!

The Poweramp:

This was the challenge. On check the pre-driver and driver stages of the poweramp, it was shocking to note that not a single transistor had survived. Wonder how the power amp got fried in the first place. My assumption is that the power amp probably developed some kind of fault and someone attempted to fix it. Since components were not available in India, he may have tried some modifications or short cuts. While doing so, he may have shorted something and fried the amp. On closer examination, we also noted that the speaker and short circuit protection board was completely by-passed (which could have caused the amp to get fried in the first place when something went wrong while attempting to repair it). Again, absolutely all the semiconductors had to be sourced from the UK and carefully wired back into the PCB. The technician who worked on the amp earlier had completely ruined the PCB by making modifications and what not. Parts of the PCB had to be rebuilt so we decided to get it done locally. Using schematics from the service manual (which was in German and had to be translated), the PCB was restored to its original form and all the replacement components wired back. The next step was to source a replacement speaker protection board with relays. This took quite a bit of time but we managed to source a OEM board from ebay Germany. The replacement board however, had 2 fried wire would resistors which the seller claimed got damaged due to a short circuit in the amp from which it was salvaged. So again, the replacement parts had to be sourced from UK. Meanwhile we got the amp to sing without the relays on the test bench (risky but worth a try as we had also procured some extra spares, just in case). Finally, the resistors came, they were wired to the board and the board restored in the amp. The restoration was complete. It was a grand success, the amp was singing at last and that too, it was singing real good.

Now back to the present, its 12:30 am now and the amp has been running here since 10pm yesterday. Its now playing vinyl, Nat King Coles Rambling Rose. My first impressions, very impressed. The 4-control tone control is amazing, one can really project the mids using this. Also the bass boost switch is pretty handy. I liked the DB control beside the master volume control which can be used to control the sensitivity of the volume control. Its late night so cant play loud but I was able to do a comparison with my NAD rig. The Grundig amp sounds more bright and aggressive, versus the NADs typically laid back, free flowing sound. Metallicas black album sounded punchy and macho. This amp is ideal for listening to impact music and live music. When I was listening to the James Last LP, I could imagine sitting in front of a live orchestra, the imagery was that good, a tad better than the NAD. The highs are more or less like the NAD but the bass is far tighter and creates an instant impact. With the bass boost switch turned on, it really shakes the window panes but does not sound boomy or over whelming. However I must mention that my NAD preamp tends to cover up ticks and pops while playing vinyl against the Grundig amp which plays them as-is. However thats not a major worry as this can be compensated using the amazing tone controls.

Overall, its a wonderful amp, really great on the cosmetic front with the 1970s classic silver solid state look and it sounds truly impressive, and its built like a tank. Its playing upstairs right now, and Im downstairs writing this review and cant help but admire how rich this amp sounds. Its full of new components, semiconductors and all so will need about 40 hours of break in before we can reach a spot closer to its baseline sound signature. Will keep listening and keep you posted. Here are some pics of the amp on the floor in my listening space (sorry for the poor clarity as Im yet to get my sony cam back from service).
 
Last edited:
Listened till 3am this morning, mostly vinyl. The amp is really sounding good, got some sleep and started again at 6:30am with Pink Floyd's "The Wall". Can't stop listening.
 
can we have some inside shots ? of the restored PCB, and before shots if any?

Unfortunately by brother did the restoration and he does not have the patience to take photos at each and every stage (same as with the CF-5500 cassette deck which we restored earlier). Also I don't want to dismantle the amp once again to take pics. This amp has generated a lot of interest especially with the neighbours, with its sound. We've had quite a few visitors over to take a look at it, so preferred to keep it all screwed up. The PCB was repaired at a local shop as we don't have the tools and know how to do this at home. What happened was that the original technician who attempted to repair attempted and ruined this amp, tried to modify the circuitry by removing the connective signal traces and replaced them with pieces of wire cut and soldered all over the place. We had these conductive pathways reconstructed so as to restore the original PCB and then soldered back all the components. It was one hell of a job (and expensive too)
 
Last edited:
Great product......now its all Made in China.........:rolleyes:

Very true, this amp is built so solid that it you feel the enclosure, you could imagine, you were resting your hand on a re-inforced concrete pillar. The quality of steel used for the cabinet is really good, and rock solid. The cabinet screw-on cover is a far cry from the semi-flexi ones used on the NADs. German equipment of those times (in this case, 1981) was built to last.
 
** Cost Of Restoration **

Some of you were curious to know the cost of restoration. Need to check my credit card statement and will share the entire list of components replaced and component costs later this week.
 
Check out our special offers on Stereo Package & Bundles for all budget types.
Back
Top