rahulavachat
New Member
Hello Friends !
I need some help from you as I have a plan to build my custom floor standing speakers from available sony speakers I have.
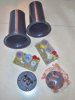
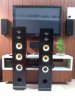
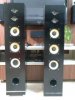
What I have with me is... see attached image as well.
Front Speakers - SS-RV990 - 2 nos.
Accepts impedence of 6 to 16 Ohms
Sub Woofer 1 - 15cm cone type
Woofer 1 - 15cm cone type
Tweeter 1 - 5cm cone type
Nominal Impedence 6 ohms
Surround Speakers - SS-RSV60 2 nos.
Woofer 1 - 13cm cone type
Tweeter 1 - 5cm cone type
Super Tweeter 1 - 2cm cone type
Nominal impedence - 24 ohms
All i have is...
Mid Range - 4
Low Frequency - 2
Tweeters - 4
Super Tweeters - 2
I have Denon AVR 1311 which has following front LR output...
Front L/R 75 W + 75 W (8 ohms, 20 Hz - 20 kHz) / 110 W + 110 W (6 ohms, 1 kHz)
Now out of above given speaker availability, can i build two floor standing speakers which are compatible with my AVR. I am not too techno guy and i dont want to risk my AVR/AMP by connecting non compatible speakers.
Please recommend me combinations and crossover needs. Also be frank if nothing can be produced out of these speakers.
Regards
Thank in Advance
Rahul
I need some help from you as I have a plan to build my custom floor standing speakers from available sony speakers I have.
What I have with me is... see attached image as well.
Front Speakers - SS-RV990 - 2 nos.
Accepts impedence of 6 to 16 Ohms
Sub Woofer 1 - 15cm cone type
Woofer 1 - 15cm cone type
Tweeter 1 - 5cm cone type
Nominal Impedence 6 ohms
Surround Speakers - SS-RSV60 2 nos.
Woofer 1 - 13cm cone type
Tweeter 1 - 5cm cone type
Super Tweeter 1 - 2cm cone type
Nominal impedence - 24 ohms
All i have is...
Mid Range - 4
Low Frequency - 2
Tweeters - 4
Super Tweeters - 2
I have Denon AVR 1311 which has following front LR output...
Front L/R 75 W + 75 W (8 ohms, 20 Hz - 20 kHz) / 110 W + 110 W (6 ohms, 1 kHz)
Now out of above given speaker availability, can i build two floor standing speakers which are compatible with my AVR. I am not too techno guy and i dont want to risk my AVR/AMP by connecting non compatible speakers.
Please recommend me combinations and crossover needs. Also be frank if nothing can be produced out of these speakers.
Regards
Thank in Advance
Rahul