Some half-complete speaker projects photos

tcpip

Well-Known Member
Joined
Mar 1, 2010
Messages
542
Points
93
Location
Bombay
I had some friends coming over to look at what I do in speaker building. So I pulled out some half-complete speakers from storage and just lined them up to let them see physically what these things sound like. Out of these friends, exactly one has seen one or two high-end audio systems, the others were from the Gen Z which means they've only used Rs.1,000 earphones or Bluetooth boomboxes. So, their feedback was not really very on-point, but nevertheless, it gave me a chance to see what my own projects look like once they are actually set up.

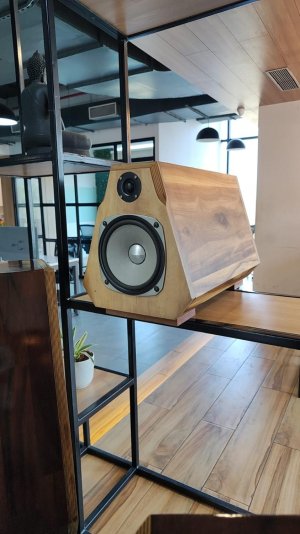
This one below is a small standmount, whose front baffle is small, but its depth is bigger than its front -- the depth is almost 2 feet, because the internal volume is about 30 litres. It uses a Fostex FF225WK 8" full range as a midbass and a SB tweeter. The idea was to make something "small" to keep close to the wall, and have somewhat higher sensitivity than usual, to be driven by a SET valve amp. It has a port in the rear surface. This is a different model from what I usually make, because I almost never design for tube amps.
IMG-20230205-WA0017.jpeg

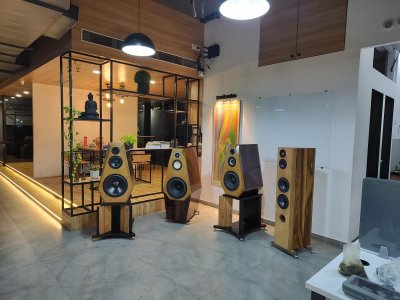
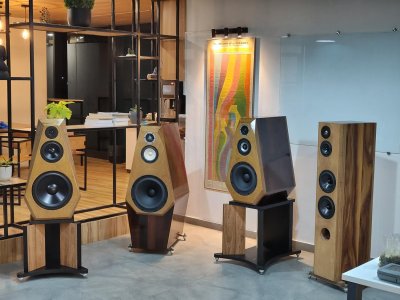
Two of these are floorstanders, two are large standmounts on stands of my own design.
IMG_20230204_191813096_HDR.jpeg
IMG_20230204_191801823_HDR.jpeg

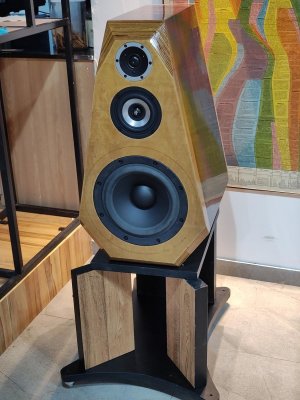
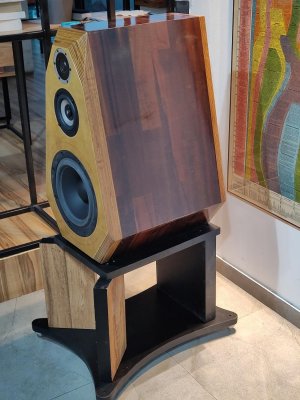
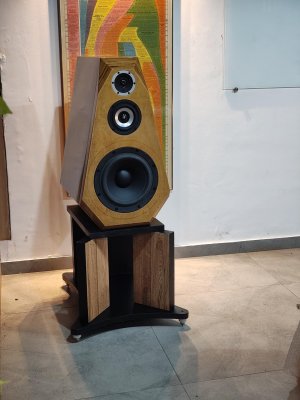
This one below is a standmount with the SB29NRX as woofer, a Jordan Eikona 2 as midrange, and a Satori ring radiator tweeter.
IMG_20230204_183821953.jpeg

IMG_20230204_183806237.jpeg

The stands were an experiment with MDF construction. The upright pieces are 50mm thick MDF (two sheets of 25mm each, stuck). The two uprights in front have vitrified tiles stuck on them, for rigidity and looks. The base has D-nuts and spikes. As always for me, the spikes are from Sound Foundations.
IMG_20230204_183755894.jpeg

Don't ask me how they sound -- they are not finished yet.
 
Absolutely great photos. Lovely wood work.

IDEA : On the last speaker photo, if you were to reverse the enclosure 180 degrees onto the stand, bass notes from the woofer will couple to the floor, ( for a subsequent forward launch ), in a more efficient manner than how you now have the enclosure positioned and photographed.

Bass waves, being omnidirectional, will " roll around " the enclosure, and reflect less controlled, energy-wise, in the orientation as photographed.

However, in either position, the void area where you have attached spikes, will be a bass compromise.

See if you can fill in that spike-height void area, all the way to your floor. so waves won't be able to do anything but move down and forward into the room, towards the listener.

In doing the above, keep the front baffle surface of the woofer totally FLUSH with the stand's vertical front surface.

On my highly efficient speaker-to-stand set up, 1/32 of an inch of mis alignment, in or out from flush, makes an audible difference. This is with a speaker using a reflex port below the 16 inch woofer. Experiment systematically. I don't really know for sure how your system may behave.

Again, absolutely lovely wood work and photos. Thanks for sharing them here.

Jeff

Just keep my comments in mind, and only when you are " in the mood ", experiment by A-Bing. Don't touch volume control. Louder is almost always better !!
 
Amazing, where is this place? I see your from Mumbai.
when can we audition?
Thanks, Amrut and Yogibear. These speakers (and I) are in New Bombay, but they're not yet complete. I'll definitely be posting details here once they are complete, plus posting full plans, circuits, measurements, and construction details on my website once I finish the work, as I always do. Would love to have you and others come and listen once done. The shapes are my attempt to make big speakers look less boxy. If you see the photos which have a row of four speakers, then in those photos, the one on the extreme right is a typical modern slim tall floorstander. If I had used a typical rectangular shape for my wider-body designs, I feel they would have looked too boxy.

Jeff, my last photo already has the woofer some 20" above the floor. Are you suggesting that I raise it higher, so that its axis becomes 40" above the floor? In that case, thanks but no thanks, I am not too keen.:)
 
Jeff, my last photo already has the woofer some 20" above the floor. Are you suggesting that I raise it higher, so that its axis becomes 40" above the floor? In that case, thanks but no thanks, I am not too keen.:)
No, you have not yet visualized what I was trying to verbalize. Everything is the same height.

In the last photo, turn the speaker 180 degrees on it's stand, so that effectively, the speaker stand is reversed. The rear of the stand, with a FLAT vertical span, becomes the FRONT of the main speaker's stand.

That way, bass energy from the woofer, can couple, guided by the stand's FLAT VERTICAL panel position, more directly to the floor. It should more effectively launch bass energy from the floor to the listener's position. The stand's vertical panel becomes a "small narrow vertical speaker baffle", flush positioned ideally with the woofer's baffle.

The void under the lowest horizontal wood , ( that holds and positions the speaker spikes ), needs to be closed-off on that one " facing front " end.

Filling the void, caused by the spikes, is a continuation of the stand's flat vertical baffle panel under the woofer cone, all the way to the floor . By doing this, omni directional bass energy from the woofer does not flow into that narrow void, and travel willy nilly. Bass energy couples more purposefully to the floor, and traverses in a continuum to the listener's seated position. Got it ??
 
No, you have not yet visualized what I was trying to verbalize. Everything is the same height.

In the last photo, turn the speaker 180 degrees on it's stand, so that effectively, the speaker stand is reversed. The rear of the stand, with a FLAT vertical span, becomes the FRONT of the main speaker's stand.

Understood. I would have understood it earlier if you had asked me to rotate the stand 180 degrees instead of rotating the speaker. :)

Yes, there is an impact on the sound if the woofer's output gets a flat baffle from edge of its cone to the floor, instead of being in free air, so to speak, like it is doing now. However, I think I'm interested in seeing how the woofer sounds in free air, whether the bass will be cleaner and lighter this way. Let's see.

And for contrast, I always have the second design beside it, with a tall floorstander with a full height baffle.

@tcpip ...lovely build and design. They look smacking gorgeous 😍😍. How I wish I had your wood working skills 🙈🙈.
Arre, it's my carpenter, I have zero woodworking skills and even less strength and patience. My carpenter is a bulldog with a magic touch.
 
Understood. I would have understood it earlier if you had asked me to rotate the stand 180 degrees instead of rotating the speaker. :)

Yes, there is an impact on the sound if the woofer's output gets a flat baffle from edge of its cone to the floor, instead of being in free air, so to speak, like it is doing now. However, I think I'm interested in seeing how the woofer sounds in free air, whether the bass will be cleaner and lighter this way. Let's see.

And for contrast, I always have the second design beside it, with a tall floorstander with a full height baffle.


OK, glad you got it. Also, try and fill the void at the front of the floorstander, near the floor, caused by its spike heights. Use a simple non attached piece of wood. Flush positioned with the front baffle. A-B it at your leisure, once you have that speaker optimized. Please let us know what, if anything, you hear.

What I described about " baffling to the floor " is likely far more sensitive with 104.5 dB 16 inch driver ( 515G-8HP in a 825 enclosure ) with woofer cone being bass-reflex AND front-horn-loaded, than in your present infinite baffle design speaker.

I like your non- parallel side walls a lot, BTW !!

Be careful not to overdamp the insides. Many do so. Start first with NO damping, and systematically listen on music, to what you add VS the lesser amount you had previously listened to.

Do not assume starting out with any amount of damping. NONE first, listen, and ADD by listening to each iteration. You'll nail it, that way.

Lots of DIY labor and time required.

Jeff
 
Last edited:
Arre, it's my carpenter, I have zero woodworking skills and even less strength and patience. My carpenter is a bulldog with a magic touch.
I gave up DIY speaker building 2 years ago as I can't find a reliable carpenter to do the job .
 
I had some friends coming over to look at what I do in speaker building. So I pulled out some half-complete speakers from storage and just lined them up to let them see physically what these things sound like. Out of these friends, exactly one has seen one or two high-end audio systems, the others were from the Gen Z which means they've only used Rs.1,000 earphones or Bluetooth boomboxes. So, their feedback was not really very on-point, but nevertheless, it gave me a chance to see what my own projects look like once they are actually set up.

This one below is a small standmount, whose front baffle is small, but its depth is bigger than its front -- the depth is almost 2 feet, because the internal volume is about 30 litres. It uses a Fostex FF225WK 8" full range as a midbass and a SB tweeter. The idea was to make something "small" to keep close to the wall, and have somewhat higher sensitivity than usual, to be driven by a SET valve amp. It has a port in the rear surface. This is a different model from what I usually make, because I almost never design for tube amps.
View attachment 75118

Two of these are floorstanders, two are large standmounts on stands of my own design.
View attachment 75119
View attachment 75120

This one below is a standmount with the SB29NRX as woofer, a Jordan Eikona 2 as midrange, and a Satori ring radiator tweeter.
View attachment 75121

View attachment 75122

The stands were an experiment with MDF construction. The upright pieces are 50mm thick MDF (two sheets of 25mm each, stuck). The two uprights in front have vitrified tiles stuck on them, for rigidity and looks. The base has D-nuts and spikes. As always for me, the spikes are from Sound Foundations.
View attachment 75123

Don't ask me how they sound -- they are not finished yet.
Very good designs, I am tempted to build full range speakers by looking your work. I am also from Mumbai. I want to connect for your guidance.
 
I know a very good carpenter, won't have hands on experience with speakers but really good guy for furniture work.
Let me know if you want to speak with him,
No, actually, I have a reliable and experienced chap so far. My comment was about the DIY builder in general.

Also, carpenters who are experienced in furniture building often have to do a lot of unlearning in order to build good enclosures. If they are open and curious, they learn well. Else, they are very stubborn and one has to fight with them to make them do things with different rules. (My carpenter took years, literally, before he accepted that (i) leader holes for screws have to be drilled to the full depth needed for the entire screw to go in, (ii) he must screw in the screw without hammering it in the last half inch, and (iii) each screw needs to be coated in Araldite before being inserted. He was on the verge of spoiling one of my enclosures because he had simply omitted screws for the bracing -- he had just assembled the box without any tight clamping.)

@Vishram karande I'll be happy to connect on WhatsApp, just PM me.
 
Purchase the Audiolab 6000A Integrated Amplifier at a special offer price.
Back
Top