DIY - AMD Fusion HTPC

mmmm not bad, I wonder how much more time we can save, if we take the direct approch, I mean not using eventghost to edit the shell, instead directly make the changes on windows shell to omit its booting .....

Thanks. I did try it. But Group Policy Editor is not available on Windows 7 HP or Home Basic. Eventghost is not used for editing the shell as you mentioned, instead it is set as the windows shell, the default being explorer. This way system boots directly into eventghost. Explorer is never loaded. Instead of eventghost, xbmc can also be set as the shell to save some more loading time. However we need eventghost in the background to control the generic remote control. I use eventghost to load my avast a/v also as I'm skeptic about virus infection through usb drives. Even with all these settings, the load time is hardly 15-20 seconds.


Get rid of the user log on screen as well ..... else you will get stuck with an extra step everytime you boot to put your credentials, which I believe also interrupt the seeming boot process of the HTPC

That image is for reference only. Since auto logon is enabled, you don't need to click the user name or enter password. That user selection/password window is never displayed.
 
Here is the final chapter of this DIY project.

XBMC splash screens for Windows Welcome Screen

The link I posted is not working. The correct link is Splash Screens - Home Theater Backdrops & Wallpapers

The red one is my favourite - Splash Screens - XBMC Splash Screen - Home Theater Backdrops & Wallpapers

Windows Boot Animation

You can download windows boot animations from Browsing deviantART


Use Windows 7 Boot Updater and select the boot animation from 'File'> 'Load boot skin...'

Change Windows Branding

The welcome screen still has windows branding logo like 'Windows 7 Home Premium' at the bottom of the screen, the accessibility button etc. which we would like to remove.

2qc11yf.png


An excellent step by step guide is discussed here: How to Remove Branding Logo and Ease of Access (Accessibility) Button from Windows Vista and 7 Login Screens? - Tweaking with Vishal

Edit messages like 'Welcome', 'Shutting down' etc.

Want to change the 'Welcome' message at logon to something like 'Welcome to XBMC' or the 'Shutting down...' message to 'Turning off XBMC' ? Read the following two guides.

Welcome Log On Text Message - Change - Windows 7 Forums

Shutting down... Text Message - Change - Windows 7 Forums

After doing all these customizations, your system will look like a dedicated media center. The next step is to configure the remote control.

PC Remote control

No media center is complete without a dedicated remote control. Remote Control Reviews - XBMC

The recommended remote controls are based on windows eHome IR driver (RC6), but these are expensive and you will need to source them from ebay or amazon etc. The advantage of such remote controls is that they are highly customizable and you don't need eventghost to control the remote.

With the help of forum member srinisundar, I have ordered one such remote control.
NEW HP MCE /REMOTE CONTROL /USB IR RECEIVER /IR Emitter | eBay


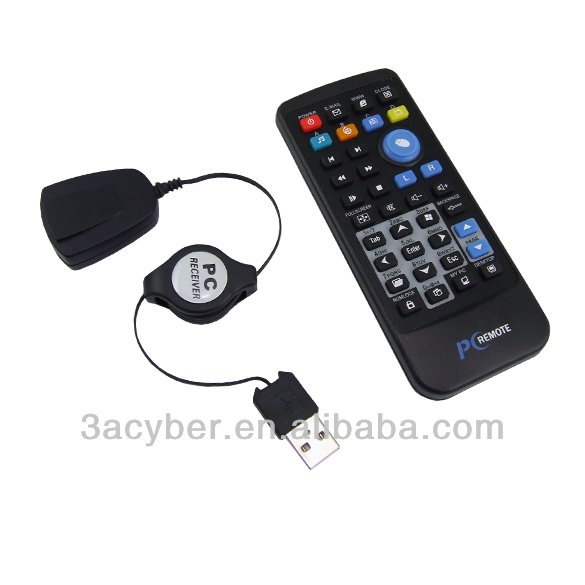
For the time being I am using this remote control which is available on ebay india for Rs.600/- Multimedia IR PC Remote Controller with USB Receiver | eBay

USB_Computer_PC_Remote_Control.jpg


This remote control is basically a keyboard and mouse combo. It sends keyboard shortcuts like Alt+F4 for the close button and media commands for playback buttons. You can use such a remote control with XBMC out of the box. However the functionality of some keys cannot be changed. For instance, if close button is pressed it will close xbmc without showing any confirmation, 'www' will start your browser etc. Here is where eventghost comes to your rescue.

Configure PC Remote control

First plugin the remote control receiver to a suitable USB port. Please note that eventghost will recognize the remote only when it is plugged into the usb port you selected. Then start the device manager - Right click Computer>Manage>Device Manager. Under the 'Human Interface Device' locate your remote control device. In my pc it is the second 'USB Input Device'. If you don't know which one is your device, then remove the receiver and plugin it again and note which usb device is newly added.

Right click the device and select Properties> Details. Select the property 'Hardware Ids' and copy the first value. Similarly copy the value for 'Device class guid' also.

x4lyfb.png


xli5io.png


Go to the folder 'C:\Program Files\EventGhost\plugins\PC Remote Controller' and open the file '__init__.py' using notepad or notepad++ (recommended). Replace the guid and hardwareId with the copied values. Scroll down a little and again replace the "PC Remote Controller" with the new hardware id. Save the file.

2a0ai9z.png


am2xz8.png


Start eventghost. Rightclick 'Autostart' > Add Plugin. Select PC Remote Control under Remote Receiver. Eventghost will prompt you to download and install the driver for this device. After the driver is downloaded and installed, you will see a new device 'PC Remote Controller' under the device manager.

14t4v1u.png


Now press the play button on the remote control and you will see an entry PCRemoteController.Play on the log window of eventghost. Drag and drop the event PCRemoteController.Play (icon with lightning symbol) to the Play macro of XBMC2 plugin as shown in the image. Similarly configure all the buttons or actions as you desire. It is recommended to delete all unused plugins and macros like zoom player, winamp etc.

dykqao.png
 
Hi baiju, can you get an approx indication of tyhe power consumption by going via this fusion mobo route?
 
I read in another thread that the power consumption is around 20W only.

Ok thanks, if possible please give me some reference thread. However I had one additional query, presently it has HDMI 1.3, is there is fusion / i-atx board with HDMI 1.4 built in? As even if a add another graphics card in future I read that these boards have a 4x pci-e slot hence high end graphics card will nto run at fuill bandwidth.
 
^^ Also, @cha_indian, even if you use a 90 degree adapter, the cabinet should have a PCI "window" in the back (in the appropriate place) so that the RCA and other ports of the sound card can be slotted-in, in an accessible way.

The best way to go about doing this would be to use a micro-atx cabinet.
 
I would also like to share the following:

Program Harmony Remote Control
Logitech Harmony remote can be programmed to control the generic remote control shown above. The remote is grouped under Computer>>Media Center PC>>Chinavasion>>CVSB-983.

Create Boot Animation from Videos

Download the tool Video2Png from Coder for Life - Project - Win 7 Boot Updater: Extras and extract the contents. Drag and drop the video file onto the video2png.bat file. Make sure that the video file name has no space in it.

With my limited photoshop knowledge I created a boot animation for XBMC using a sample video clip downloaded from Abstract Animation | "free abstract animation".

You can download the animation from XBMC Boot Animation.rar - File Shared from Box - Free Online File Storage
 
is it possible to use a 90 degrees right angle PCI card adaptor for installing a Asus Xonar Card ??

I happened to come by a solution while replying to a thread started by haisaikat and thought of this Q you'd posted a bit before.

It looks like the Silverstone LC19 has the facility to do a 90degree tilted install of a PCI card (NOT PCIe). This cabinet also comes with the required adapters for installing a PCI card in this way.

What's more, that cabinet comes with a 120w fanless (DC/DC) PSU with an external brick. 120w will be quite enough for an AMD Fusion install.

Combine this cabinet with an Asus E350M1-M, a Xonar ST, and a Notebook HDD (the cabinet will take a 3.5" HDD also), and you have a fully fanless, ultra silent Music PC. :licklips:

The cabinet is a quite a bit expensive, though. :p

Sorry to barge in on the thread, @baijuxavior :eek:

EDIT: A review with more details can be read here.
 
Last edited:
My experiments with XBMC continues...

Start windows from XBMC

We are booting directly into XBMC. So what if we want to see the explorer? Of course there always is the Ctrl+Alt+Del method. But for that you will need a keyboard and need to type 'explorer' at File>New Task. Here I will tell you how to create a menu in xbmc to start windows explorer.

We will create the new menu in the shutdown window of xbmc which is called by pressing 's'. For this we need to edit the file 'DialogButtonMenu.xml' file of the skin folder. I am using XBMC pre-eden version and the default skin is 'confluence'. The skin folder can be found under 'C:\Program Files\XBMC\addons'. Skin folders are named like 'skin.confluence'. You will need to edit the xml file of your selected skin.

Default shutdown menu of eden confluence skin is shown below:

2nvt4j4.png


Open the file 'DialogButtonMenu.xml' under the folder 'C:\Program Files\XBMC\addons\skin.confluence\720p' using notepad or notepad++ which is my favorite editor. It is recommended to make a backup of this file.

Using ctrl+f search for '<onclick>XBMC.Quit()</onclick>'

Just above this line add '<onclick>XBMC.RunScript(C:\program files\XBMC\startwindows.py)</onclick>' without the quotes.

You can remove the quit command if you don't want to close xbmc. If you want to close xbmc, then leave the quit command line.

Change the <label>13012</label> to 'Exit to windows' or whatever you like.

I used <label>Exit to windows</label>

Save the changes you made.

The xml code will now look like this:

2el5c47.png


So we added a 'python' script named 'startwindows.py' to run when the exit button is clicked. But where is the 'startwindows.py' script? We will need to create this script under the xbmc root folder - C:\program files\XBMC

In notepad++ open a new file by clicking the 'new' button and type in the following:

import os, subprocess
subprocess.Popen(["explorer.exe"], shell=False)

Save the file with name 'startwindows' and file type as Python file to the folder C:\program files\XBMC

If you use notepad then enter the file name as 'startwindows.py' and file type as 'all files'.

Now start XBMC, press button 's' or your remote power button which has been configured to send the 's' key and you will see a new shutdown window. Select the 'Exit to Windows' button and voila you are taken to the windows explorer. If you have configured xbmc to directly boot using instantsheller as I described earlier, you will see the complete windows desktop rather than the explorer window.

v61b0x.jpg
 
Last edited:
The Marantz PM7000N offers big, spacious and insightful sound, class-leading clarity and a solid streaming platform in a award winning package.
Back
Top