I got a limited quantity of Glasswool from some source and decided to put it for good use. And I am glad I tried it. The difference it has made is quite amazing. I now doubt if people who endlessly upgrade their audio system without focusing on acoustic correction of their room, are going in the right path. Creating an acoustic panel is darn simple if you have time for it ( moderately difficult though).
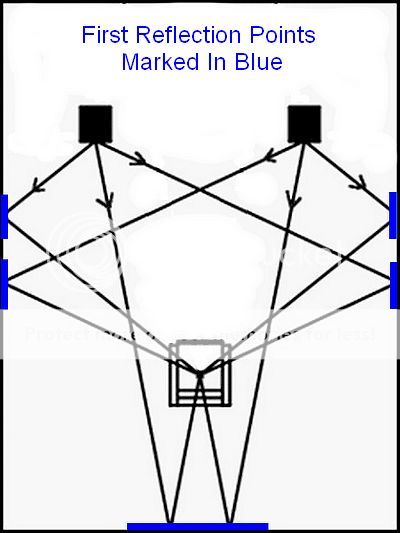
I used mirror technique and tried the panels on side walls at first reflection points. The sound has become more crisp and accurate now. There is no smearing of high frequencies. The bass slightly became tighter and whatever harshness existed in highs have completely gone. Snare drums are so punchy now. The sound is more focussed and there is more space between instruments now. You can clearly observe that the sound is less bouncing and fast decaying once the panels are in place. :yahoo: All these at a fraction of the cost of upgrading!
Stuff used:
8 panels of Fibreglass wool 4' x 2' each 0.5" thick
Wooden frames of 1" thickness, 2" deep. Total length 24 feet
A cheap and better quality fabric
Stainless steel 'L' angles 16 nos
0.75" and 0.5" screws
'Fevibond' Resin Adhesive
Tools: Screw driver & Hammer (or Drilling machine if you have), Scissors, Arc Saw, Surgical gloves, Measuring tape, Marking pen.
Stage 1:
First, the wood is first cut into pieces; 4 nos of 2' length + 4 nos of 4' length using a saw. You can get it cut from the plywood store where you bought it, if possible.

Arrange the pieces in a perfect rectangular frame as shown, with thinner side facing up. Then place the L angles on the corners, mark the holes with a pen and punch pilot holes using a long nail. Then screw the angles in their place. Repeat for other corners. Now invert the frame and repeat the task. You can use shorter screws this side to make it easier for you.


Stage 2:
Wear the gloves now, place the fibrewool on the floor/ table and spread the cheap fabric on it, better side facing up.


Now place the frame over it such that it slides on the fibre pad and touches the floor.

Now apply adhesive to the bottom half of the wood, throughout the frame on one side. Put adhesive as a sine wave for better results.

Now flapover the fabric and ensure it is stuck to the glue/wood.


Repeat this on the adjacent side of the frame. Now while pasting the fabric on the third and fourth sides, you have to stretch it as far as possible, without tearing it and then stick it (you may have to hold it for a minute till it dries). Do it for small lengths of 1 feet or so. Once done, you can cut the excess fabric (close to the glued area)


Stage 3
I used a slightly used bed spread for the fabric for the facing side. I bought a new one actually with a better design on it. My wife was furious when she knew it was to be cut. hyeah: Later I found it to be not so porous so avoided it. If you blow through the fabric, it should give some resistance but not completely block the air. Also it should not be stretchable.
Now spread the good fabric on the floor/ table, with better side facing down.

Place the panel on top of it, so that the naked side of it is touching the new fabric. The fiber pad may fall off, so be careful.

Ideally, before starting you could make a sandwitch of good fabric, fibreglass wool and then cheap fabric. But it was sounded complex so I did not advise earlier.
Pull out the fabric on all sides so that there are no wrinkles under the panel.
Apply adhesive on top half of the frame side (any) and then on top of the frame.

Paste the fabric on it. Repeat it for the adjacent smaller side.

Now when you do it for third and fourth side, you have to stretch it real hard (without tearing the fabric ofcourse). If its a printed material with some line design like I used, it becomes more difficult since the lines would become waves if it is not evenly stretched. Remember that the fabric is the only thing holding the stuff inside so it should be really tight. Paste it 1 feet at a time so that you can hold it tight till it dries.

Now you can again cut excess fabric, apply some adhesive and stick the new fabric over the previous one.

Once everything is done, you can apply some adhesive on such areas where fabric meets screws or metal- to ensure it does not tear over a period of time.
There you go. The first panel is ready

Repeat it for the other panel (s). It took me another Sunday to complete the other one. They do look sexy, don't they?")

You can fix rubber bush or something on back of it to give space between panel and wall or mount it in such a way that some breathing space is seen.
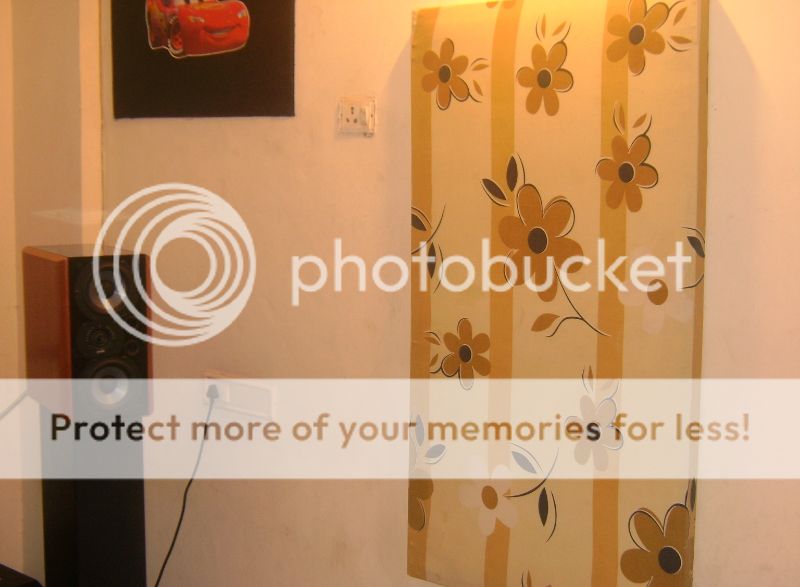
I will post a pic with the panels in their place shortly. My next assignment is to make corner bass traps. Will share W-I-P once ready.
I used mirror technique and tried the panels on side walls at first reflection points. The sound has become more crisp and accurate now. There is no smearing of high frequencies. The bass slightly became tighter and whatever harshness existed in highs have completely gone. Snare drums are so punchy now. The sound is more focussed and there is more space between instruments now. You can clearly observe that the sound is less bouncing and fast decaying once the panels are in place. :yahoo: All these at a fraction of the cost of upgrading!
Stuff used:
8 panels of Fibreglass wool 4' x 2' each 0.5" thick
Wooden frames of 1" thickness, 2" deep. Total length 24 feet
A cheap and better quality fabric
Stainless steel 'L' angles 16 nos
0.75" and 0.5" screws
'Fevibond' Resin Adhesive
Tools: Screw driver & Hammer (or Drilling machine if you have), Scissors, Arc Saw, Surgical gloves, Measuring tape, Marking pen.
Stage 1:
First, the wood is first cut into pieces; 4 nos of 2' length + 4 nos of 4' length using a saw. You can get it cut from the plywood store where you bought it, if possible.
Arrange the pieces in a perfect rectangular frame as shown, with thinner side facing up. Then place the L angles on the corners, mark the holes with a pen and punch pilot holes using a long nail. Then screw the angles in their place. Repeat for other corners. Now invert the frame and repeat the task. You can use shorter screws this side to make it easier for you.
Stage 2:
Wear the gloves now, place the fibrewool on the floor/ table and spread the cheap fabric on it, better side facing up.
Now place the frame over it such that it slides on the fibre pad and touches the floor.
Now apply adhesive to the bottom half of the wood, throughout the frame on one side. Put adhesive as a sine wave for better results.
Now flapover the fabric and ensure it is stuck to the glue/wood.
Repeat this on the adjacent side of the frame. Now while pasting the fabric on the third and fourth sides, you have to stretch it as far as possible, without tearing it and then stick it (you may have to hold it for a minute till it dries). Do it for small lengths of 1 feet or so. Once done, you can cut the excess fabric (close to the glued area)
Stage 3
I used a slightly used bed spread for the fabric for the facing side. I bought a new one actually with a better design on it. My wife was furious when she knew it was to be cut.
hyeah: Later I found it to be not so porous so avoided it. If you blow through the fabric, it should give some resistance but not completely block the air. Also it should not be stretchable. Now spread the good fabric on the floor/ table, with better side facing down.
Place the panel on top of it, so that the naked side of it is touching the new fabric. The fiber pad may fall off, so be careful.
Ideally, before starting you could make a sandwitch of good fabric, fibreglass wool and then cheap fabric. But it was sounded complex so I did not advise earlier.
Pull out the fabric on all sides so that there are no wrinkles under the panel.
Apply adhesive on top half of the frame side (any) and then on top of the frame.
Paste the fabric on it. Repeat it for the adjacent smaller side.
Now when you do it for third and fourth side, you have to stretch it real hard (without tearing the fabric ofcourse). If its a printed material with some line design like I used, it becomes more difficult since the lines would become waves if it is not evenly stretched. Remember that the fabric is the only thing holding the stuff inside so it should be really tight. Paste it 1 feet at a time so that you can hold it tight till it dries.
Now you can again cut excess fabric, apply some adhesive and stick the new fabric over the previous one.
Once everything is done, you can apply some adhesive on such areas where fabric meets screws or metal- to ensure it does not tear over a period of time.
There you go. The first panel is ready
Repeat it for the other panel (s). It took me another Sunday to complete the other one. They do look sexy, don't they?
You can fix rubber bush or something on back of it to give space between panel and wall or mount it in such a way that some breathing space is seen.
I will post a pic with the panels in their place shortly. My next assignment is to make corner bass traps. Will share W-I-P once ready.
Last edited:
")

 . Infact it gave me a gut feeling that no system upgrade can compensate for the room deficiencies which often screws up the sound royally. I remember how the PMC dealer at the Mumbai meet struggled to stop unwanted waves reaching the sweet spot.