
All,
I was enjoying my PJ projected on my wall which is offwhite in color, until one day I found that if I put a white paper there, the color reproduced on that is much better than the one projected on the wall. This woke the DIYer in me, and its time to experiment with a real cheap solution.
The long term plan is to go for a fixed frame professional screen with the budget of around 20-25 k, but it will take atleast 1+ years to achieve it. Till then, I need a temporary economical solution which can help me.
I planned to start with huge plain paper on wall, but was unable to get a role with 4.5 feet width locally. So I had to go for next option. I tried for blackout cloth, which I had spotted couple of months back at one local store. To fix it, I needed a strong frame made of wood, which will be bit tough for me to make. Thinking about alternatives, I ended up selecting the fiber wiring case, which is cheap as well as easy to procure.
I procured enough casing, and then went to the local store to get blackout cloth. Unfortunately, the store was out of supplies and not sure when they will get it in stock. I tried couple of other stores, but was unable to get blackout cloth for this purpose.
The next choice was to shelf the project until blackout cloth comes, or replicate a blackout cloth effect as much as possible. I went with the second option and brought plain cotton cloth and started from there
Materials I used
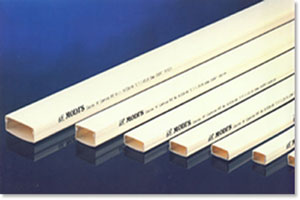
wiring cases - 4 nos ( 10 feet long)
Plastic fischers and screws to fix the wiring casing - as needed
Plain cotton cloth - 8 x 5 ft
Black chart paper - 8nos
Staples
Black tape for border
Adhesives/tapes
Tools used - power drill , screw driver, hammer, scissors
Here is the plain wall, from where I started

First I projected the image to the wall and marked borders. Then I took the base portion of fiber casing, and fixed it to the wall using fischers and screws. Ensure it is fixed strongly, and no part is hanging. Ideally, place the screws 1 - 1.5 feet apart to fix the casing strongly.

Next add black chart paper to the background, to ensure light will not get reflected so easily. Stick it using adhesive/tapes to the wall


Next, I spread the cloth on a carpet and ironed it for 20 mins, to remove all possible creases. Unfortunately I was unable to get it clean, but still not bad.
(Pic was taken before ironing)

Next I measured exact screen size needed and folded the remaining cloth to make it a thick border. I stapled the border to give it strength. I could have made it better, if I inserted a border material like a thin wooden stick, but I didnt had anything handy. Anyway, folding the border worked as required

Next was the most important part of inserting the thick border which you made by stapling, into the casing. Stretch as much as possible and insert the border to the fiber casing. Fold the border once more, if you are able to stretch that much. Once done, place the cover of the fiber casing on each side, which will stretch the cloth further. Atmost care needs to be done to ensure that it is stretched evenly without any wrinkle.
I somehow was unable to do it properly, which resulted in some wrinkles visible on top middle portion of the screen. I was totally exhausted by now, and hence didnt wanted to redo the stretching exercise. I left those wrinkles as it is

Now apply a border using a black tape. I didnt get a good quality one with needed width, and the end result reflects that. Make sure you stick the border after projecting the image, so as to align it to the border of the projected image.

And now its the testing time


And the final verdict
Did I like it - Not fully. I expected better clarity, but I know I will get this much only since I was left without much choices, due to lack of material availability.
Will it work - perfectly, until I get my permanent screen. It gives me better color reproduction and picture quality, rather than what I used to get from the wall. Also, the 3D reproduction is much more accurate in a screen.
What could have been done better - Several things. First, I should have got a blackout cloth, which would have given a better image quality.
Second - shouldn't have compromised on the stretching part, as the wrinkles was visible after the completion.
Third - A better finish, if I had focused on getting a better border material.
Fourth - A better camera, than the one on lenovo p780 would have done justice to actual picture")
But keeping the minuses apart, I am getting a better viewing experience at the cost of less than 500 Rs. Plus the satisfaction which we get from a DIY project is priceless. :yahoo:
I was enjoying my PJ projected on my wall which is offwhite in color, until one day I found that if I put a white paper there, the color reproduced on that is much better than the one projected on the wall. This woke the DIYer in me, and its time to experiment with a real cheap solution.
The long term plan is to go for a fixed frame professional screen with the budget of around 20-25 k, but it will take atleast 1+ years to achieve it. Till then, I need a temporary economical solution which can help me.
I planned to start with huge plain paper on wall, but was unable to get a role with 4.5 feet width locally. So I had to go for next option. I tried for blackout cloth, which I had spotted couple of months back at one local store. To fix it, I needed a strong frame made of wood, which will be bit tough for me to make. Thinking about alternatives, I ended up selecting the fiber wiring case, which is cheap as well as easy to procure.
I procured enough casing, and then went to the local store to get blackout cloth. Unfortunately, the store was out of supplies and not sure when they will get it in stock. I tried couple of other stores, but was unable to get blackout cloth for this purpose.
The next choice was to shelf the project until blackout cloth comes, or replicate a blackout cloth effect as much as possible. I went with the second option and brought plain cotton cloth and started from there
Materials I used
wiring cases - 4 nos ( 10 feet long)
Plastic fischers and screws to fix the wiring casing - as needed
Plain cotton cloth - 8 x 5 ft
Black chart paper - 8nos
Staples
Black tape for border
Adhesives/tapes
Tools used - power drill , screw driver, hammer, scissors
Here is the plain wall, from where I started
First I projected the image to the wall and marked borders. Then I took the base portion of fiber casing, and fixed it to the wall using fischers and screws. Ensure it is fixed strongly, and no part is hanging. Ideally, place the screws 1 - 1.5 feet apart to fix the casing strongly.
Next add black chart paper to the background, to ensure light will not get reflected so easily. Stick it using adhesive/tapes to the wall
Next, I spread the cloth on a carpet and ironed it for 20 mins, to remove all possible creases. Unfortunately I was unable to get it clean, but still not bad.
(Pic was taken before ironing)
Next I measured exact screen size needed and folded the remaining cloth to make it a thick border. I stapled the border to give it strength. I could have made it better, if I inserted a border material like a thin wooden stick, but I didnt had anything handy. Anyway, folding the border worked as required
Next was the most important part of inserting the thick border which you made by stapling, into the casing. Stretch as much as possible and insert the border to the fiber casing. Fold the border once more, if you are able to stretch that much. Once done, place the cover of the fiber casing on each side, which will stretch the cloth further. Atmost care needs to be done to ensure that it is stretched evenly without any wrinkle.
I somehow was unable to do it properly, which resulted in some wrinkles visible on top middle portion of the screen. I was totally exhausted by now, and hence didnt wanted to redo the stretching exercise. I left those wrinkles as it is
Now apply a border using a black tape. I didnt get a good quality one with needed width, and the end result reflects that. Make sure you stick the border after projecting the image, so as to align it to the border of the projected image.
And now its the testing time
And the final verdict
Did I like it - Not fully. I expected better clarity, but I know I will get this much only since I was left without much choices, due to lack of material availability.
Will it work - perfectly, until I get my permanent screen. It gives me better color reproduction and picture quality, rather than what I used to get from the wall. Also, the 3D reproduction is much more accurate in a screen.
What could have been done better - Several things. First, I should have got a blackout cloth, which would have given a better image quality.
Second - shouldn't have compromised on the stretching part, as the wrinkles was visible after the completion.
Third - A better finish, if I had focused on getting a better border material.
Fourth - A better camera, than the one on lenovo p780 would have done justice to actual picture
But keeping the minuses apart, I am getting a better viewing experience at the cost of less than 500 Rs. Plus the satisfaction which we get from a DIY project is priceless. :yahoo:
