manueljenkin
Member
This is a set up tutorial for XXhighend. It is a high fidelity music player with optimizations for low system noise and comes with a custom interpolator called Arc Predict.
WARNING: This tool will require changes to the windows registry (automated) and can sometimes cause instability issues. Use it at your own risk. I don't recommend trying it on your primary PC, especially if you have any critical work or personal files without a backup. I recommend first trying on a spare PC to get used to the quirks.
Requirements
1. PC/Laptop running Windows
2. Dotnet 3.5
3. A Dac with drivers installed (preferrably with high sample rate support)
Setting up your PC for XXhighend
1. For the first run, preferrably load some music into the Music folder in your PC for ease of access.
2. Download for the XXhighend (latest version 2.11) is available in the above link. Download and Extract the zip file to a folder in your PC (preferrably desktop) as shown.
3. If running Windows 10 or 8, download and install Dotnet 3.5. This is a pre requisite for the tool to work.

Setting up your DAC: Connect your DAC to the PC and make sure you have your DAC drivers installed. After this a couple of settings shall be tweaked for optimal performance.
A. Setting up buffer and volume: The Control Panel for the DAC will have options to set the buffer size and priority. For initial trials, it is recommended to set the Buffer Size to the maximum permissible limit and set mode to "safe" as shown in image below.


XXhighend comes with a digital volume controller that is integrated to the Arc Predict and other features for less truncation/quantization error after interpolation. Using Windows or DAC volume controller on top of XXhighend volume control can produce unoptimal results due to increased truncation errors. Recommended to set the Windows Volume and DAC volume to 100% for best experience.
Some DAC may integrate their volume control settings to windows volume control (especially if running in ASIO) and in that case setting Windows volume to 100% will also set DAC volume to 100% which is the recommended option.

B. Setting up DAC filter: XXhighend comes with an interpolation filter called Arc Predict. Arc Predict is optimized to minimize pre-ring artefacts and is optimized for better temporal signal structure. When enabled, Arc predict will provide higher sample rate input to the DAC and bypass or reduce reliance on the internal filters in DAC. Arc predict is different from common filters used in most DACs and hence there will be noticeable change from the stock configuration of the dac (for the better imo). Proper matching with the oversampling/interpolation filters present in the DAC is necessary for best experience.
B1. If your DAC is based on R2R architecture (or similar), chances are it has an option to fully bypass its internal interpolation filters. This is generally provided as an option called NOS (Non Oversampling). It is the optimal choice to pair with XXhighend.
B2. In case your DAC is based on Delta Sigma architecture (or an R2R but without NOS option), it might come with a choice of different filters. The optimal choice for XXhighend Arc Predict will be filters that are concentrated to compact time. These filters would have no pre-ring (or very minimal), little or no post ring, and slow roll off in frequency response (filters concentrated in time will inevitably be spread in frequency and vice versa). The diagram below explains the optimal and less optimal filter choices to pair up with xxhighend, in case NOS is not an option.

Optimal filter choices for modern ESS dacs would be "minimum phase slow roll off", as it is compact in time domain. For modern AKM dacs, the optimal choice would be "slow" filter.
Less ideal are filters with pre-ring (sinc, brickwall, linear phase, etc) and filters with sharp band transition (and hence spread out time domain response) as they will affect the temporal benefits offered by Arc Predict.
Some Delta Sigma dacs come with a "NOS EMULATION" mode, I don't recommend this for initial setup since the actual implementation for random signals is not very clear in these DACs.
Setting up XXhighend:
1. Double clicking on XXHighEnd.exe as shown below will open XXhighend Player. During the first run it will seek permission for access to windows registry. As mentioned earlier this is necessary for the tool to perform its functionality. Sometimes windows might throw a diagnostic warning message during the first run, this is normal and pressing continue will take you to the XXhighend program.

The player might take a while to open. Patience is key to ensure proper functionality. It should open in a couple of minutes. If it doesn't open after a while, try double clicking XXhighend.exe again to open a new instance.
2. Once XXhighend is open, it is time to do some basic initial set up. The region marked in GREEN (top-center) in the figure below holds 4 tabs. P - Current Playlist, L- List of Playlists, S- Settings (and H, the utility unknown to me). Clicking P will open playlists tab, clicking L will open List of playlists tab and clicking S will open settings tab. Settings tab will occupy the lower portion of the screen, and to come out of settings, click the P or L tab.

3. Configuring Settings:
a. Add the music folder to the Music root entry
b. Scroll down in settings to find the configuration options for the DAC. As shown in figure,
i. In the Output Field, Choose the DAC to use. It is preferable to use the KS mode if the DAC entry shows up in KS option. Else general should be fine.
ii. In Device buffer size, select the buffer size you have configured on your DAC's control panel and press Refresh.
The maximum limit in the XXhighend Settings panel is 4096. In case your DAC buffer is set to more than 4096, there is a separate method (Q settings) to multiply on this setting which will be described in the next paragraph. In this case, keep your DAC's Control Panel settings at full level (in my case 32768) and keep the XXhighend Device Buffer Size field at 4096.
iii. In DAC settings Field, choose the maximum sample rate supported by your DAC. For first trial, I recommend 384kHz 32 bit for modern dacs even if it supports 768khz sample rate. After confirming that the tool works at 384kHz, you can experiment with 768kHz sample rate.
For "at >16 bits" field, recommended option is to choose 32 bits for modern dacs.

4. Exit settings by selecting the P (current Playlists) tab. If your DAC buffer was below 4096, skip this step. If your DAC buffer was above 4096, Press Q at the bottom (below play/stop commands), as shown in the figure to open Buffer Multiplier settings.

xQ1 acts as multiplier on top of the (Device buffer size) Field set in the Settings. Choose xQ1 such that "Device Buffer Size" x "xQ1" = DAC's Control Panel Buffer Size. In this example, the DAC's control panel buffer Size was 32768, and Device Buffer Size in XXhighend Settings was 4096. Since,4096*(8) = 32768, xQ1 was set to 8.

X1 is another multiplier to set the total SFS size. The default is 14 and I recommend keeping it the same for initial trials (here I have set it at 21). Press X (marked in Blue) to exit the Q menu.
5. In the Top Left (Purple) is menus for accessing Volume Control, Volume Normalization, Interpolation Ratio, Interpolation Algorithm, etc. If an option is marked Red, it is ON. and if it is marked Blue, it is OFF.
For first run I recommend to keep "Arc Predict" and "fx" ON and the rest off (this is the default configuration of the player).
The Scroll wheel at the left is for Volume and the level is indicated at top (in dB, with 0dB being full scale). Initial setting is at -36dB, slowly raise the value to comfortable listening level. During playback the volume control works in increments, and sudden jumps/dragging the slider will not work. Each click will give an incremental increase in volume. There is a small latency associated between request to increase volume and it being reflected in playback (depending upon the overall buffer).
The slider below fx sets the interpolation multiplier ratio. The default value of slider is at 4 (middle) and with fx ON, this will give an output with a sample rate of 44100 x 4 = 176400 (or 192000 if input music is 48000khz sample rate). The slider can take values 1 (left end), 2, 4, 8, 16 (right End).
In the example, the dac settings are chosen at 384000Khz so the slider is set to 8, as 48000 x 8 = 384000.

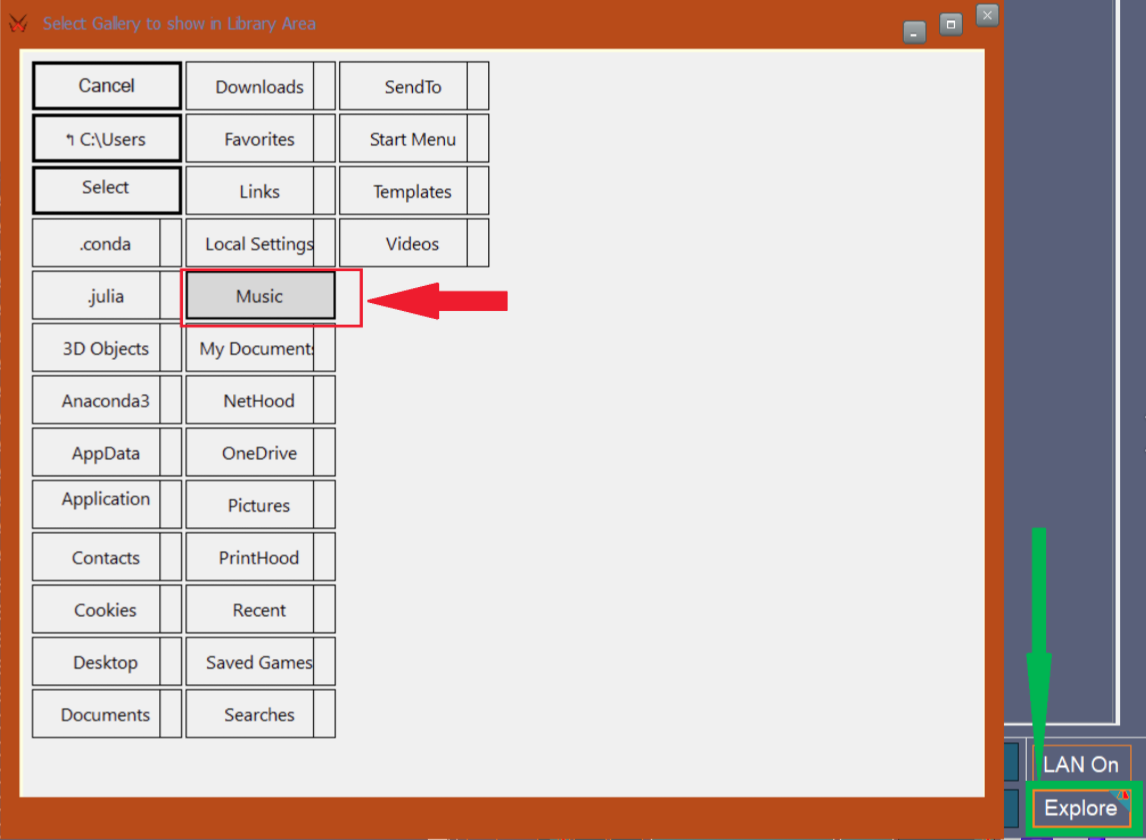
6. Time to play some music. Press Explore, marked in Blue in the Figure (present at the bottom right) to bring up the file/folder explorer.

If the test songs were stored in music folder, select the Music folder in the explorer. The music files will be imported to the left bottom side of the player (below the volume control and interpolation options).

After the music files are imported, dragging and dropping into the middle window will add it to the current playlists for playback.

Press the Play button to play the music. Make sure to keep control of Volume in safe listening levels! The image above shows a setting with Unattended Playback ON (Red). During the first run it is recommended to keep Unattended Playback off (Blue) to check if all settings are proper.
After confirming proper playback in normal mode, try Turning ON Unattended Playback (Red) for even lower noise playback. Make note of the shortcuts.
Alt + u = Volume up, Alt + d = Volume Down, Alt + s = Stop, Alt + x = close unattended mode. (u = up, d = down, s = Stop, x = close).
It is preferrable to first stop the playback using (Alt + s) before exitting using (Alt + x) to ensure system stability during the transition.


Some guidances for Further Tweaking if interested.
1. XXhighend 2.11 seems to be optimized with unattended playback enabled as the target, and attended playback is there for functional testing. In attended playback version 2.11 can sound a tad bright. If unattended playback feels uncomfortable, I recommend trying out version 2.10 instead. It doesn't seem to have much brightness in attended playback, but imo version 2.11 with unattended playback sounds better than 2.10 with or without unattended playback.
2. The buffer settings chosen in both DAC and XXhighend for this demo is a mere guideline. For best performance, it is suggested to start from highest buffer in both and tweak from there to find an optimal configuration. Higher Buffers cause less of total data fetch, but each data fetch contains larger data which will imply lower periodicity of access noise, but each noise spike can be higher. On the other hand lower buffers, will have higher periodicity of access noise but each noise spike can be of lower level. Note that these effects may not scale linearly due to intrinsic lack of determinism in modern systems due to use of differing paging algorithms and inter-processor scheduling. The optimal position would be to find the sweetspot that minimize the overall impact of this noise in the analog circuits, by either globally minimizing noise, or by detuning the noise to become uncorrelated. As can be seen, this will vary from system to system, depending upon the choice of CPU, RAM, motherboard, cables, connected accessories and even the electromagnetic spectrum in the ambient environment.
3. The choice of optimal filters for DAC is a mere guideline as well. The overall end result will depend also on how stable the system is with each of these filters, and also about the precision of implementation of these filters and how they interact with the noise shaping profile of the DAC. All other indexes matched, NOS > temporally concentrated (hence spectrally distributed) filter > temporally distributed filter in terms of compatibility with XXhighend. But it cannot be guaranteed, "all other indexes matched" happens in reality, as either system stability may change, or even the DAC manufacturer may choose to pay higher attention to detail on specific filters (say linear phase, which is less optimal for XXhighend) leaving out the others (say minimum phase apodized, which is more optimal for XXhighend) to merely exist as a choice and this could affect the overall analysis and comparisons. Hence it may be worthwhile to experiment with other filters in case the filters suggested in the beginning of the thread don't give good results.
4. Arc Predict Interpolator is optimized for real world sounds and analog synths. For EDM, Generic digital synths, or brickwall or compressed music, it would be optimal to disable Arc Predict Interpolator and use Anti-Image Instead. There are other configuration options in XXhighend that has not been described in this post (example : Peak Extend, iPhase, Anti Image, Minimize OS). There are also options in settings to disable different windows system tasks, etc. These may be explored on personal interest.
Happy Listening!
WARNING: This tool will require changes to the windows registry (automated) and can sometimes cause instability issues. Use it at your own risk. I don't recommend trying it on your primary PC, especially if you have any critical work or personal files without a backup. I recommend first trying on a spare PC to get used to the quirks.
Requirements
1. PC/Laptop running Windows
2. Dotnet 3.5
3. A Dac with drivers installed (preferrably with high sample rate support)
Setting up your PC for XXhighend
1. For the first run, preferrably load some music into the Music folder in your PC for ease of access.
2. Download for the XXhighend (latest version 2.11) is available in the above link. Download and Extract the zip file to a folder in your PC (preferrably desktop) as shown.
3. If running Windows 10 or 8, download and install Dotnet 3.5. This is a pre requisite for the tool to work.
Setting up your DAC: Connect your DAC to the PC and make sure you have your DAC drivers installed. After this a couple of settings shall be tweaked for optimal performance.
A. Setting up buffer and volume: The Control Panel for the DAC will have options to set the buffer size and priority. For initial trials, it is recommended to set the Buffer Size to the maximum permissible limit and set mode to "safe" as shown in image below.
XXhighend comes with a digital volume controller that is integrated to the Arc Predict and other features for less truncation/quantization error after interpolation. Using Windows or DAC volume controller on top of XXhighend volume control can produce unoptimal results due to increased truncation errors. Recommended to set the Windows Volume and DAC volume to 100% for best experience.
Some DAC may integrate their volume control settings to windows volume control (especially if running in ASIO) and in that case setting Windows volume to 100% will also set DAC volume to 100% which is the recommended option.
B. Setting up DAC filter: XXhighend comes with an interpolation filter called Arc Predict. Arc Predict is optimized to minimize pre-ring artefacts and is optimized for better temporal signal structure. When enabled, Arc predict will provide higher sample rate input to the DAC and bypass or reduce reliance on the internal filters in DAC. Arc predict is different from common filters used in most DACs and hence there will be noticeable change from the stock configuration of the dac (for the better imo). Proper matching with the oversampling/interpolation filters present in the DAC is necessary for best experience.
B1. If your DAC is based on R2R architecture (or similar), chances are it has an option to fully bypass its internal interpolation filters. This is generally provided as an option called NOS (Non Oversampling). It is the optimal choice to pair with XXhighend.
B2. In case your DAC is based on Delta Sigma architecture (or an R2R but without NOS option), it might come with a choice of different filters. The optimal choice for XXhighend Arc Predict will be filters that are concentrated to compact time. These filters would have no pre-ring (or very minimal), little or no post ring, and slow roll off in frequency response (filters concentrated in time will inevitably be spread in frequency and vice versa). The diagram below explains the optimal and less optimal filter choices to pair up with xxhighend, in case NOS is not an option.
Optimal filter choices for modern ESS dacs would be "minimum phase slow roll off", as it is compact in time domain. For modern AKM dacs, the optimal choice would be "slow" filter.
Less ideal are filters with pre-ring (sinc, brickwall, linear phase, etc) and filters with sharp band transition (and hence spread out time domain response) as they will affect the temporal benefits offered by Arc Predict.
Some Delta Sigma dacs come with a "NOS EMULATION" mode, I don't recommend this for initial setup since the actual implementation for random signals is not very clear in these DACs.
Setting up XXhighend:
1. Double clicking on XXHighEnd.exe as shown below will open XXhighend Player. During the first run it will seek permission for access to windows registry. As mentioned earlier this is necessary for the tool to perform its functionality. Sometimes windows might throw a diagnostic warning message during the first run, this is normal and pressing continue will take you to the XXhighend program.
The player might take a while to open. Patience is key to ensure proper functionality. It should open in a couple of minutes. If it doesn't open after a while, try double clicking XXhighend.exe again to open a new instance.
2. Once XXhighend is open, it is time to do some basic initial set up. The region marked in GREEN (top-center) in the figure below holds 4 tabs. P - Current Playlist, L- List of Playlists, S- Settings (and H, the utility unknown to me). Clicking P will open playlists tab, clicking L will open List of playlists tab and clicking S will open settings tab. Settings tab will occupy the lower portion of the screen, and to come out of settings, click the P or L tab.
3. Configuring Settings:
a. Add the music folder to the Music root entry
b. Scroll down in settings to find the configuration options for the DAC. As shown in figure,
i. In the Output Field, Choose the DAC to use. It is preferable to use the KS mode if the DAC entry shows up in KS option. Else general should be fine.
ii. In Device buffer size, select the buffer size you have configured on your DAC's control panel and press Refresh.
The maximum limit in the XXhighend Settings panel is 4096. In case your DAC buffer is set to more than 4096, there is a separate method (Q settings) to multiply on this setting which will be described in the next paragraph. In this case, keep your DAC's Control Panel settings at full level (in my case 32768) and keep the XXhighend Device Buffer Size field at 4096.
iii. In DAC settings Field, choose the maximum sample rate supported by your DAC. For first trial, I recommend 384kHz 32 bit for modern dacs even if it supports 768khz sample rate. After confirming that the tool works at 384kHz, you can experiment with 768kHz sample rate.
For "at >16 bits" field, recommended option is to choose 32 bits for modern dacs.
4. Exit settings by selecting the P (current Playlists) tab. If your DAC buffer was below 4096, skip this step. If your DAC buffer was above 4096, Press Q at the bottom (below play/stop commands), as shown in the figure to open Buffer Multiplier settings.
xQ1 acts as multiplier on top of the (Device buffer size) Field set in the Settings. Choose xQ1 such that "Device Buffer Size" x "xQ1" = DAC's Control Panel Buffer Size. In this example, the DAC's control panel buffer Size was 32768, and Device Buffer Size in XXhighend Settings was 4096. Since,4096*(8) = 32768, xQ1 was set to 8.
X1 is another multiplier to set the total SFS size. The default is 14 and I recommend keeping it the same for initial trials (here I have set it at 21). Press X (marked in Blue) to exit the Q menu.
5. In the Top Left (Purple) is menus for accessing Volume Control, Volume Normalization, Interpolation Ratio, Interpolation Algorithm, etc. If an option is marked Red, it is ON. and if it is marked Blue, it is OFF.
For first run I recommend to keep "Arc Predict" and "fx" ON and the rest off (this is the default configuration of the player).
The Scroll wheel at the left is for Volume and the level is indicated at top (in dB, with 0dB being full scale). Initial setting is at -36dB, slowly raise the value to comfortable listening level. During playback the volume control works in increments, and sudden jumps/dragging the slider will not work. Each click will give an incremental increase in volume. There is a small latency associated between request to increase volume and it being reflected in playback (depending upon the overall buffer).
The slider below fx sets the interpolation multiplier ratio. The default value of slider is at 4 (middle) and with fx ON, this will give an output with a sample rate of 44100 x 4 = 176400 (or 192000 if input music is 48000khz sample rate). The slider can take values 1 (left end), 2, 4, 8, 16 (right End).
In the example, the dac settings are chosen at 384000Khz so the slider is set to 8, as 48000 x 8 = 384000.
6. Time to play some music. Press Explore, marked in Blue in the Figure (present at the bottom right) to bring up the file/folder explorer.
If the test songs were stored in music folder, select the Music folder in the explorer. The music files will be imported to the left bottom side of the player (below the volume control and interpolation options).
After the music files are imported, dragging and dropping into the middle window will add it to the current playlists for playback.
Press the Play button to play the music. Make sure to keep control of Volume in safe listening levels! The image above shows a setting with Unattended Playback ON (Red). During the first run it is recommended to keep Unattended Playback off (Blue) to check if all settings are proper.
After confirming proper playback in normal mode, try Turning ON Unattended Playback (Red) for even lower noise playback. Make note of the shortcuts.
Alt + u = Volume up, Alt + d = Volume Down, Alt + s = Stop, Alt + x = close unattended mode. (u = up, d = down, s = Stop, x = close).
It is preferrable to first stop the playback using (Alt + s) before exitting using (Alt + x) to ensure system stability during the transition.
Some guidances for Further Tweaking if interested.
1. XXhighend 2.11 seems to be optimized with unattended playback enabled as the target, and attended playback is there for functional testing. In attended playback version 2.11 can sound a tad bright. If unattended playback feels uncomfortable, I recommend trying out version 2.10 instead. It doesn't seem to have much brightness in attended playback, but imo version 2.11 with unattended playback sounds better than 2.10 with or without unattended playback.
2. The buffer settings chosen in both DAC and XXhighend for this demo is a mere guideline. For best performance, it is suggested to start from highest buffer in both and tweak from there to find an optimal configuration. Higher Buffers cause less of total data fetch, but each data fetch contains larger data which will imply lower periodicity of access noise, but each noise spike can be higher. On the other hand lower buffers, will have higher periodicity of access noise but each noise spike can be of lower level. Note that these effects may not scale linearly due to intrinsic lack of determinism in modern systems due to use of differing paging algorithms and inter-processor scheduling. The optimal position would be to find the sweetspot that minimize the overall impact of this noise in the analog circuits, by either globally minimizing noise, or by detuning the noise to become uncorrelated. As can be seen, this will vary from system to system, depending upon the choice of CPU, RAM, motherboard, cables, connected accessories and even the electromagnetic spectrum in the ambient environment.
3. The choice of optimal filters for DAC is a mere guideline as well. The overall end result will depend also on how stable the system is with each of these filters, and also about the precision of implementation of these filters and how they interact with the noise shaping profile of the DAC. All other indexes matched, NOS > temporally concentrated (hence spectrally distributed) filter > temporally distributed filter in terms of compatibility with XXhighend. But it cannot be guaranteed, "all other indexes matched" happens in reality, as either system stability may change, or even the DAC manufacturer may choose to pay higher attention to detail on specific filters (say linear phase, which is less optimal for XXhighend) leaving out the others (say minimum phase apodized, which is more optimal for XXhighend) to merely exist as a choice and this could affect the overall analysis and comparisons. Hence it may be worthwhile to experiment with other filters in case the filters suggested in the beginning of the thread don't give good results.
4. Arc Predict Interpolator is optimized for real world sounds and analog synths. For EDM, Generic digital synths, or brickwall or compressed music, it would be optimal to disable Arc Predict Interpolator and use Anti-Image Instead. There are other configuration options in XXhighend that has not been described in this post (example : Peak Extend, iPhase, Anti Image, Minimize OS). There are also options in settings to disable different windows system tasks, etc. These may be explored on personal interest.
Happy Listening!
Last edited: