yet another :) DIY speaker stand

the classic look is always nice
good work

is the top plate detachable
if it is
wouldnt turning the top plate by 90 degrees be better such that the width is shorter than the depth? so as to match the speaker
 
thanks magma. yes the top plate is detachable, will try your suggestion.

thanks Chandu.

here is the cost breakup
2*12" + 2*10 " 18 mm mdf = 300 rs
3 inch pvc = 140 rs
steel threaded rods * 2 + nuts etc = 90
paint = 200 rs
sand = free:)

weekend to assemble / paint .. took couple of days to dry.
 
Last edited by a moderator:
thanks Chandu.

here is the cost breakup
2*12" + 2*10 " 18 mm mdf = 300 rs
3 inch pvc = 140 rs
steel threaded rods * 2 + nuts etc = 90
paint = 200 rs
sand = free:)

weekend to assemble / paint .. took couple of days to dry.

Nice work.
How did you fix the MDF boards to the pvc pipes?
 
Sachin, if you can provide a detailed step-by-step account of how you put the stands together along with photos, it will be nice. Otherwise this thread of yours is of no value to members.

Cheers
 
wow the black lacquour is giving killer looks ...good work ..detailed pics with the secret recipe should be uploaded .

waiting waiting!
 
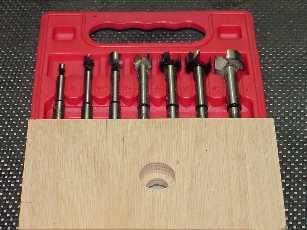
forstner.jpg


thanks guys. Understand Venkat. I should have taken photos at stages, but did not :(

Its based on the now famous tnt design and inputs from memebers who have done this before.here is the link
TNT-Stubby - A DIY Speaker Stand Project on TNT-Audio [English]

How i did ..
1. Got the mdf boards cut from a local plywood/hardware shop. Tried for the 1 inch one, but it was only available in 1 shop and he wanted me to buy the entire sheet. so settled for 18mm
2. Got the steel threaded rod, got this from another shop. I think they use it for alliminum alamarihs.Came with the nuts and washers.
3. Cut holes in the mdf with my drill machine. One through the board and one circular one for the nut, bought a new drill bit. The exact diagram you will see on the site.
4. Got the 3 inch PVC pipes. The cut was not so good. he did using a hack saw. You can get this cut with machine for finer results.
5. Made sure everything fitted. Cut the steel rood after fitting the pipes ect. This to make sure the rod exactly fits the height and does not protrude out to touch the speakers.
5. dissambled everything and painted. Basic black oil paint. I did give 2 coats , hence the shine probably :)
6. Once dried started with base plate , screwed the rod , used silver foil at the ends so sand does not touche wood base of the PVC. Filled sand. Fitted the top board, screwed the nut tight .
7. then used mseal at the ends of the PVC to prevent any sand spill.

I am happy with the results and the stand is stable. It is basically giving me good speaker seperation (in the photo earlier these were besides the center speaker of my 5.1) and also the required height. So yes sound has improved, but need to hear more :)

regards
Sachin
 
Last edited:
thanks sachin..........it is very very easy to build stands like this.
forstner.jpg


thanks guys. Understand Venkat. I should have taken photos at stages, but did not :(

Its based on the now famous tnt design and inputs from memebers who have done this before.here is the link
TNT-Stubby - A DIY Speaker Stand Project on TNT-Audio [English]

How i did ..
1. Got the mdf boards cut from a local plywood/hardware shop. Tried for the 1 inch one, but it was only available in 1 shop and he wanted me to buy the entire sheet. so settled for 18mm
2. Got the steel threaded rod, got this from another shop. I think they use it for alliminum alamarihs.Came with the nuts and washers.
3. Cut holes in the mdf with my drill machine. One through the board and one circular one for the nut, bought a new drill bit. The exact diagram you will see on the site.
4. Got the 3 inch PVC pipes. The cut was not so good. he did using a hack saw. You can get this cut with machine for finer results.
5. Made sure everything fitted. Cut the steel rood after fitting the pipes ect. This to make sure the rod exactly fits the height and does not protrude out to touch the speakers.
5. dissambled everything and painted. Basic black oil paint. I did give 2 coats , hence the shine probably :)
6. Once dried started with base plate , screwed the rod , used silver foil at the ends so sand does not touche wood base of the PVC. Filled sand. Fitted the top board, screwed the nut tight .
7. then used mseal at the ends of the PVC to prevent any sand spill.

I am happy with the results and the stand is stable. It is basically giving me good speaker seperation (in the photo earlier these were besides the center speaker of my 5.1) and also the required height. So yes sound has improved, but need to hear more :)

regards
Sachin
 
Follow HiFiMART on Instagram for offers, deals and FREE giveaways!
Back
Top