Advice please on Garrard Model RC210

Moolenschotjes

New Member
Joined
Feb 13, 2021
Messages
8
Points
3
Location
Netherlands
Hello,

My father gave me this week his brother’s Garrard Model RC 210 from the mid 50’s, early 60’s. I have cleaned it and seems to run well. The recordplayer has the original headshell with a turnable cartridge GC8 78/33-45 with two wires (Red/Black) connected to two pins. The other two pins are not soldered and looks not to be suitable to connect with extra wires as these are made out of plastic. It appears to me that this is a ceramic mono cartridge.

The player has a audio cable with a 3-pin DIN plug soldered to a small board within the unit.

Here is my personal wish and challenge; Can I turn this RC210 into a stereo unit to play records (stereo) released after late 60’s?

I need advice on what steps to be taken to make this happen? Guess replacing the headshell first with 4 wired pins and a different cartridge, replacing the original GC8

Some guidance and advice is very much appreciated as I’m new to this vintage player.

Thanks, Stefan
 
Hello Stefan, thanks for writing in and welcome to HifiVision. The Garrard RC210 is one of the nicest looking record changers from Garrard and with some simple lubrication, will run very well for many many years. The GC8 is a turn-over mono ceramic cartridge which explains why only 2 wires are used and not 4 as in standard stereo applications. The Garrard RC210 tonearm is actually wired for stereo and has a 4-pin headshell (only 2 of these are used for mono). What you would need to do is to find a stereo ceramic cartridge and replace the GC8 or you could alternatively use a stereo magnetic (MM) cartridge which can track at 6-8 grams for your RC210. I have used ceramic cartridges Sonotone 8T and EEI CS2000 (EEI was an Indian brand) for stereo on a RC210 when I had one, and have also used the Shure M3D magnetic cartridge which sounded really great. If you change the cart, dont forget to adjust the spring that enables the VTF setting for the tonearm. I have found about 6gms of tracking weight to be adequate. Here are a couple of photos showing the headshell and tonearm wiring junction:

Tonearm wiring.JPG
headshell.JPG
 
Last edited:
Thank you Reubensm for the great feedback, really appreciated. Can you help me a little bit more with your comment "adjust the spring that enables the VTF setting for the tonearm" I don't know exactly what you mean by this? Thanks, Stefan
 
Adding some pictures of the Headshell to explain the situation (other connector pins in Headshell seems to be made from plastic) - existing wiring in the tonearm (only two wires) and wiring from tonearm to soundboard / audio cable - Din3 connector.

I might need to replace the current headshell for one with 4 pins to install a new stereo cartridge.
Have already done already a search for a new cartridge a came across a Sonotone 20-T1 or 20-T2. From reading the description this refers to 1volt or 2volt?? Is this important for my model 210?
 

Attachments

  • tempImage7dCjZk.png
    tempImage7dCjZk.png
    976.6 KB · Views: 12
  • tempImageZOMtue.png
    tempImageZOMtue.png
    689 KB · Views: 12
  • tempImage9yYwft.png
    tempImage9yYwft.png
    606.5 KB · Views: 11
  • tempImageBsAm5U.png
    tempImageBsAm5U.png
    614.1 KB · Views: 10
first of all, the good thing about the RC210 is Garrard had the foresight, even though the RC210 was most commonly used in mono radiograms and record players, Garrard actually wired the tonearm for stereo with 2 pairs of cabling running from the headshell socket to the junction tag board below the rear of the tonearm, as illustrated in your pics. As you can see, a grey and a brown shielded pair coming out of the tonearm assembly are soldered to the tag board. So you're Garrard is actually wired for Stereo.

stefan tonearm wiring.png

Of course, as a mono cartridge was used, and the changer was installed in a mono application configuration, the cable (called the pickup or gram interconnect) appears to be a mono one. You can simply replace this cable with 2 mono cables with RCA plugs for stereo use. Nothing needs t be changed on the tag board as it seems to be wired correctly (cant see the underside but it all seems fine).

Also there is no need to get a new headshell. Your headshell is already a 4 pin stereo headshell, again the RC210 was actually wired for Stereo use and hence the headshell also accepts stereo cartridges. As your current configuration is for mono, only 2 pins are used. See the picture below:

Stefan's headshell.png

So as in the picture only the bottom 2 pins are used. This means only one of the 2 tonearm wiring pairs are used and your output cable is connected to one of these pairs from the tagboard under the rear of the tonearm. All you need to do is carefully have another pair of cartridge wires soldered to those other 2 vertical pins in the headshell, and you're headshell will be ready for a stereo cartridge.

I have been working on dismantling a RC210 for restoration and here are some pics for reference, in relation to your queries:

1.jpg

Yes that's in really bad shape but it can be restored.

Here is a picture of the tonearm (pickup arm) headshell socket which accommodates 4-pin headshells:

2.jpg

Now, here's a shot of the twin tonearm cables, one for each channel. Yes, your tonearm is already wired for stereo (red arrow). The green circle points to the headshell socket mount, should you need to take it out for cleaning:

3.jpg

Here is that spring what I was talking about. This is what needs to be adjusted for calibrating the vertical tracking force (VTF) for the cartridge which you plan to use:

4.jpg

This is where you chose your setting, just slip the spring into one of the 3 little holes, as per your VTF requirement (just choose the top most hole which is closest to the base of the tonearm, for the heaviest setting and bottom most for the lightest setting :) ).

5.jpg

Some pictures of the 4-pin headshell (similar to the one which you have, the mounting holes under the Garrard logo, the headshell wiriing and a sample stereo ceramic cartridge:

7.jpg

8.jpg

9.jpg

10.jpg

And finally, here's a shot of that tag-board again:

6.jpg

As you can see, the brown cable is wired to the left and the grey cable to the right, that's your 2 channels for you. You can also see that my RC210 has also been pulled from a mono setup, hence you can see the output cable (the thick black one) wired to only one channel.

Hope this helps :)

All the very best!
 
Last edited:
first of all, the good thing about the RC210 is Garrard had the foresight, even though the RC210 was most commonly used in mono radiograms and record players, Garrard actually wired the tonearm for stereo with 2 pairs of cabling running from the headshell socket to the junction tag board below the rear of the tonearm, as illustrated in your pics. As you can see, a grey and a brown shielded pair coming out of the tonearm assembly are soldered to the tag board. So you're Garrard is actually wired for Stereo.

View attachment 54661

Of course, as a mono cartridge was used, and the changer was installed in a mono application configuration, the cable (called the pickup or gram interconnect) appears to be a mono one. You can simply replace this cable with 2 mono cables with RCA plugs for stereo use. Nothing needs t be changed on the tag board as it seems to be wired correctly (cant see the underside but it all seems fine).

Also there is no need to get a new headshell. Your headshell is already a 4 pin stereo headshell, again the RC210 was actually wired for Stereo use and hence the headshell also accepts stereo cartridges. As your current configuration is for mono, only 2 pins are used. See the picture below:

View attachment 54662

So as in the picture only the bottom 2 pins are used. This means only one of the 2 tonearm wiring pairs are used and your output cable is connected to one of these pairs from the tagboard under the rear of the tonearm. All you need to do is carefully have another pair of cartridge wires soldered to those other 2 vertical pins in the headshell, and you're headshell will be ready for a stereo cartridge.

I have been working on dismantling a RC210 for restoration and here are some pics for reference, in relation to your queries:

View attachment 54665

Yes that's in really bad shape but it can be restored.

Here is a picture of the tonearm (pickup arm) headshell socket which accommodates 4-pin headshells:

View attachment 54666

Now, here's a shot of the twin tonearm cables, one for each channel. Yes, your tonearm is already wired for stereo (red arrow). The green circle points to the headshell socket mount, should you need to take it out for cleaning:

View attachment 54667

Here is that spring what I was talking about. This is what needs to be adjusted for calibrating the vertical tracking force (VTF) for the cartridge which you plan to use:

View attachment 54668

This is where you chose your setting, just slip the spring into one of the 3 little holes, as per your VTF requirement (just choose the top most hole which is closest to the base of the tonearm, for the heaviest setting and bottom most for the lightest setting :) ).

View attachment 54670

Some pictures of the 4-pin headshell (similar to the one which you have, the mounting holes under the Garrard logo, the headshell wiriing and a sample stereo ceramic cartridge:

View attachment 54671

View attachment 54672

View attachment 54673

View attachment 54674

And finally, here's a shot of that tag-board again:

View attachment 54675

As you can see, the brown cable is wired to the left and the grey cable to the right, that's your 2 channels for you. You can also see that my RC210 has also been pulled from a mono setup, hence you can see the output cable (the thick black one) wired to only one channel.

Hope this helps :)

All the very best!

Nothing to say. Hats off sir.
 
first of all, the good thing about the RC210 is Garrard had the foresight, even though the RC210 was most commonly used in mono radiograms and record players, Garrard actually wired the tonearm for stereo with 2 pairs of cabling running from the headshell socket to the junction tag board below the rear of the tonearm, as illustrated in your pics. As you can see, a grey and a brown shielded pair coming out of the tonearm assembly are soldered to the tag board. So you're Garrard is actually wired for Stereo.

View attachment 54661

Of course, as a mono cartridge was used, and the changer was installed in a mono application configuration, the cable (called the pickup or gram interconnect) appears to be a mono one. You can simply replace this cable with 2 mono cables with RCA plugs for stereo use. Nothing needs t be changed on the tag board as it seems to be wired correctly (cant see the underside but it all seems fine).

Also there is no need to get a new headshell. Your headshell is already a 4 pin stereo headshell, again the RC210 was actually wired for Stereo use and hence the headshell also accepts stereo cartridges. As your current configuration is for mono, only 2 pins are used. See the picture below:

View attachment 54662

So as in the picture only the bottom 2 pins are used. This means only one of the 2 tonearm wiring pairs are used and your output cable is connected to one of these pairs from the tagboard under the rear of the tonearm. All you need to do is carefully have another pair of cartridge wires soldered to those other 2 vertical pins in the headshell, and you're headshell will be ready for a stereo cartridge.

I have been working on dismantling a RC210 for restoration and here are some pics for reference, in relation to your queries:

View attachment 54665

Yes that's in really bad shape but it can be restored.

Here is a picture of the tonearm (pickup arm) headshell socket which accommodates 4-pin headshells:

View attachment 54666

Now, here's a shot of the twin tonearm cables, one for each channel. Yes, your tonearm is already wired for stereo (red arrow). The green circle points to the headshell socket mount, should you need to take it out for cleaning:

View attachment 54667

Here is that spring what I was talking about. This is what needs to be adjusted for calibrating the vertical tracking force (VTF) for the cartridge which you plan to use:

View attachment 54668

This is where you chose your setting, just slip the spring into one of the 3 little holes, as per your VTF requirement (just choose the top most hole which is closest to the base of the tonearm, for the heaviest setting and bottom most for the lightest setting :) ).

View attachment 54670

Some pictures of the 4-pin headshell (similar to the one which you have, the mounting holes under the Garrard logo, the headshell wiriing and a sample stereo ceramic cartridge:

View attachment 54671

View attachment 54672

View attachment 54673

View attachment 54674

And finally, here's a shot of that tag-board again:

View attachment 54675

As you can see, the brown cable is wired to the left and the grey cable to the right, that's your 2 channels for you. You can also see that my RC210 has also been pulled from a mono setup, hence you can see the output cable (the thick black one) wired to only one channel.

Hope this helps :)

All the very best!

Thanks Reubensm,

This is fantastic and great insight how to convert my fathers RC210 to stereo use. Did not how to do this and even if it was possible.
We are very pleased with your great knowledge and kindness to guide us in the right direction...

I will search for the right stereo cartridge.
Can you advise me on the difference voltage references I have seen for instance with Sonotone Cartridge T19 or T20-1 or T20-2.
What does this mean in practice?

Will also search for you advised cartridges.


In the meantime I came across this cartridge: A original Ronette ST106 crystal stereo reversing cartridge for Vinyl & 78rpm records with universal 1/2 "Retma mount. (Vinyl needle & 78rpm needle) High-output version on a universal Retma bracket, the improved version of the ST105 with a lower needle pressure and an improved and flatter frequency curve. NOS in a controlled, perfect condition.(For the BF40 needles) output: 580mV needle pressure: between 4 and 7 grams.

Would that be a good match?

Kind regards,
Stefan
 

Attachments

  • Schermafbeelding 2021-02-14 om 11.39.05.jpg
    Schermafbeelding 2021-02-14 om 11.39.05.jpg
    164.2 KB · Views: 5
Last edited:
Thanks, only happy to help. Actually what makes these projects interesting is that not too many enthusiasts in the modern world have actually experienced ceramic cartridges. If one asks around, one will be told - don't use them, they will damage your records, they are for cheap record players and have very poor sound quality, etc. These days, ceramic cartridges are usually associated with China and cheap Crosley turntables. A person who therefore shows interest in a ceramic cartridge is often discouraged straight away.

The reality is rather different. Yes a lot of the ceramics were made for low cost portable record players especially in the 1970s and early 1980s but at one point in time, especially in the 1950s and 1960, they were at the peak of their popularity and used in hifi applications, quite generously.

Before getting to cartridge types, it is important to note that ceramic cartridges do not damage records. Most records that have suffered groove damage when played with ceramic carts are due to the following reasons:
1) worn stylus
2) incorrect tonearm alignment
3) record stacking in changers (as the tracking angle of the stylus keep changing)
4) very heavy tonearms without VTF adjustment
5) using the 78 stylus to play microgroove records
6) careless use especially when manually maneuvering the tonearm, not cleaning records and not cleaning the stylus

So the myth is busted, Ceramic cartridges wont damage your records if you use a good clean stylus, have a light weight tonearm tracking at not more than 4-6 gms, when using a changer, dont stack more than 2 records when playing microgroove records (LPs, EPs, 45s) and use the correct stylus type - which is not to forget to switch between microgroove and 78 styli, if you play 78s. Ceramic cartridges come usually with 2 stylus types - (1) sapphire and (2) diamond. I haven't noticed any audible difference in the sound quality but the diamond stylus tends to track better as it does not wear easily. The lifespan of diamond stylus is more.

Now to the cartridge types. There are many brands out there from the old times. Ronnette, Sonotone, Asiatic, BSR, Garrard, etc were some of the common ones, while Philips had some great ones, but a little non-standard as they are primarily for use with Philips equipment. Here in India, the options available back then were Philips, HMV and EEI. Philips often sold their ceramic cartridges with diamond styli.

I have been playing around with ceramics since my childhood and my father had been experimenting with these in hi-fi setups since the 1960s. To start with, ceramic cartridges are high output types with outputs ranging from about 0.5v to about 1v on an average when tracking with optimum VTF. I recollect my father telling me stories of how he could increase the output marginally by increasing the VFT although I have never tried it myself for obvious reasons.

You have asked about the difference between Sonotone cartridge types. My knowledge of Sonotone is only limited to online reading and my experience with the 3T (mono) and 8T (stereo) cartridges. I do know that if you see a "D" in the model number (which is actually quite rare), it meant that the stylus was a diamond stylus. I also recollect my father telling me (during those numerous father-son electronics conversations) that if the same cartridge was available in 2 versions, they were likely to be mono and stereo versions and if there was a 2 as the suffix of one of these (even though both versions had the same model number), it meant that the one without the '2' suffix was a low output version and the '2' version was a higher output version. There is no way I can verify this but I recollect my father telling me this.

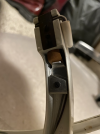
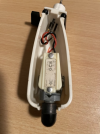
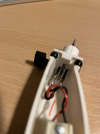
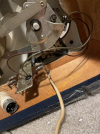
Regarding the Ronette cartridge which you have mentioned, I think it will work beautifully with your RC210. You don't have to punch front of the headshell as it is already punched for the flip-over knob (if you see my headshell, the front is not punched). It is also a half-inch mount type so it should fit your headshell perfectly. However I suggest you keep an eye on the seating of the cartridge in the headshell. If you feel that the cart sits too deep inside the headshell, then you can use a spacer (you can make one yourself) between the headshell and the cartridge while mounting it. If the cartridge sits too deep inside the headshell, the rim of the underside of the headshell will make contact with the record surface. Also ensure that you get the pin configuration (known as pinout) of the cartridge correct when wiring it to the headshell. Never solder wires directly to the cartridge. Use headshell wire clips on the cartridge side while you can carefully solder the other end to the headshell pins. Checking the continuity from the headshell pins (with the headshell mounted on the tonearm) to the tag board below the tonearm, will help you ascertain the correct line and ground wiring pins for each channel.

Keep an eye on the VTF once you have installed your cartridge. It is good to have a small digital jeweler's weighing scale for checking this. For Ronnette, Sonotone, etc a good tracking weight would be 6gms for record changers (if the VTF is less, the tonearm may skate when the changer is operating in auto-mode).

Some useful information on Sonotone Cartridge types and their specs can be had from here

Lastly and most importantly, you havent mentioned what amplifier you plan to connect your RC210 with stereo ceramic cart, to. This is a very important aspect. Most vintage amplifiers from the 1950s and 60s had 2 phono options, for Ceramic/Crystal and Magnetic Cartridges, however as we entered the 70s, and with the advent of more affordable Magnetic carts (from the likes of Shure for example), Ceramics started fading from hi-fi use and most hi-fi enthusiasts switched to Magnetic. As a result, the ceramic phono input disappeared from almost all amplifiers. However due to the high output of ceramic carts, they could still be connected to the Aux (auxiliary) input of any amp and they would play. However when used with this method, the sound quality would completely lack bass response (low frequencies) and you'd hear some kind of screechy music (another reason why folk thought ceramic carts produced low quality sound). Theoretically, all ceramic cartridges are designed to accommodate RIAA equalization without any external RIAA equalization network, a key factor for ceramics is input impedance balancing or matching. Ceramic carts are designed to work with high impedance amplifier inputs operating at 1M or higher, while the average amplifier Aux input offers an almost standard 47k input impedance. This mismatch result in a complete loss of low frequencies.

You have 2 options as a solution to the above issue with input impedance mismatch. You can:

1) you can use a small passive network between the cartridge and the input of the amplifier - these work extremely well if the amplifier has a sensitive input or you are attempting to connect your ceramic cartridge to a magnetic phono input. The flip side of this approach is that there is an obvious gain loss. Also when using a passive network with a magnetic input, proper isolation and grounding is required to reduce hum and noise. Here is an example from the Sonotone manual.

orionxtalcer.gif

2) you can use a ceramic phonostage which in my opinion is the best option. A ceramic phonostage will take care of the input impedence matching aspect and will also provide adequate gain suitable for any amplifier type. If you have knowledge of basic electronics, you can build one yourself with a few components and some free time. The phonostage produces best results and is noise free, especially if mounted as close as possible to the record changer (you can even fix it somewhere near that tone arm wiring tag board) and grounded properly with the record changer chassis. Here are 2 examples, one using a IC and the other a transistor (for stereo you will require one for each channel):

articles-extreme-circuits-preamp-stage-for-ceramic-phono-cartridge-or-violin-pickups-1366645083.jpg

Sorry, that a lot of reading but its good to know all this stuff when going on a ceramic adventure. If implemented correctly, your RC210 changer with its stereo ceramic cartridge can be made to sound outstanding, even challenging some magnetic cartridge based systems :)

I also suggest you go through the following reading materials:

1) History of Sonotone and everything to know about Sonotone ceramic cartridges - click here
2) Great user experiences, with tips and tricks on how to get the best out of ceramic cartridges - click here (there are 25 pages to read :) )

Important: when taking out that Garrard emblem on the headshell (carefully push it out through the large hole, from inside the headshell), be careful not to dent it or loose it. A replacement is hard to find and your headshell wont look complete without it. When putting it back after mounting the cartridge, do so only after you've properly calibrated the cart and use perhaps a light dab of rubber-based glue as you should be able to take it out again, if you want to change the cartridge again, at some point. :)

All the very best!
 
Last edited:
Thank you for taking the time Reubensm to write this all up for me - great information and will spend some more time on this to make my Cartridge choice. I do like the turnable ones - but mainly for the original look of this 210. Will also read more about the connection to the Amp. All my rooms in the house are installed with Sonos Amps or Speakers (like Play 5/Five) with external aux/input. Certainly don't have any Amps in my house with Din3 or Din5 sockets. Again, really appreciate your help and guidance on my project. Thanks and you made me even more enthusiastic! Most persons I talked to.. advised me to let it go and gave up, as it would destroy my old records. Found this difficult as I really like the vintage look of the RC210.
 
Some additional notes:

  • You will have to switch the cabling plugs from DIN types to RCA type. Amplifiers these days do not have Din-3 or Din-5 sockets any more. RCAs are the universal standard. However DIN offered the advantage of having a single cable rather than 2 cables, 1 for each channel.
  • For a changer this old, a key component is the idler wheel. Garrard idlers don't wear easily, especially when in constant use but of you feel that the changer slows down when the auto-mechanism triggers, or the auto mechanism is sluggish, it is an indication that the idler is on its last legs. A worn idler also causes increased rumble
  • The RC210 does not have a spark suppressor (capacitor) and for the older decks, you may hear static when the deck switches on and off. Ensure that you open up and clean the deck switch (which switches on and off the motor). If you want to take it a level up, adding a spark suppressor capacitor is a good mod. It will also protect your deck switch
  • The center spindle is a the most delicate part of the turntable, ensure that it does not bend. If it does, while you work on the deck, then getting a replacement is expensive and tricky
  • Clean the inside rim of the platter, this usually accumulates rubber and dust over a period of time (sometimes even rust) causing it to become uneven, this can cause speed variations (although this is rare for a changer that is in constant use)
  • The deck suspension springs, don't ignore these. Not a bad idea to spray some wd40 on them and clean them up. They tend to rust easily and break, and getting exact replacements may be difficult
  • And finally, while it is safe to play your records on your changer, these spindle changers may cause damage to the record label and center hole of your records. Hence, when playing LPs, prefer to operate in manual mode and if you have to stack, dont stack more than 2 (I say 2, keeping in mind that some double record albums from the 60s and 70s came with side 1 and 4 on LP1 and side 2 and 3 on LP2. This configuration is obviously keeping in mind stacking :)). Also if your LPs are slightly warped, the 2 record surfaces will make contact when one drops over the other. Stacking is ideal for 45s and 78 and I have enjoyed stacking 45s. However always remember that the stylus angle will change with every record that drops, causing potential groove damage (for microgroove records) and uneven stylus wear.

Enjoy your adventure and the vintage listening experience that comes with it.
 
Have been able to buy a Shure M3D stereo cartridge (without needle) as well as a 4 wired Garrard replacement Headshell. I decided to keep the Headshell originally installed with the GC8 cartridge as is. Investment costs are a bit higher now, but that's a choice :) Can't wait to have everything shipped, so I can make a start with all suggestions made by Reubensm - again thanks for the good advice and support on my little project.
 
I have been cleaning the Model 210 and it looks good now. Old grease has been removed and added new one plus lubricated all moving parts.
Challenge since cleaning is that it doesn't run smooth. The platter has been removed and cleaner on the inside. Also the Idler wheel has been carefully cleaned and is still feeling soft and seems to be in good condition.

Have made some videos to show what happens during start up and re-loading of records: Videolink: Model 210
Need advice to find the root cause and how to solve it.

Thank you in advance...
 

Attachments

  • tempImageiDcqNS.png
    tempImageiDcqNS.png
    526.4 KB · Views: 7
  • tempImageze7k2h.png
    tempImageze7k2h.png
    450.6 KB · Views: 7
Hi Reubensm,

Uploaded the videos now to YouTube... Hope you are able to view them now.
Your advice is very much appreciated - Thanks.


Sometimes there is a "tick" with the last record as you can here in the 3rd video. It's not always there.
As you can.. I need to support the player in the process to a point where it picks-up automatically.
 
Thanks for the videos. I was not able to view the earlier ones due to the firewall on my home network.

Looks quite dramatic but this is a common symptom of old Garrard changers that have been in constant use for many year or have been in storage for many years.

You may want to check the condition of the idler wheel and the idler wheel spring tension. The old idler wheels are either smoothened off or become brittle. A changer slowing down when the auto-mech works is the first sign that the idler is either worn or its spring tension is not right. The platter coming to a dead stop when the auto-mech kicks in indicates very low torque being transferred to the platter. Remember, its the platter that turns and enables the auto-mech.

Also you may want to check the pulley on the motor spindle as if it has rubber residue on it or some oil may have accidently fallen on it while servicing the turntable, this can happen. The idler wheel rim and the platter rim should also be clean and not have any traces of oil on them.

Just in case you discover that the idler wheel would require a change, you can find a replacement here. I have bought this RC210 idler wheel in the past and it worked very well.

Edit: kindly note that the idler wheel is referred to as the intermediate wheel in the service manual description (service manual can be downloaded here) and also is referred to as Inter Wheel in the parts list. They are all one and the same.
 
Last edited:
Wharfedale Linton Heritage Speakers in Red Mahogany finish at a Special Offer Price. BUY now before the price increase.
Back
Top