Components that matter- Turntable.

I did get the new headshell, Cartridge & knobs for the TT.

Way to go!

The cartridge will improve after some hours of play. You'll hear the biggest improvement after playing 5-6 LP sides - you will hear the bass firm up and the highs will sound clearer. It ought to stabilise by 40-50 hours or even lesser.

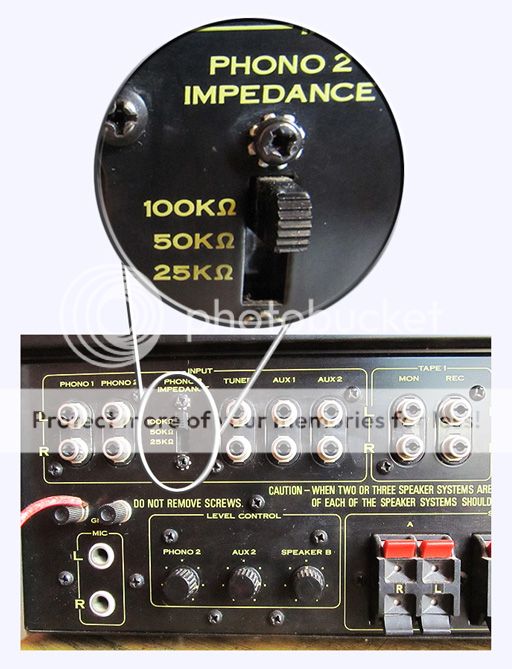
Does your phono pre have settings for capacitive loading? If yes, try using higher value as the M97xE needs higher capacitive loading. I forgot the exact figure, but a quick search on the forum should bring up the post of omishra. Assume the capacitance of your TT cable about 100-120 pF. Then subtract this value from the required capacitive loading. The resultant value is what you should set in the phono preamp. I think you will need circa 180-200 pF loading.

Also, IIRC, this cartridge can sound better at 33K or 62K Ohms resistive loading instead of the usual 47K. 33K will tame the highs (if you find your sound bright). 62K will accentuate the highs. Play around with the settings, if possible.

Also, how many grams is your VTF?
 
@jls001, Thank you for the info...Well, VTF is between 1.5 - 1.75. I have adjusted according to the procedure. The cart seem to be tracking well without skip.

I have fed the TT out to my phono-in of my Rotel RA-413. It does not have any other type of adjustment at the back. It has some filter for hi-low on the front panel. Shown in the link below.

http://www.hifivision.com/vintage-audio/55256-vintage-beauties-vu-meters.html

I agree with you on the Cart. opening up after couple of hours. It must have done about 10hrs now & sounds sweet. Firm Bass & clear mids & highs.

Kindly elaborate on the capacitive & resistive loading that you have talked about.
 
Kindly elaborate on the capacitive & resistive loading that you have talked about.

You should consider DIY-ing the CNC phono stage. It allows setting both resistive and capacitive loadings, and sounds very good. I told you analog playback is a very demanding hobby:lol:
 
Yea...my next project will be that...but, this euphoria settle down to a stable graph. A day is not far enough when i say...Hey, may be this can sound better that what it is now.. :D

Btw. I have doubt which you guy can clear for me...!

What is the critical distance form the stylus tip to the end-washer of the Headshell. Internet info says some where between 48mm to 52mm..which one is correct.

I tried at 52mm & the results were not good. The needle was not tracking well. So, back to 48 and all seems fine.

Looking forward to some gyan on the above. Btw. VTF IS 1.5-1.75.

What you're asking is "what is the correct overhang?" The overhang is the distance from the center of the TT spindle to the tip of the stylus. It varies from arm to arm, and is NOT fixed. Please look up the manual of your TT. It is usually 10-16 mm. 48-52 mm you read about is probably applicable to some other tonearms.
 
I am referring to the cartridge needle position in the headshell to the tip on the tone arm screw where the head socket gets mounted.

Let me make myself clear...Headshell has a 10mm slot where you can mount the cartridge for alignment. So, what is the distance that has to be maintained from the needle to the base of the headshell.

https://www.youtube.com/watch?v=rxyuZ4073po.

The above video deals with it the end. He explains it around the 8th minute on video. Aligning the cartridge.
 
Last edited:
I am referring to the cartridge needle position in the headshell to the tip on the tone arm screw where the head socket gets mounted.

Let me make myself clear...Headshell has a 10mm slot where you can mount the cartridge for alignment. So, what is the distance that has to be maintained from the needle to the base of the headshell.

Measuring the overhang from the socket end is one way of measuring it, but not the universal method. Measure the distance from the center of the spindle to the tip of the stylus. It works for every arm/cartridge combo. As I already mentioned, the 48 or 52 mm distance from stylus tip to socket works for certain arms where the OEM has specified it. Go with the spindle center to stylus tip measurement and you'll get it right each time, simply because that's the definition of overhang. Follow direct measurement instead of derived measurement.

Do note that there are many headshells which do not have slots (10 mm or otherwise) but have just a single hole (e.g. Certain vintage SME arms with unadjustable cartridge position, or Garrard TPA 12 arm). On such arms, it is not possible to adjust overhang, whereas on your headshell which provides 10 mm slot, you have a fair amount of adjustment for overhang. You can even adjust for offset angle (use appropriate protractor). Google Keith Howard Arm Geometer for more details on the relationship between offset angle, overhang, effective length, etc. You can even create your own protractor using the Arm Geometer application. I have created mine for a 12 inch DIY arm and it works well. It also generates the tracking error for the combo and you can choose a geometry that optimises what is important for you (e.g. Choose a geometry that minimises inner groove distortion, or choose another geometry that minimises overall distortion - the caveat here being that there will always be distortion, and the different geometries just change the error distribution). You may also like to read up on the Loefgren and Baerwald geometries.
 
Hmm...That's a lot of input for my gray matter and will absorb as fast as possible.:eek:hyeah:

Will follow the procedure of the overhang and find out how much is the off-set. The point to be noted is when you say...Distortion is the part of it and cannot be eliminated...But, can be optimized.

This thread so far has opened a Pandora box of nuances of playing with Vinyls and turntable...All points taken in its stride for that sweet sound.

It feels wonderful to be part of HFV & its knowledgeable members.:clapping:
 
I have Pioneer SA 9100 vintage integrated amp which lets me adjust the loading on the phono cartridge, i can adjust variable resistance for my MM cart.
Actually i have tried with all settings but sounds sweeter at 100k omhs, it also has adjustable phono gain pot for phono 2 input. My Yamaha CA-810 has connections for 3 TT's. One for MC, one not variable, and one with 3 choices of resistance, but pioneer sounds damn good.
Love to own sachins CNC phono stage, i have plans of building one soon. Thanking Jls for valuable inputs :)


impedanceswitchpicofSA9100_zpsa3b0c33d.jpg


HFV%20signature%2022%20Nov%202014_zps8mvvczk9.gif
 
Last edited:
Please have a look at the drawings here from soundfountain.com, explaining what are mounting distance (pivot to spindle), effective length (pivot to stylus tip), overhang, and offset angle. Scroll down to the middle of the page for the relevant diagrams. The whole page is a very interesting read and worth trying to understand, especially SRA.

And here is another look in isometric 3-dimensional view from The Analog Dept. This drawing also shows the concept of inner and outer null points.

And here is another beautiful illustration from The Analog Dept.
 
The Marantz PM7000N offers big, spacious and insightful sound, class-leading clarity and a solid streaming platform in a award winning package.
Back
Top