Hi Folks
I had to relocate to Chennai last year. The room assigned for HT/ music sounded terrible with lot of flutter echo and ringing. So much so that I did not bother to setup my system properly, for over an year. The corner bass traps I made earlier worked pretty well in my previous home but were not adequate for this. Check this link to know how I made them. If you try it, remember to keep the face width of the trap 18 to 24 inches for best results.
The new room was another proof that no matter how good your system is, poor acoustics can screw everything. Acoustic treatment is probably the simplest and cheapest fix though not always the easiest, to improve the sound quality. Many of us continue to upgrade endlessly to improve the SQ (applying band-aids and more band-aids) without treating the core issue.
Though I have done before/ after measurements in the past, I am comfortable these days trusting my ears to see what good things room treatment can do. For the same reason I did not go too scientific finding the room modes, calculating the right size/ density of traps etc. I always believe that it is quite difficult to go wrong with acoustic treatment though you might overdo it. I must also admit that I am a novice in this field so take my work with a pinch of salt.
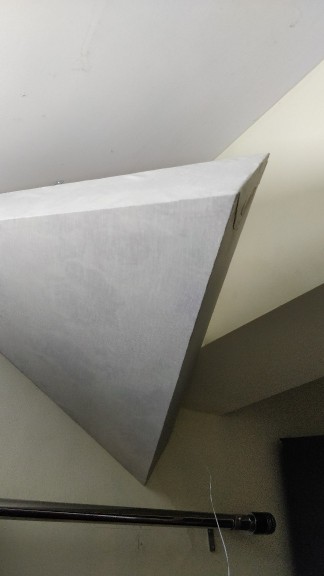
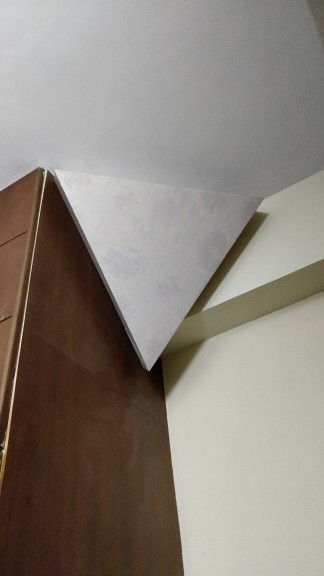
Like mosquitoes, bass loves corners. They like to hang around where walls meet. But worse are the areas where the walls and the ceiling meet. I always wanted to do a tri-corner bass trap but never really got the time. Now that I was forced to do it, I got going recently and completed four tri-corner bass traps as well as two side wall absorption panels.
I did not keep a track of the cost involved, but let me assure you, it is peanuts compared to the benefits. What is needed is your time, interest and little skills. If you have not done any treatment to your room (besides your carpet, ofcourse), let me assure you, this will be the best 'upgrade' you have done to your system, not just a ‘tweak’.
Materials used: Plywood 0.75 inch thick. Rockwool 50 mm, 120 kg/ cubic metre, fabric, fevicol, metal hooks, screws, nails, cable tie etc. You can use glasswool too if you can find, as some say it is safer. We are going to make all panels 100 mm or about 4 inches deep.
Tools used: Drilling machine, gun tacker, screw driver, saw, scissors, painting brush, duster, measuring tape, scale, marker pen, ladder...
Frames
Since there was this wood workshop next to the plywood store, I got it cut from there, saving lot time and labour.


Making square frames was pretty straight forward, however, the triangular ones were a bit tricky. The angle at which the two pieces meet should be 60 degrees. Managed to explain to the carpenter and he did a fair job. The frames were secured with nails and fevicol.


The rectangular frame should be of 4 ft x 2 ft, the size of the panels purchased. However to save wood, I had to keep the outer measurements 4x2 and thus I had to trim the rockwool panels to fit. If you are trying this DIY, you could keep the inner measurements 4x2. Same with the triangular traps, I had to chop the mineral wool to fit them. My original calculation of size for the triangular frame is given below. Going forward I will alternate between triangular and rectangular traps as they are built.

Fabric
We will be covering the panel with two layers of fabric to eliminate the slightest fear of hazard. The inner layer was done with used bed spreads. The cloth must not be stretchable at the same time porous enough to allow some air if you blow through it. Let the fabric be solid, light coloured unlike what I did.
For wrapping, you will need a gun tacker ( I used Miles TS-623 with 23/10H pins). You can do this without stapler (using Fevicol SR998) but the gun saves lot of time (and is fun to use ). Punch at 4-5 points on each side.

While you do the second side, stretch a bit and while you do the last side, stretch as much as you can without tearing the fabric, ofcourse.


Now you can use the brush and apply fevicol to close the gaps. Once again stretch and press the fabric, few seconds after applying the glue.

Now do the same with the other three panels.

Meanwhile, I did the same process on the rectangular frames. Place the fabric on the panel, stretch, staple, glue and trim.

I used fishing wires along the width so that they can hold the rockwool tight in place. This seems optional.


Do not wrap the other side yet")
Stuffing
In the box, there were 6 panels of 4ft x 6ft x 50mm each

Going forward, you will need gloves to protect your hands. Also wear full sleeves shirt, jeans, socks as well as eye gear. Though not as bad as glasswool, these can be itchy as well.
As mentioned earlier, I had to trim the rockwool panel to fit the frame. Two panels in each frame. Use duster to remove the debris formed while cutting / handling.


Repeat for the other panel

Now lets go back to the triangles. Cut the slab as per the sketch.

The side chunk is a waste So you get one equilateral triangle and two right triangles (x 2 for each slab of rockwool)

Place them inside the frame as illustrated:


Now repeat for the other panels. There you go, all the panels are ready. The side panels are pretty heavy now!

Repeat the wrapping process for the uncovered side, with your base fabric. Ouch, that's gonna take lot of time!

Second layer wrapping
If you want to keep it simple, you can use only one layer of fabric. If so, wrap it such that front side looks clear off pasting job. I picked up a plain, light color for the ceiling traps and an abstract printed fabric for the side ones.

Now the corner wrapping can be a bit tricky. Difficult to explain so let the pictures do the talking.


Don't forget the stretching. You don't want wrinkles on them!

One panel done

All four done. Pat yourselves if you reached this far.

Contd.....
I had to relocate to Chennai last year. The room assigned for HT/ music sounded terrible with lot of flutter echo and ringing. So much so that I did not bother to setup my system properly, for over an year. The corner bass traps I made earlier worked pretty well in my previous home but were not adequate for this. Check this link to know how I made them. If you try it, remember to keep the face width of the trap 18 to 24 inches for best results.
The new room was another proof that no matter how good your system is, poor acoustics can screw everything. Acoustic treatment is probably the simplest and cheapest fix though not always the easiest, to improve the sound quality. Many of us continue to upgrade endlessly to improve the SQ (applying band-aids and more band-aids) without treating the core issue.
Though I have done before/ after measurements in the past, I am comfortable these days trusting my ears to see what good things room treatment can do. For the same reason I did not go too scientific finding the room modes, calculating the right size/ density of traps etc. I always believe that it is quite difficult to go wrong with acoustic treatment though you might overdo it. I must also admit that I am a novice in this field so take my work with a pinch of salt.
Like mosquitoes, bass loves corners. They like to hang around where walls meet. But worse are the areas where the walls and the ceiling meet. I always wanted to do a tri-corner bass trap but never really got the time. Now that I was forced to do it, I got going recently and completed four tri-corner bass traps as well as two side wall absorption panels.
I did not keep a track of the cost involved, but let me assure you, it is peanuts compared to the benefits. What is needed is your time, interest and little skills. If you have not done any treatment to your room (besides your carpet, ofcourse), let me assure you, this will be the best 'upgrade' you have done to your system, not just a ‘tweak’.
Materials used: Plywood 0.75 inch thick. Rockwool 50 mm, 120 kg/ cubic metre, fabric, fevicol, metal hooks, screws, nails, cable tie etc. You can use glasswool too if you can find, as some say it is safer. We are going to make all panels 100 mm or about 4 inches deep.
Tools used: Drilling machine, gun tacker, screw driver, saw, scissors, painting brush, duster, measuring tape, scale, marker pen, ladder...
Frames
Since there was this wood workshop next to the plywood store, I got it cut from there, saving lot time and labour.
Making square frames was pretty straight forward, however, the triangular ones were a bit tricky. The angle at which the two pieces meet should be 60 degrees. Managed to explain to the carpenter and he did a fair job. The frames were secured with nails and fevicol.
The rectangular frame should be of 4 ft x 2 ft, the size of the panels purchased. However to save wood, I had to keep the outer measurements 4x2 and thus I had to trim the rockwool panels to fit. If you are trying this DIY, you could keep the inner measurements 4x2. Same with the triangular traps, I had to chop the mineral wool to fit them. My original calculation of size for the triangular frame is given below. Going forward I will alternate between triangular and rectangular traps as they are built.
Fabric
We will be covering the panel with two layers of fabric to eliminate the slightest fear of hazard. The inner layer was done with used bed spreads. The cloth must not be stretchable at the same time porous enough to allow some air if you blow through it. Let the fabric be solid, light coloured unlike what I did.
For wrapping, you will need a gun tacker ( I used Miles TS-623 with 23/10H pins). You can do this without stapler (using Fevicol SR998) but the gun saves lot of time (and is fun to use ). Punch at 4-5 points on each side.
While you do the second side, stretch a bit and while you do the last side, stretch as much as you can without tearing the fabric, ofcourse.
Now you can use the brush and apply fevicol to close the gaps. Once again stretch and press the fabric, few seconds after applying the glue.
Now do the same with the other three panels.
Meanwhile, I did the same process on the rectangular frames. Place the fabric on the panel, stretch, staple, glue and trim.
I used fishing wires along the width so that they can hold the rockwool tight in place. This seems optional.
Do not wrap the other side yet
Stuffing
In the box, there were 6 panels of 4ft x 6ft x 50mm each
Going forward, you will need gloves to protect your hands. Also wear full sleeves shirt, jeans, socks as well as eye gear. Though not as bad as glasswool, these can be itchy as well.
As mentioned earlier, I had to trim the rockwool panel to fit the frame. Two panels in each frame. Use duster to remove the debris formed while cutting / handling.
Repeat for the other panel
Now lets go back to the triangles. Cut the slab as per the sketch.
The side chunk is a waste
So you get one equilateral triangle and two right triangles (x 2 for each slab of rockwool)
Place them inside the frame as illustrated:
Now repeat for the other panels. There you go, all the panels are ready. The side panels are pretty heavy now!
Repeat the wrapping process for the uncovered side, with your base fabric. Ouch, that's gonna take lot of time!
Second layer wrapping
If you want to keep it simple, you can use only one layer of fabric. If so, wrap it such that front side looks clear off pasting job. I picked up a plain, light color for the ceiling traps and an abstract printed fabric for the side ones.
Now the corner wrapping can be a bit tricky. Difficult to explain so let the pictures do the talking.
Don't forget the stretching. You don't want wrinkles on them!
One panel done
All four done. Pat yourselves if you reached this far.
Contd.....
Last edited: