Not to tell again the advantage of a sub for better sound stage and depth. I was wondering for long if I can hook a woofer to my wall mounted TV without compromising space and money. Here is the summary of my DIY mini project over a weekend. With very basic knowledge of electronics and soldering I think it was pretty easy for me when all components in place.
Background.
Using a Sony plasma complimenting with its proprietary separate twin speakers (14w) and super acoustically loaded woofer (28w) in living room I never felt the need of a separate system for a TV. But then it made me terribly miss the sound depth for my bedroom LED. The highs were crisps and mids were OK but of course bass was non existent. For some thoughtful reasons, it is wall mounted at good height and I didn't want to use any other space or like to see wiring mess visible around the TV. (at least from front) I spent couple of days thinking and finally gave a try using all old stuff lying which I did not throw away.
Used following:
1. A removable woofer called drumbeat system from old school BPL tv (source: uncle)
2. Creative inspire 2500 2.1 computer speakers (old & wiring issue)
3. airtight plastic container (useless due to crack).
4. 3.5mm wired volume controller from ebay (sourced before long time for 2.1 speakers)
5. 3M double stick tape & Solder gun.
6. Lots of patience over excitement.
7. Few weird glimpse from better half for what exactly I was trying.")
Action:
1.Released a working amp from the woofer case of creative speaker. It was connected to a 20w woofer.
2. Opened the drumbeat woofer (too many screws) to clean and checked the acoustic dumping condition. All was OK. Fortunately the speaker was also 20w and also magnetically shielded, (although not necessary for LED) This made easier as I didn't have to match power.
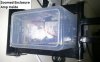
3. Used the plastic container as an enclosure for amp. Made lot of holes to release hot air from amp. The wired from woofer were connected to amp sub out and joints were soldered.
4. Used 3M tape to stick the amp to enclosure. Its more or less same size with amp's borders, so was pretty fit already.
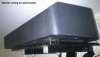
5. Placed the amp on the wall mount used earlier for D2h box above the TV wall mount. Since new videocon d2h uses RF, I don't need the box to be in direct contact with remote. It can be hidden behind tv now.
6. Placed the completed amp box in the gap of articulated arm of TV wall mount. Since the Tv has been put higher, I used a bigger aftermarket wall mount with a tilted angle. This gives good space between TV and wall.
7. Connected 3.5mm cable to TV out and amp IN. Adjusted the bass and master volume.
Result:
Deep Bass, Much more depth especially with movies/ music channels.
Although it can not match the performance of my living room setup, its much better and kinda more than satisfactory. Especially when its been designed from old components from lying stuff and without spending even a single rupee. Its clean, No wastage of space (behind TV):yahoo:
Below are the images taken from mobile.
Background.
Using a Sony plasma complimenting with its proprietary separate twin speakers (14w) and super acoustically loaded woofer (28w) in living room I never felt the need of a separate system for a TV. But then it made me terribly miss the sound depth for my bedroom LED. The highs were crisps and mids were OK but of course bass was non existent. For some thoughtful reasons, it is wall mounted at good height and I didn't want to use any other space or like to see wiring mess visible around the TV. (at least from front) I spent couple of days thinking and finally gave a try using all old stuff lying which I did not throw away.
Used following:
1. A removable woofer called drumbeat system from old school BPL tv (source: uncle)
2. Creative inspire 2500 2.1 computer speakers (old & wiring issue)
3. airtight plastic container (useless due to crack).
4. 3.5mm wired volume controller from ebay (sourced before long time for 2.1 speakers)
5. 3M double stick tape & Solder gun.
6. Lots of patience over excitement.
7. Few weird glimpse from better half for what exactly I was trying.
Action:
1.Released a working amp from the woofer case of creative speaker. It was connected to a 20w woofer.
2. Opened the drumbeat woofer (too many screws) to clean and checked the acoustic dumping condition. All was OK. Fortunately the speaker was also 20w and also magnetically shielded, (although not necessary for LED) This made easier as I didn't have to match power.
3. Used the plastic container as an enclosure for amp. Made lot of holes to release hot air from amp. The wired from woofer were connected to amp sub out and joints were soldered.
4. Used 3M tape to stick the amp to enclosure. Its more or less same size with amp's borders, so was pretty fit already.
5. Placed the amp on the wall mount used earlier for D2h box above the TV wall mount. Since new videocon d2h uses RF, I don't need the box to be in direct contact with remote. It can be hidden behind tv now.
6. Placed the completed amp box in the gap of articulated arm of TV wall mount. Since the Tv has been put higher, I used a bigger aftermarket wall mount with a tilted angle. This gives good space between TV and wall.
7. Connected 3.5mm cable to TV out and amp IN. Adjusted the bass and master volume.
Result:
Deep Bass, Much more depth especially with movies/ music channels.
Although it can not match the performance of my living room setup, its much better and kinda more than satisfactory. Especially when its been designed from old components from lying stuff and without spending even a single rupee. Its clean, No wastage of space (behind TV):yahoo:
Below are the images taken from mobile.