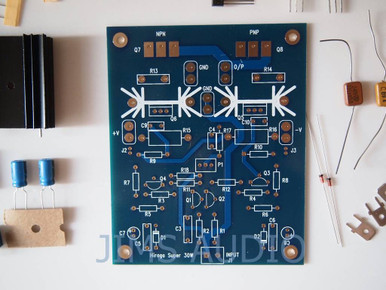
Jean Hiraga Super 30 - The Beginning

Continuation....
Finding the right guy for each job was the most difficult part in these kind of builds as most of the vendors are not interested and ready to take up one off project. I had to run around quite a lot in Bangalore checking out vendors listed in JustDial and similar sites. I will be listing down all these at the end so that it will be much easier for guys like me in future.

Since my sketch has so many design elements, CAD design became very important and that took me weeks to get the right person, the corona lockdown was not helping either. Had to have multiple sessions with the CAD guy to tweak the design and after 3 weeks of constant follow ups I received milled panels. It was an ecstatic moment seeing the design which was there only in your brain right in front of you.

View attachment 53219
View attachment 53220
View attachment 53221
View attachment 53222

I had ordered all the necessary parts in the meantime and was ready to kick-start test assembling the chassis. I followed the automobile way of wiring and created separate wiring looms for each boards terminated with lugs and spades. The power wires are 2.5sqmm and 1.5sqmm, the input signal wires are shielded Canare microphone cables. Learnt the braiding technique from YouTube ;).
View attachment 53223

The PCBS are arranged for marking the mount holes, all the 3mm threads are manually done at home using hand drill and tapping kit. The transformer is mounted using M5 bolts like all the chassis panels.
View attachment 53224

The small board is a soft start to avoid current surge.
View attachment 53225

I had to go for double layer arrangement as the chassis was compact and most of the space was eaten by transformer itself. The wiring layout has been finalized after multiple trials to avoid any ground loop and hum.
View attachment 53226

PCBs are mounted on Aluminum square tube cut into half.
View attachment 53227

Test assembled,
View attachment 53229

I ran it like this for couple of weeks to understand the heating effect and bias adjustment. Temperature was hovering around 53 degree after 2 hours of operation.
View attachment 53230
View attachment 53231
Sir i have one small doubt on ground connection.
Since you have 2 power rails. Are both ground separate right from the input source ground to speakers out ground , or there is no issue if common ground is done.
 
Sir i have one small doubt on ground connection.
Since you have 2 power rails. Are both ground separate right from the input source ground to speakers out ground , or there is no issue if common ground is done.
Grounding is the most challenging part of a JH build, this is very sensitive and any ripples in the chain shows right away.

Coming to the question, i have used a common ground for both channels. There were ground loop issues which had to be cleared using star ground and careful routing of power lines.
Hi,
I am new to this forum. Got inspired by your DIY, where can I get PCBs for this JH super 300
 
Last edited:
Not a first timer at all.. Excellent finish.

Neighbour's envy Owner's pride ....😃😃😃
Thanks for the kind words, it's true that I had done so many iterations in my mind before the real build. We don't have the luxury of prototyping in diy world 😀
 
You did a beautiful job. Your work and dedication to detail was very encouraging, for all of us to see. Bravo !!

May I make just one single minor suggestion, .............for you to consider ?


All wires, when energized, have fields around them.

It is best to keep wires separated from each other, so one field does not interfere with the other. I usually suggest 1/8th of an inch or more separation. In your amp, I see about ten white tie wraps, bundling wires together, to make it " look neat ".

The amp will sound better if you remove all those internal tie wraps, and throw them away.

Just separate the wires, so they do not touch each other, 1/8th of an inch, or more.

Report back to us all, and tell us if the amp sounds subjectively " purer", perhaps somewhere between 1 to 3 % better.

Please share your listening experiment here on the Forum, so others may possibly benefit.

Jeff

PS : I certainly LIKE your 500 VA R-Core power transformer. Low in radiated fields.
 
Last edited:
This is the build log of a Jean Hiraga 30W class A amp which is my first attempt to make DIY product without the normal characteristics of a DIY Build. The word DIY usually associates with low cost, functional design with less importance given to aesthetics but I wanted to challenge myself to a design which can compete with professional units in terms of build quality.

I ventured into audio DIY very recently (2018) and was looking for a perfect amp for myself, that was the time I got introduced to Hifivision and stumbled upon this particular thread of Sadik’s. Sadik's JH30.
As most of you know, he is a master craftsman and I always envied his engineering skills. I was a first-time builder neither equipped for such extensive build but didn’t hesitate to grab couple of his pcbs when he listed them for sale in the forum. It was designed by Aniket whos is very well known in DIY space for his DD amps, I didn't have any doubt on the build quality and design of these boards.

View attachment 53212

The real challenge was that I had no clue where to start but gained confidence after reading about various JH builds around the world and started ordering parts from RS components. All these were happening in 2019 and there were many others discussing about group building JH in various WhatsApp groups. A friend has asked my help in building one for him during one such casual talk which I tried to discourage as I was not confident myself as a builder. But he was very persistent and had more confidence on me, I didn’t have any choice other than to accept the challenge. We had discussed an estimate and delivery deadline of January 2021, with this I started planning activities backwards (I am in to IT and the project management experience really came handy here ).

Below were my to-do lists,

~~ Populate amp boards with high quality components
I believe in quality and was not ready to compromise on component quality, which includes audio grade caps (ELNA, Denon, Wima), Precision Resistors (Vishay Dale) and original active devices from ON Semi.

View attachment 53213

~~Heatsinks
As with any of the Class A amps, this is the most significant component which defines how ‘cool’ is your amp and how “heavy” it is. Usual trend is to have a 250-300mm heatsink for each channel with both transistors mounted on it. I decided to take it a bit further and ordered 4, one for each transistors, each of these weighting 2KGs and the amp already grown to 8Kgs . The below picture is after a failed attempt to anodize it in gold color, the final finish is different.

View attachment 53214

~~Transformer
The original design uses a 500VA and I decided to go with the same. I went with R-Core as it is supposed to have the least flux leakage and the cost difference was not that much compared to torroid. The spec is 24V – 0 – 24V and 12V – 0, 512VA, weighs about 7kg.

The cassette is to get a reference for understanding the size.
View attachment 53215

~~Capacitor bank
This is the most dreaded part in a JH build as the design is very sensitive to power supply noises. The original design uses about 1F of capacitance to smoothens the DC which uses massive capacitors and eventually adds to the cost. I didn’t want to go with those beer can capacitors mainly due to cost and lack of availability hence opt for 2 separate boards each comprising of 16 4700uf capacitors.

View attachment 53216

~~Chassis Design
I started with a clean state and my design evolved around the heatsinks, like how to make them look symmetric, what is the best placement for effective heat dissipation etc. Since I am illiterate with CAD and similar software; my only option was the same old pencil and paper. It took me almost 3-4 months to get the complete design after numerus iterations evaluating pros and cons. I decided to build it with 8mm aluminum plates for all sides which will also act as heatsinks.
View attachment 53217

8mm Plates
View attachment 53218
Kindly advise from where I can get this PCB
This is the build log of a Jean Hiraga 30W class A amp which is my first attempt to make DIY product without the normal characteristics of a DIY Build. The word DIY usually associates with low cost, functional design with less importance given to aesthetics but I wanted to challenge myself to a design which can compete with professional units in terms of build quality.

I ventured into audio DIY very recently (2018) and was looking for a perfect amp for myself, that was the time I got introduced to Hifivision and stumbled upon this particular thread of Sadik’s. Sadik's JH30.
As most of you know, he is a master craftsman and I always envied his engineering skills. I was a first-time builder neither equipped for such extensive build but didn’t hesitate to grab couple of his pcbs when he listed them for sale in the forum. It was designed by Aniket whos is very well known in DIY space for his DD amps, I didn't have any doubt on the build quality and design of these boards.

View attachment 53212

The real challenge was that I had no clue where to start but gained confidence after reading about various JH builds around the world and started ordering parts from RS components. All these were happening in 2019 and there were many others discussing about group building JH in various WhatsApp groups. A friend has asked my help in building one for him during one such casual talk which I tried to discourage as I was not confident myself as a builder. But he was very persistent and had more confidence on me, I didn’t have any choice other than to accept the challenge. We had discussed an estimate and delivery deadline of January 2021, with this I started planning activities backwards (I am in to IT and the project management experience really came handy here ).

Below were my to-do lists,

~~ Populate amp boards with high quality components
I believe in quality and was not ready to compromise on component quality, which includes audio grade caps (ELNA, Denon, Wima), Precision Resistors (Vishay Dale) and original active devices from ON Semi.

View attachment 53213

~~Heatsinks
As with any of the Class A amps, this is the most significant component which defines how ‘cool’ is your amp and how “heavy” it is. Usual trend is to have a 250-300mm heatsink for each channel with both transistors mounted on it. I decided to take it a bit further and ordered 4, one for each transistors, each of these weighting 2KGs and the amp already grown to 8Kgs . The below picture is after a failed attempt to anodize it in gold color, the final finish is different.

View attachment 53214

~~Transformer
The original design uses a 500VA and I decided to go with the same. I went with R-Core as it is supposed to have the least flux leakage and the cost difference was not that much compared to torroid. The spec is 24V – 0 – 24V and 12V – 0, 512VA, weighs about 7kg.

The cassette is to get a reference for understanding the size.
View attachment 53215

~~Capacitor bank
This is the most dreaded part in a JH build as the design is very sensitive to power supply noises. The original design uses about 1F of capacitance to smoothens the DC which uses massive capacitors and eventually adds to the cost. I didn’t want to go with those beer can capacitors mainly due to cost and lack of availability hence opt for 2 separate boards each comprising of 16 4700uf capacitors.

View attachment 53216

~~Chassis Design
I started with a clean state and my design evolved around the heatsinks, like how to make them look symmetric, what is the best placement for effective heat dissipation etc. Since I am illiterate with CAD and similar software; my only option was the same old pencil and paper. It took me almost 3-4 months to get the complete design after numerus iterations evaluating pros and cons. I decided to build it with 8mm aluminum plates for all sides which will also act as heatsinks.
View attachment 53217

8mm Plates
View attachment 53218
Kindly advise from where I can get the Jean Hiraga PCB as shown in the image
 
Purchase the Audiolab 6000A Integrated Amplifier at a special offer price.
Back
Top