Making a tone arm

Sumanta

Well-Known Member
Joined
Nov 27, 2011
Messages
646
Points
63
Location
Baroda
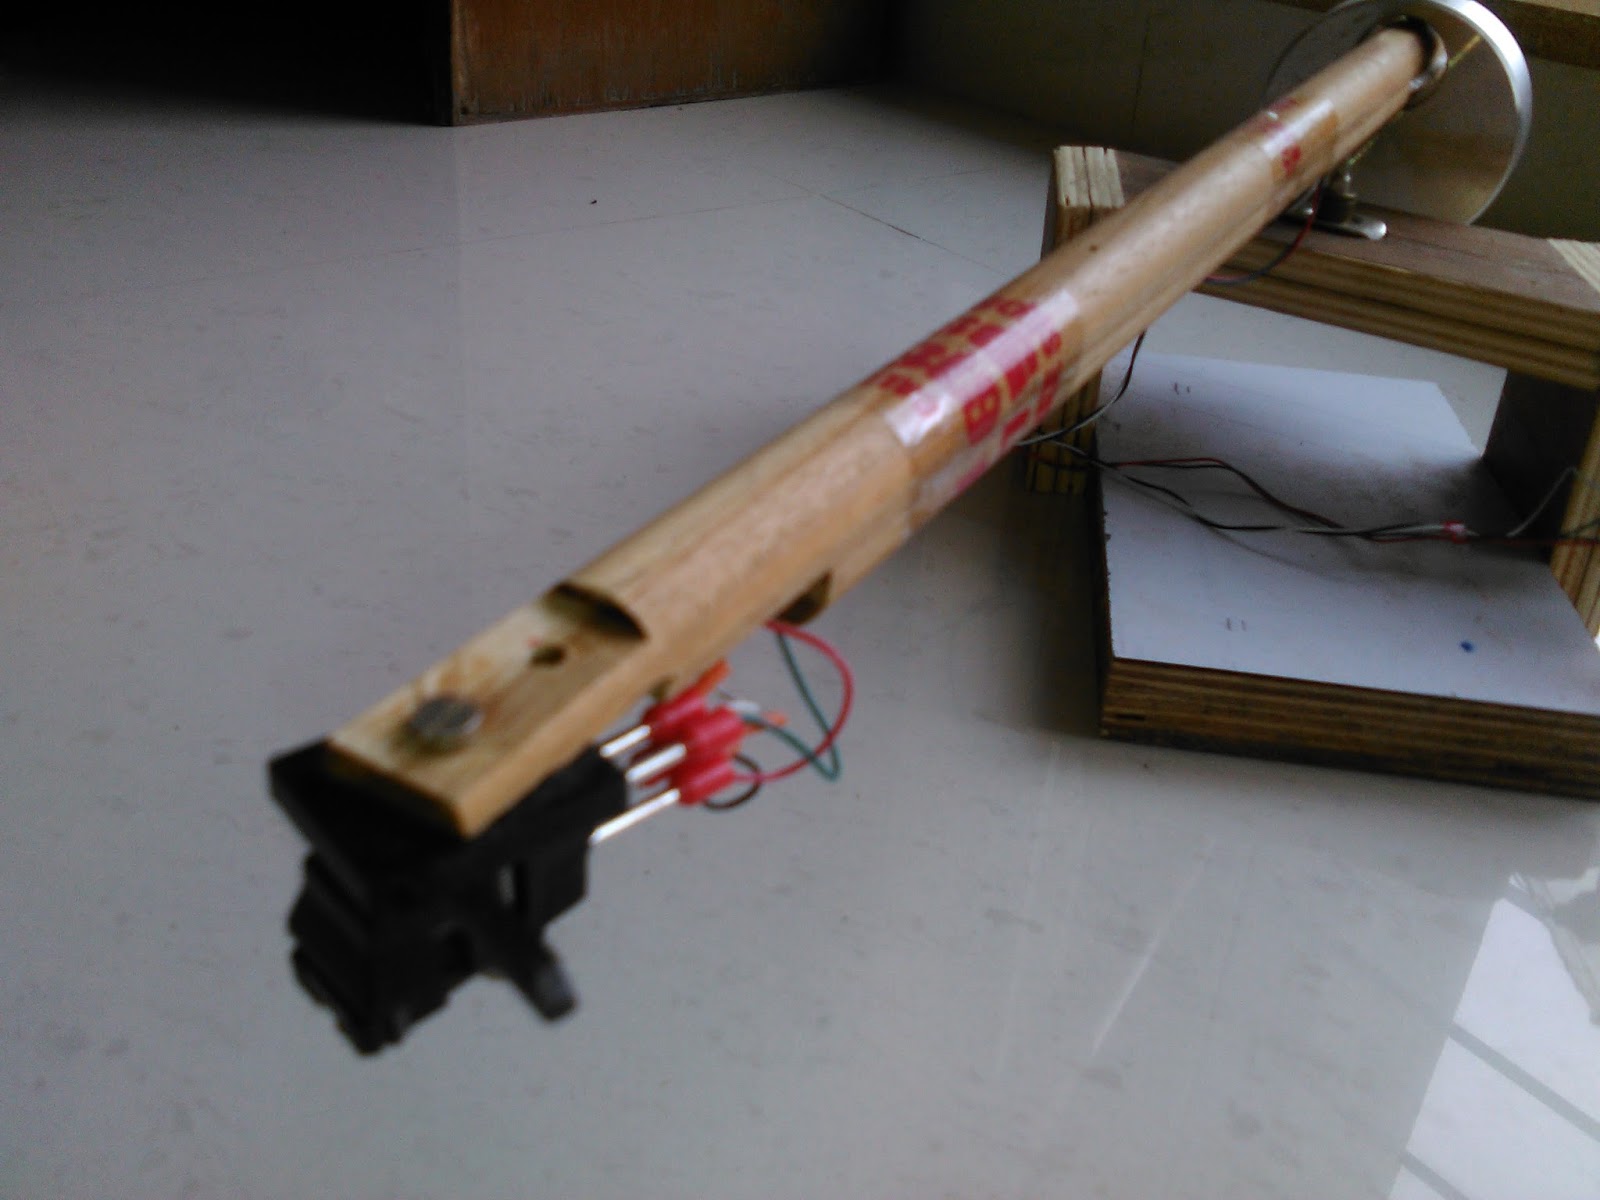
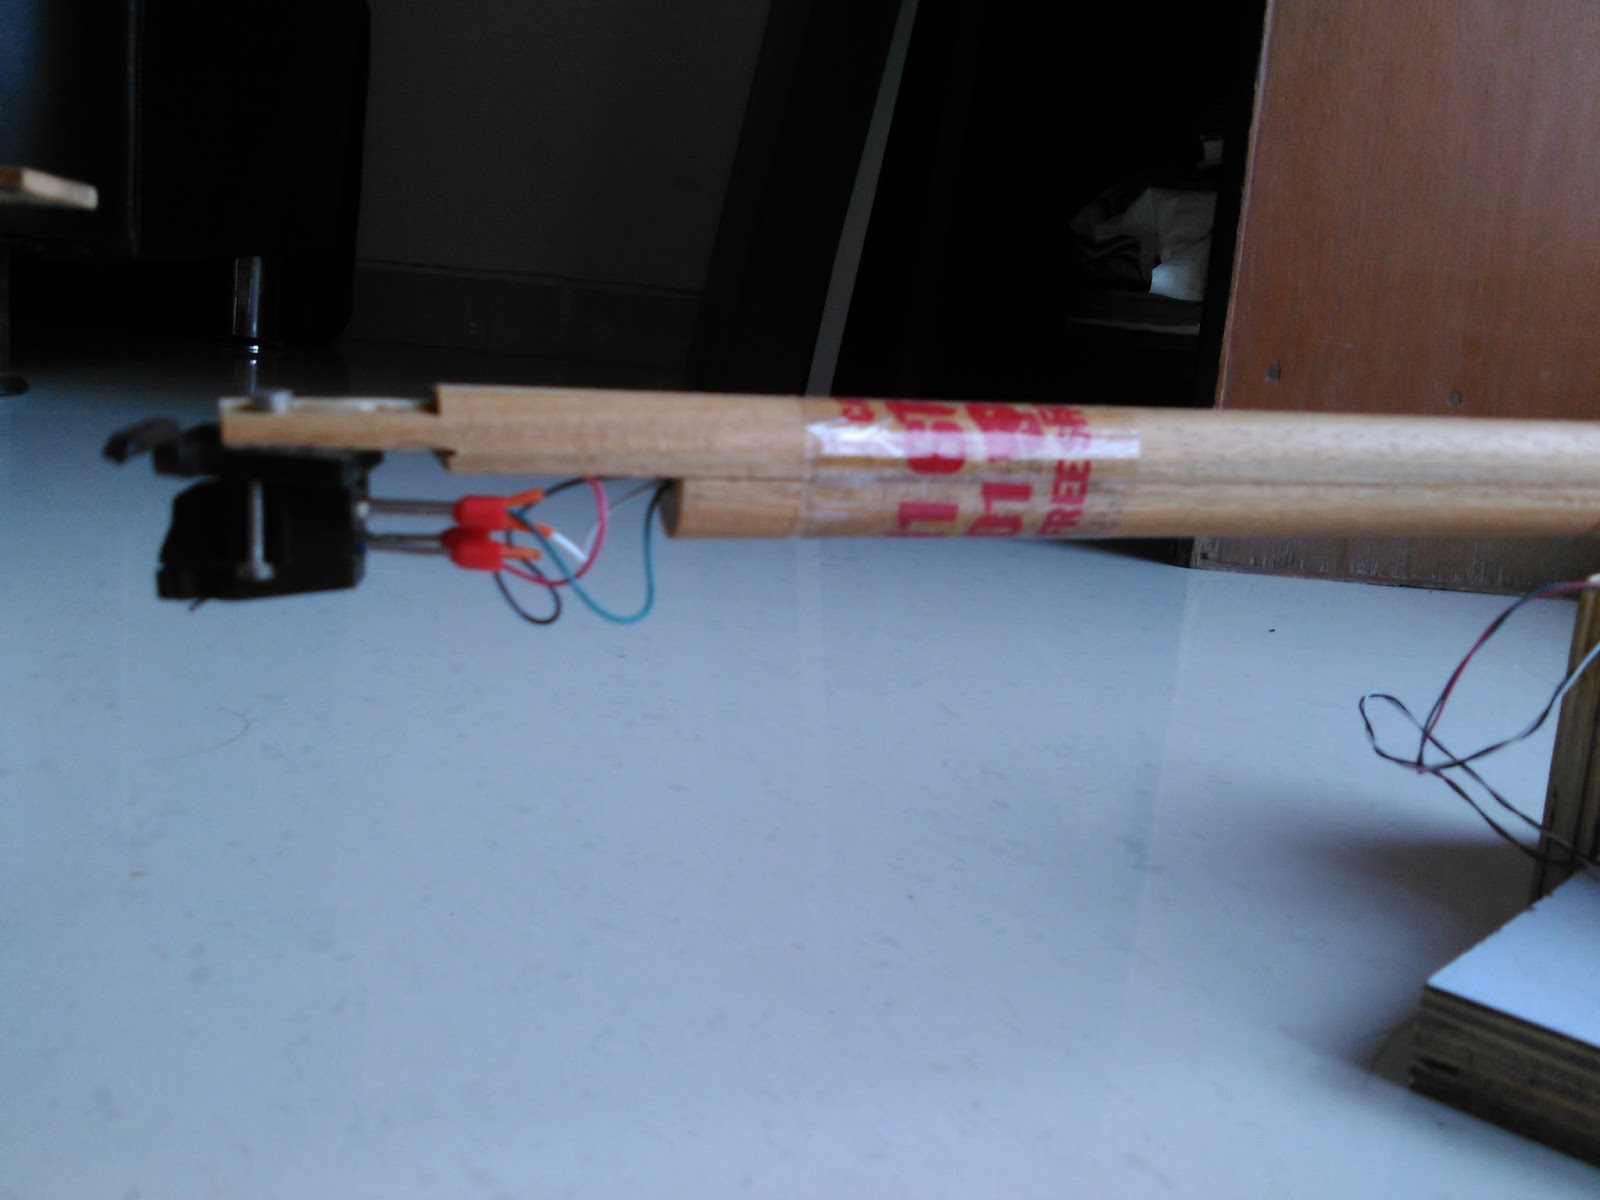
Seeing JLS001's wonderful, simple, effective uni pivot tone arm, making one of my own was going in my mind.
In addition to enjoying life of a diy cycle, another arm will help me having to cart-stylus ready for different kind of records (condition). Learning through it is a basic gain anyway.

I read Joshua's posts several times but missed mentioned topic about Frank Schroeder's unique magnet bearing unipivot kind of tone arm design. Once I stumbled that topic while re-reading Joshua's post, I read diyaudio's related post DIY Schroeder Tonearm??? - diyAudio.

For picking up interest faster, go to page 40 and see photos.

Knowing making of Schroeder type require tenacity, good tools, knowledge and huge time, I just could not take off my eyes and mind for its simplicity and beauty in its design.

I want to make it as simple as possible. I know I will loose accuracy if I am too simple, but I still want to try.
Not that I understood all posts (984 in total) in it, but most and while reading towards the 3/4 post of it, a thought strike me.
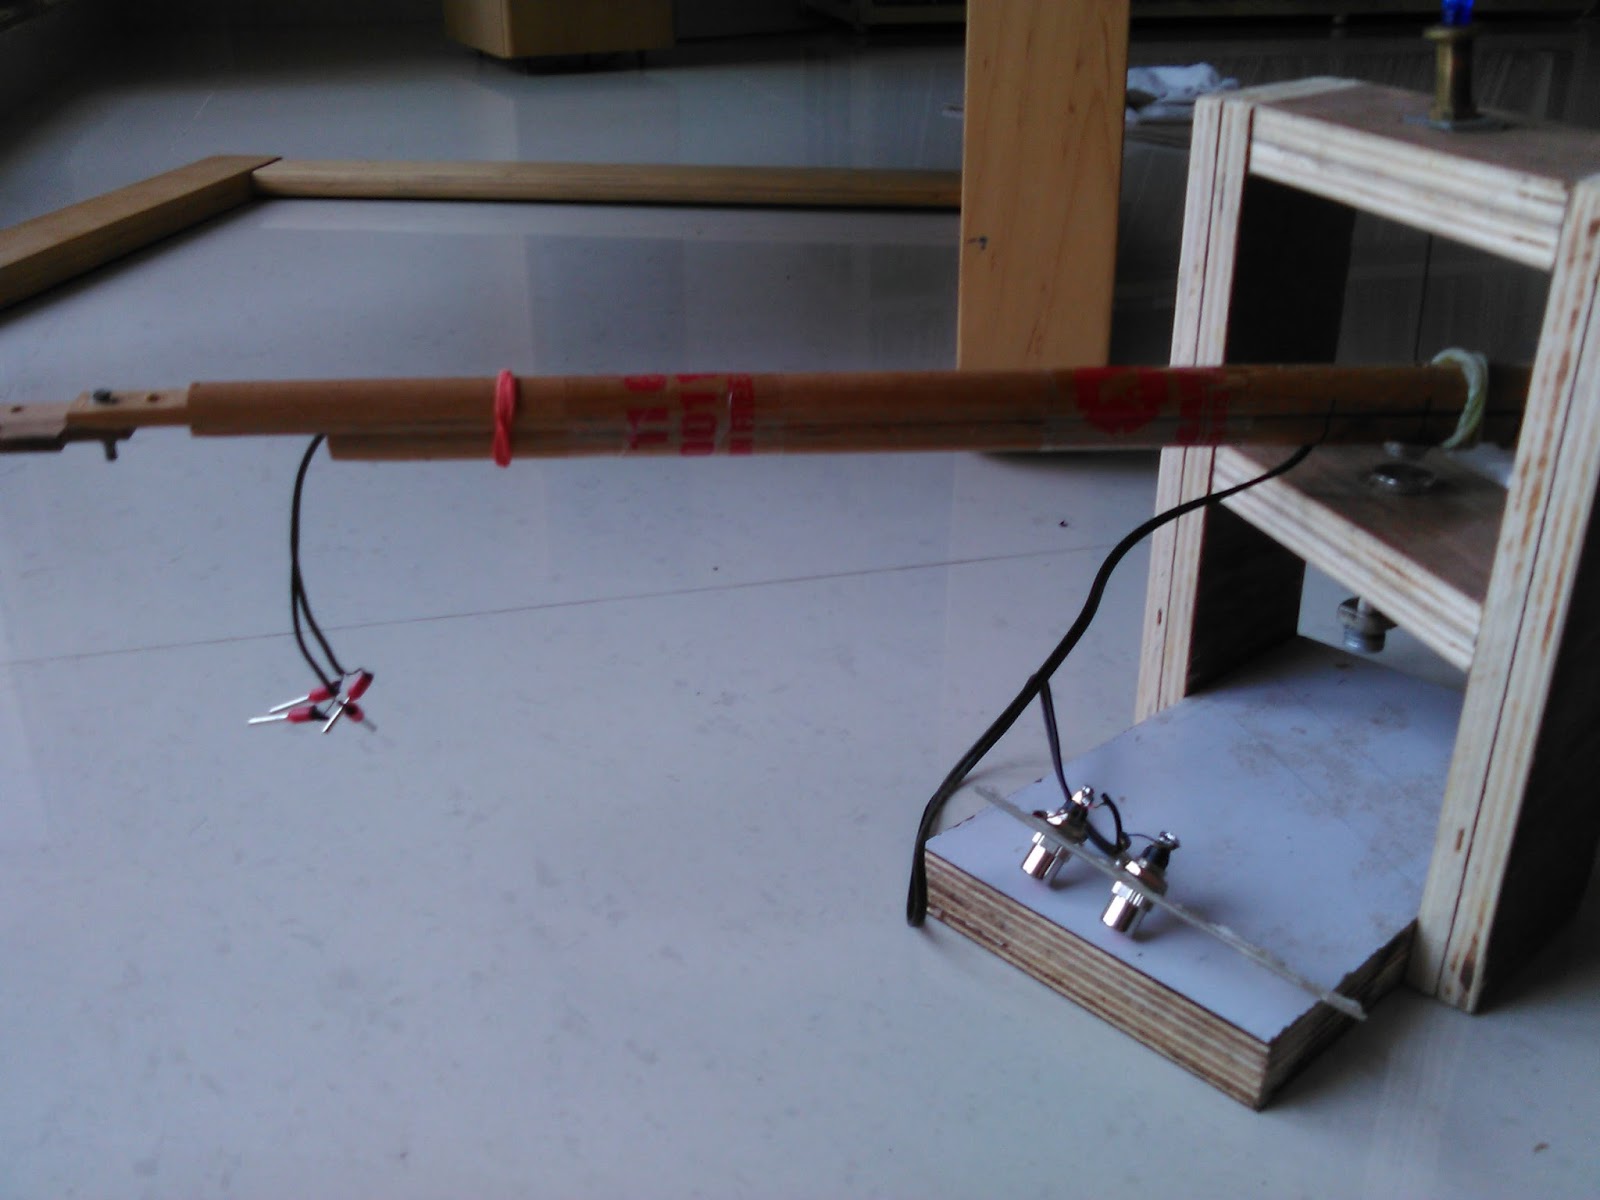
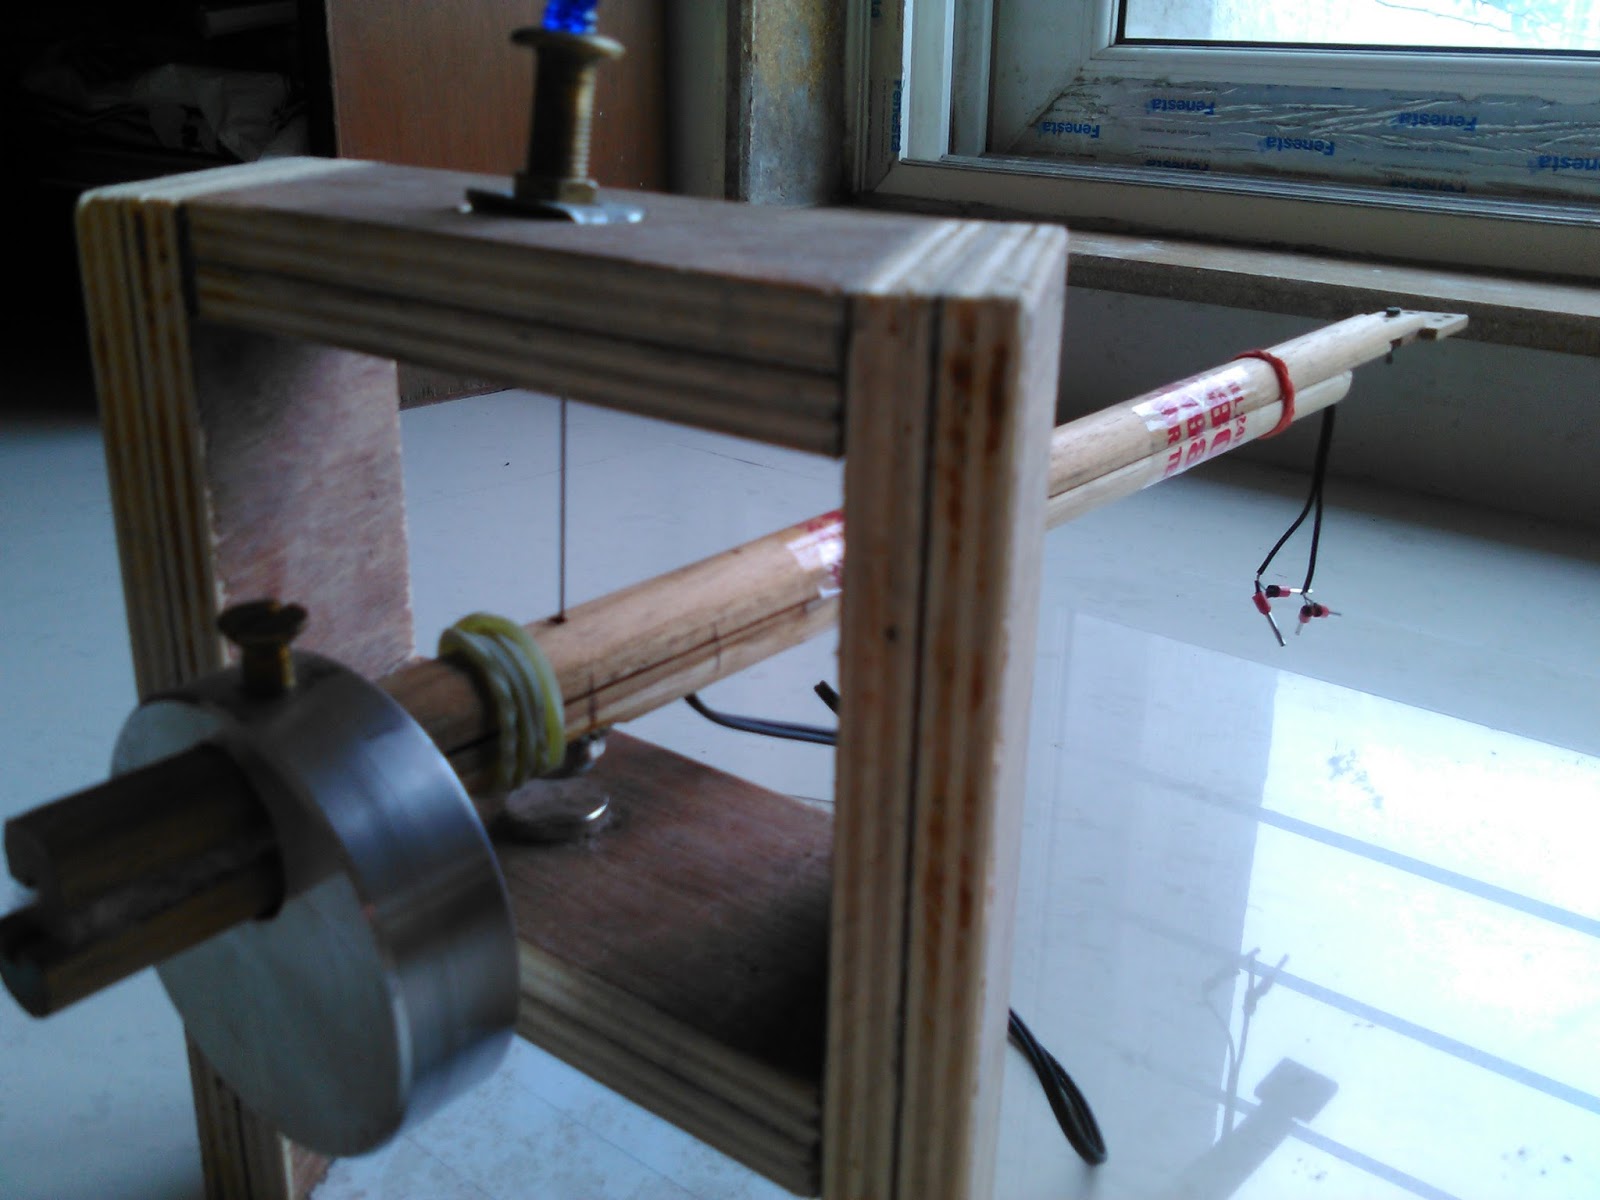
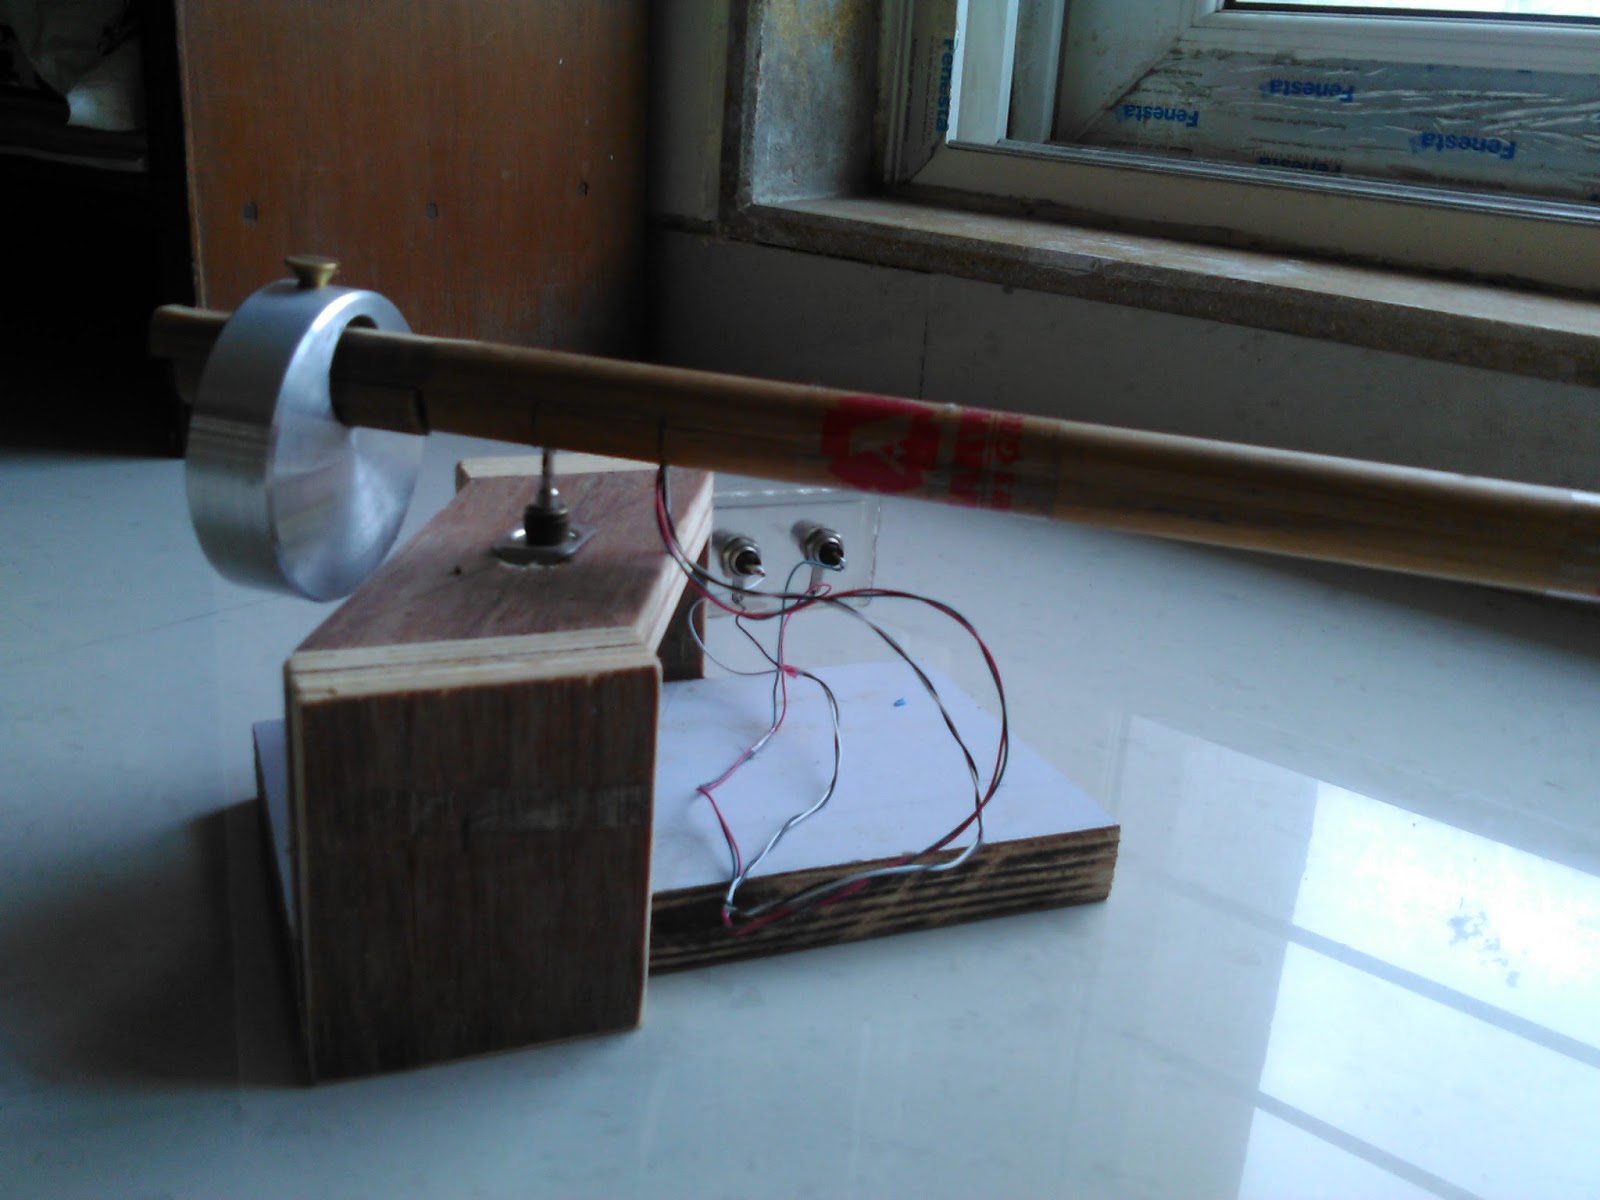
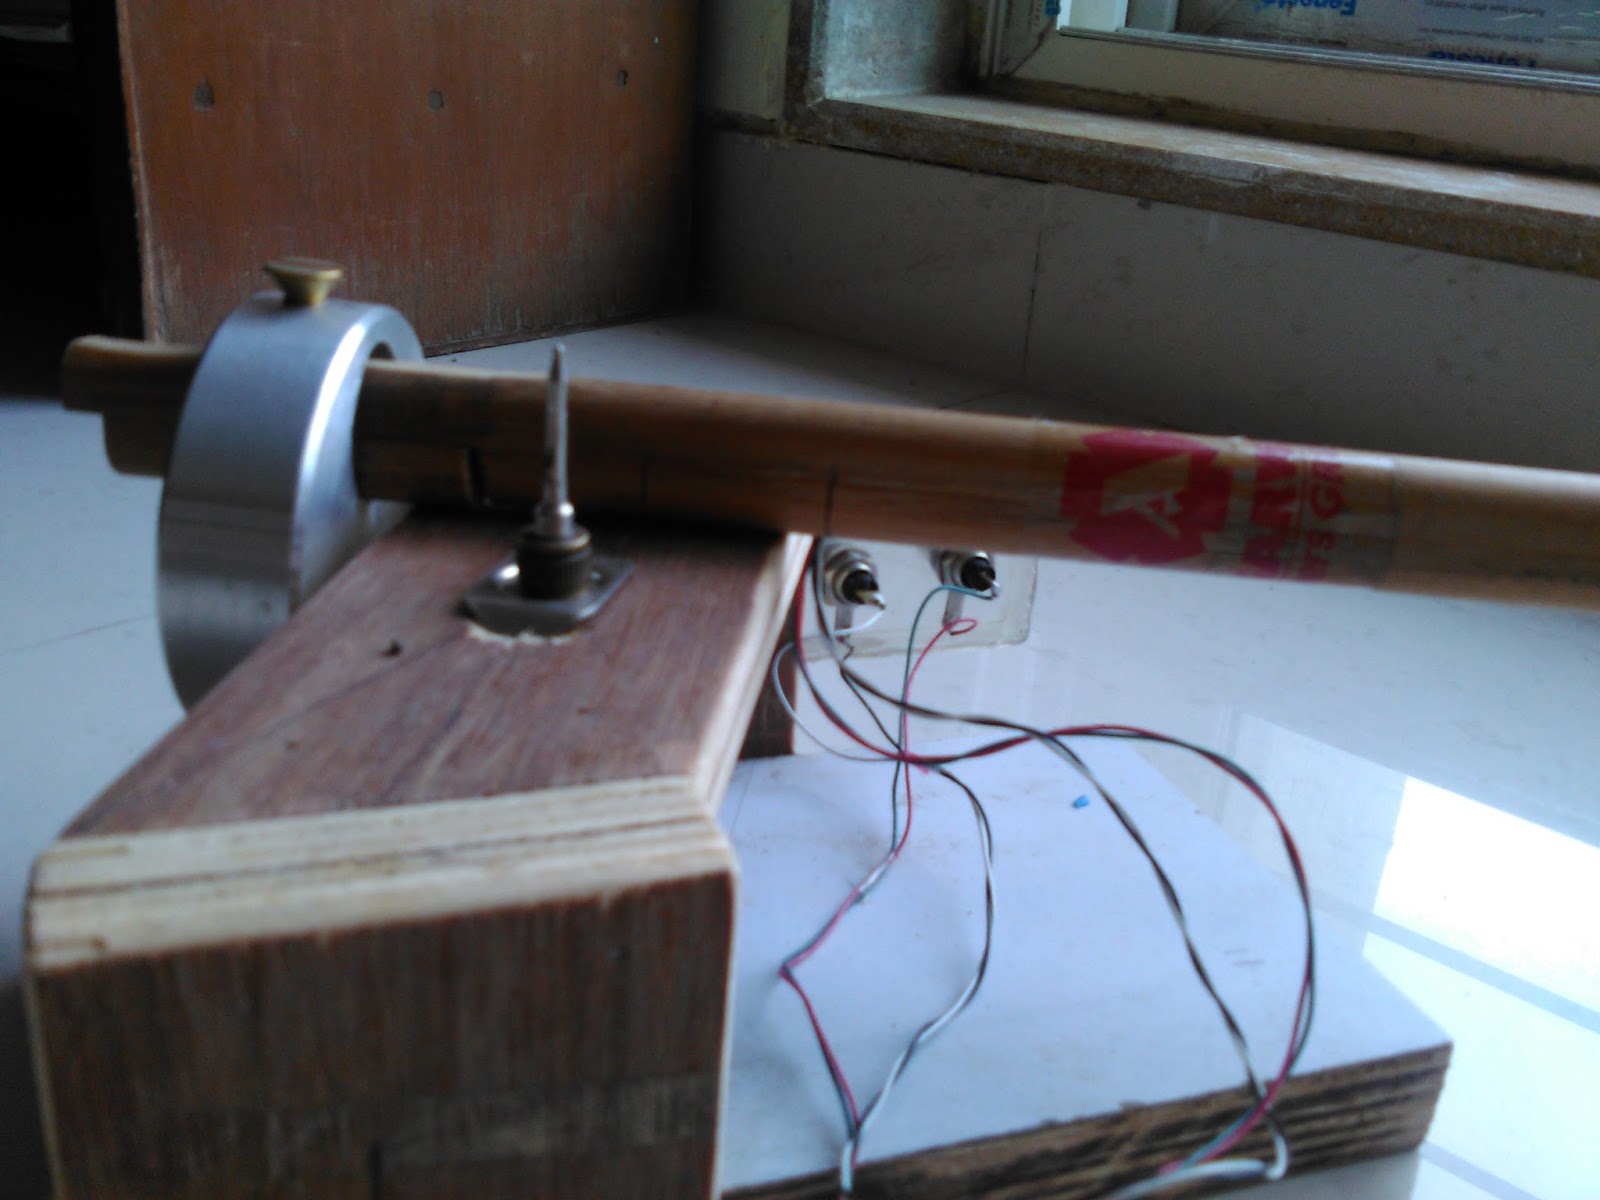
What if I replace those two magnets by a rubber band below the wand, but keep all other design identical. Magnet attracting each other in Schroeder's design provides the damping and bearing. But in case of feedback (movement)coming from records via stylus moves magnet in wand away from magnet on baseplate. This movement actually increase gap between centre point on magnet surfaces and hence decreases attraction force.
But, if I put rubber band instead, any movement will increase pull in the rubber band so, it should work better. Am I missing or mis understanding something?

I know a rubber band or a rubber string will induce more friction than free air magnets but if I am right in assuming rubber band works better or equal in terms of damping and tension force, friction can be a workable compromise as the design will be much simpler than uni-pivot (may be).
And hooking a rubber band will not infer much noise I think.

Design drawing is still in my head, will come to paper soon.
I want to make such a design which can try my idea first and then go for Schroeder clone if I fail.
I will update you all from then on.
Till then give your suggestions/comments/ideas.
 
@Sumanta: you'll need to keep on replacing the rubber band. They have very short life, especially when under constant stress.

Also, the neodymium magnet grade N52 used by many Schroeder clone builders is a very, very strong magnet. If one puts two such magnets together, one cannot pull them apart by hand. The only way to separate them is to slide them apart. It means that a magnetically suspended bearing made from such strong magnets behaves like a very rigid bearing, though not as much as a gimball bearing, but certainly as good if not better than, unipivots. I'm not sure if you'll be able to achieve that sort of rigidity with rubber bands.
 
Actually, the pivot point bearing should be as rigid as possible in regards to its movement. Yet it should ideally be friction less for both vertical and horizontal rotations.
now, if the above statement is correct and unipivot is a compromise, then how about having a stiff string with a pivot point(somehow and have the wand there).
So, then, I understand how successful Schroeder's design is.
I will try with magnet of hard drive, they are quite strong. In qualitative measurement (?), two broken parts of those magnet too can't be separated by hand. Sliding them apart is the only way.
 
Kindly have a re-look at the way I have made the female bearing. It's just a piece of brass on which I had punched a conical indentation. The inside surface of the conical indentation (I'm not calling it a hole as it doesn't go all the way to the other surface) is very smooth as it h was hammered with a sturdy centre punch.

The male bearing is the tip of a ball pen. Ball pen tips are usually made of some tungsten alloy, very, very hard and finely finished with super tight tolerances (proof: even five rupees ball pens write smoothly).

There is no doubt some friction exists between the mating parts but it is really almost negligible. Both vertical and horizontal movements are absolutely smooth with no notchiness at any point. Just to be sure, one can lubricate with something like watch oil, but I didn't even bother to do that though I have the watch oil. If this part is a deal breaker for you, I'll make one and send it to you.

So I would say your doubt is unfounded. Yes, one can use jewel bearings for the female, and it will likely work even better, but if you read through the Nanook thread many have simply made holes on the underside of the arm tube, and put two-part plastic glue which they shape before the glue dries. I was fairly sure the outcome would be cruder than the punched brass plate, which was why I went to the extent of making the brass part.
 
Rubber band will deteriorate fast and gradual diminishing pull across entire record is doubtful. All tonearms can be compromise. A unipivot is as simple as it gets with just single point friction. Some people do not prefer antiskating at all. Search for Title with PDFs of following article. In the past I had downloaded them and made a small book to read at leisure.

1) Pickup arm design techniques - Tejinder Singh Randhawa
2) A New Turntable Arm Design - Edgar Villchur (AR Turntable Designer)
3) The Skating Force Phenomenon - James H. Kogen
4) Skating Force and antiskating - lynn_sarah2011 Download here
Following are related and good read too.
5) Understanding Phono Cartridge - S. K. Pramanik
6) High Fidelity Phono Cartridge : Here

Regards
 
A possible project for you, Sumanta:

https://youtu.be/FJGkZwNpkDY

It's deviously simple looking but absolutely innovative. This is a linear tracking tonearm which doesn't use air suspension, nor ball or roller bearings, but simple water suspension. It can be made with readily available materials. There is lots of interest and efforts being put into making a tangential tracking tonearm that avoids servo mechanisms, air bearing pumps, and multiple bearing joints with elliptical travel paths. The mechanics are usually very complex, and the mathematics is even less well understood.

What this water suspended tangential tracker does is avoid all those complications and made a daringly simple one. And it works. Like a dream.

Listen to the quality of sound even on the YouTube video - it's stunningly pure.

This is most likely my next tonearm project.
 
Last edited:
The thread linked below is probably the bleeding edge (outside of professional tonearm designers) in knowledge in the field of tangential tracking arms which DO NOT use air bearing.

Angling for 90 - tangential pivot tonearms - diyAudio

Some well known tonearm authorities also participate in the discussions. When you have lots of free time please go through it.

Yes, I read it. Went green seeing depth of knowledge and capability in making things of their own. But is too much for me.
 
Yesterday, I took a hard drive internal to take out the magnet of it.

I have collected nozzle of cycle tube which can be used for hanging the string for Schroeder with vertical movement and anti skating arrangement tuning.
For string, I tried cables of bikes as they are thinner. I had tried taking off most of the wires to bring flexibility in twisting. It is not up to the mark. But if an arm is of 12" length, anti skating is not required. I gathered or looked for some other bits and pieces too thinking they can be used for making the base, poles, cantilevers.

I thought for possible configuration of the base and the whole arrangement. Having two properly shaped magnet (without buying) and holding them and the string is still a problem yet to be properly solved by me.

I also bought a piece of wood bit to make the arm. The carpenter happily made a groove in the center of the bit on the flat face.

I thought, following JLS001's advice of trying uni pivot first.
So, I cut the bit in two halves one of 15" and the other of 17". Flat surface of the bid is not at all flat. It will be a problem (work) for me or a carpenter. Let's see.
I made a nearly 1" long hole on the top part to hold the cartridge holder.

JLS001's post is super helpful.

I have got a Brass screw holder which was used in the hard drive which I will be using as the female bearing on top part of the arm.

I now have to make the cartridge holder first.
Similar to JLS001, I will use wires of a headphone.
Thank you Joshua, Hiten and everybody else for immense help and for sharing your knowledge.
 
My biggest problem in near future will be to weigh things and VTF. I do not have any weighing machine to measure grams. I have to request some jewelry shop or someone who uses such a machine.
 
My biggest problem in near future will be to weigh things and VTF. I do not have any weighing machine to measure grams. I have to request some jewelry shop or someone who uses such a machine.

Digital jeweller's scale are cheap:

0.01 - 200g Digital Jeweler Jewellery Weight Weighing Pocket Scale - 28 | eBay Mobile

I got mine some years back from an eBay seller in Rajkot for about Rs 400 plus shipping. Works very well and has resolution of 0.01 gram. I used Sachin's mod to be able to weigh cartridge tracking weight at the correct height (namely, at record surface level).
 
Talking of counterweights, it is best to have the counterweight as close to the pivot point (after it is balanced) instead of having it riding at the end of the counterweight stub of the arm. When it is placed closer to the fulcrum/pivot, the moment of inertia is lesser. A higher moment of inertia will make the arm more lethargic. Lower will make it more agile and able to react faster to vertical and horizontal forces acting on it.

The counterweight I'm using on my Nanook arm is about 110 grams. I made a second one weighing 140 grams but it's too heavy and can't balance this arm.
 
Schoreder tonearm is complex for first timers. It has many hidden secrets, adjustments etc. I am not discouraging you not to try this, but some simpler uni-pivots like Nanook's 219, and some linear trackers(without air bearing ) are easy to DIY and very good.

Regards
Sachin
 
Talking of counterweights, it is best to have the counterweight as close to the pivot point (after it is balanced) instead of having it riding at the end of the counterweight stub of the arm. When it is placed closer to the fulcrum/pivot, the moment of inertia is lesser. A higher moment of inertia will make the arm more lethargic. Lower will make it more agile and able to react faster to vertical and horizontal forces acting on it.

The counterweight I'm using on my Nanook arm is about 110 grams. I made a second one weighing 140 grams but it's too heavy and can't balance this arm.

Yes my idea is to do so too.
 
Schoreder tonearm is complex for first timers. It has many hidden secrets, adjustments etc. I am not discouraging you not to try this, but some simpler uni-pivots like Nanook's 219, and some linear trackers(without air bearing ) are easy to DIY and very good.

Regards
Sachin

Already started that way.
Schroeder design can be simple too, and already has examples there in diyaudio.
I think expections makes it complicated as well.
 
Bad news!
While plucking out the female bearing from the wider arm, I accidentally stuck a screw inside the bearing and that screw got fixed there. It has broken from its edge and remain inside the bearing.
I had another harddrive to get another bearing but unfortunately its part is designed differently.

Need to find or make a female bearing now :-{(
 
Here are some shots of what I have done on my two tone arm DIY so far.

They use simple cycle tube nozzle and its holder, a refll top for the uni pivot shat and bearing. I have used a star head (octagon head) screw as a female bearing. which I screwed in on the bottom of top wooden bid.

For the magnetic uni pivot design, I got magnets locally in Baroda. I increased their net strength by adding broken magnets of hard drives. they are quite strong.

I am yet to set final weight balance. I am actually not progressing further as I do not have space to place these arms in the setup here. I am waiting for an active cross over which can make space by taking the graphic equalizer somewher else. One try of the active cross over project failed miserably already.
Me and my friends are trying to make one but it will take time.

In the mean time if any of you wants to take them to make good use of it. Feel free to contact me.


20150917073239.jpg


20150917073448.jpg


20150917073543.jpg


20150917073601.jpg


20150917073856.jpg


20150917073830.jpg


20150917073239.jpg
 
Fascinating to see so many people building tonearms today. During the actual vinyl days there were several students building them at our college. One even built a very good copy of the SME arm ! They were lucky, we had a very good workshop and encouragement from the staff !
My turntable used the motor assembly from a Garrard with a large wooden platter on it ( with a felt mat) and a home made tone arm. Worked quite well. Had a Shure M55 on it. There was a record clamp at the center . Just a large heavy metal disc.The whole assembly was isolated from the main chassis made of wood using springs. Th earm's vertical movement was made using watch makers steel screws with a conical depression on one end. The shaft was made of a thin steel rod ground to a conical end on each side. Worked quite well. The sideways movement was handled by a good (small) regular ball bearing.It was sealed on either side and had practically no play . Original SKF I think. Pity I didn't bother to take pictures ! I had fluid damping also at the base of the tone arm! The tone arm itself was a regular 8mm aluminum tube with a 3mm sheet metal headshell with holes drilled in it to reduce the weight.Today you have all the tried and tested cartridge positions for minimum tracking distortion. We calculated them from formulae at that time ! :)

Best of luck to all of you building the tone arm and the turntable. It's great fun !
 
Last edited:
The Marantz PM7000N offers big, spacious and insightful sound, class-leading clarity and a solid streaming platform in a award winning package.
Back
Top