mpasanthosh
Active Member
Hey everyone, I have made lots of good friends through the forum and really appreciate that the forum has been helpful to me in many ways.
I wanted to create a thread with respect to the work performed in a BX300 which would be useful for rest/fellow members who are into DIY and can take up the repair job on their own.
Interest in Tapes & Decks:
My uncle in Salem used to own a shop in the first floor of Maruti complex, Opp New Bus Stand Salem. He used to retail tapes, CDs and records.
Back in those days he had built his own tape deck and also assembled speakers with Bolton Drivers, we used to play tapes and enjoy music in our farm house in Salem. I was a kid back then and would fiddle with the decks now and then when he goes away, afraid I might get scolding for fiddling with his stuff.
Over period of age I lost interest in Tapes and moved to Digital media completely.
I used to discuss with @Hassan Khani about Tamil CDs and stuff, he sort of like kindled the lost interest in tapes and some how I started getting an urge to buy a tape deck and listen to the tapes which I had. This started with the Sansui D-100.
Later I moved on to other decks from Nakamichi, based on feedback from @Hassan Khani, and yes they do sound very good.
The pain being finding them in a good condition.
Would also like to thank @NakTech the technical guru for these tape decks and would value his suggestions and advice, still remember the day I was taking apart my first Sankyo mechanism with him in video call. Also got to know @Technics_Fan fellow member of our forum who resides near my place. We used to have late night calls discussing about the technicalities, really thankful to him for his time and support for the same.
@Hassan Khani is a very patient and nice person to talk to, we had discussions ranging couple of hours each day, some tracking through service manual, and others about technicalities alignment etc. It was a pleasure getting introduced back into the analog world, without his guidance I would have never entered the tape route, neither got a deck to listen to the tapes.
Tools Required:
WHS-300 Alignement Gauge
Test Tapes
Oscilloscope
Mirror Tape
Tone Generator/PC Based/Mobile Based - provided you can verify the Sine Wave in the Oscilloscope to see if it is fine.
Torque Meter
To calibrate a tape deck to spec you would need all seven tools listed above.
The BX-300 I got had the following issues.
1. The buttons in front panel were sloppy to respond and sometimes would be non-responsive completely.
2. The record mode would not function
3. Once issue 2 was fixed it would record one channel but the other channel would erase with no recording at all.
4. Input sliders would not attenuate the input signal to zero.
5. Counter LED would not light up remains off always
6. Pinch rollers damaged leading to tape path issues
7. The Back tension belt was eaten
The mechanism when removed is easier to work on, in the BX300, the front fascia needs to be removed or moved in a 45 degree so that the mechanism can pulled out.
The Sankyo Mechanism usually has the following molex connectors:
1. Play Back Head
2. Erase Head
3. Record Head
4. Power supply for Reel, Cam, DD Drive
5. Leaf Switch Molex Connector
It is easy to go through the schematics and make your way you, it has a clear picture on how the molex connectors are connected and the colour wiring description for the same.
Mechanism Removed Outside:
Back Tension Belt Eaten:
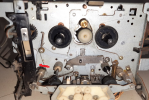
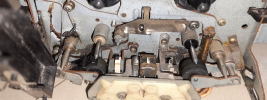
I had remove the pinch rollers and other the head block assembly to clean up the mess and install a new back tension belt.
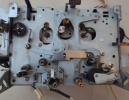
Front Part of the mechanism with most parts removed.
Picture of the mechanism after cleaning dirt and grime.
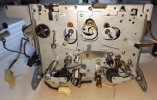
The leaf switches used for Cam Control were also rusty and oxidised, had cleaned them with high grit sandpaper 5000 grit.
Condition of the Leaf Switches:
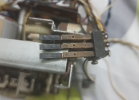
Condition of the leaf switches post cleaning:
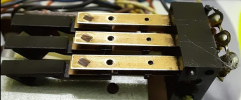
Condition of input sliders:
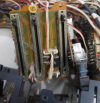
These sliders control the input volume attenuation and also the output volume control.
Post Cleaning:
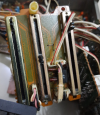
The Innards of the Front Panel were also dusty and I had it cleaned.
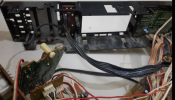
Tape Type Selector Switches:
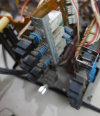
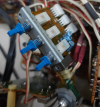
These motors have the dead spot syndrome as highlighted by Umesh as well.
I still find it best to have the motor replaced complete rather than restore it.
The motors can be cleaned by removed the shaft out and using a Dremel tool, to clean the commutator and the brushes.
Pic of commutator before rework:
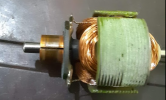
After polishing it with Dremel:
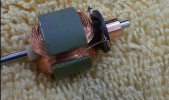
The same procedure will apply for the CAM motor as well.
To get the reel motor outside you need to remove the flywheels and the DD drive assembly outside.
The cam motor is the easiest to access, you can remove it by removing a screw in the front and one in the rear holding the CAM motor in place.
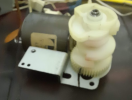
Ensure you get CAM Gear Marked as the position should stay in place when you put it back.
Picture of the mechanism once you put everything back, I have cable tied the stray hanging wires.
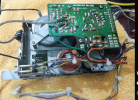
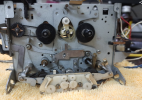
Note: The back tension belt is installed in place, I have removed the Idler Tyre and performed the Idler Gear Mod.
The hubs have to be changed to use the Idler Gear instead of the the Idler tyre.
The DD drive shafts are lubricated with oil supplied by my friend Chandrukasirajan, the characteristics are very similar to the one used by Nakamichi - Anderol.
Once this was done I moved over to the electronic issues:
1. The buttons in front panel were sloppy to respond and sometimes would be non-responsive completely [Replaced Logic IC]
2. The record mode would not function [Replaced Logic IC]
3. Once issue 2 was fixed it would record one channel but the other channel would erase with no recording at all. [Replaced Analog Switching IC]
4. Input sliders would not attenuate the input signal to zero. [The sliders ground pin was damaged so signal would never attenuate to zero ended up replacing the sliders].
5. Counter LED would not light up remains off always [Replaced counter drive IC]
6. Pinch rollers damaged leading to tape path issues [New pinch rollers used]
7. The Back tension belt was eaten [Replaced Back Tension Belt]
Picture of the deck post rework, I also painted the top cover lid matt black as it was very rusty earlier.

Calibration instructions are detailed in service manual.
Usually the play back torque is adjusted a torque meter, play back torque is 50gm and the back tension is around 6 to 8gm.
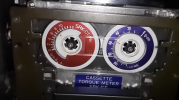
To align the azimuth you can also use the XY Mode in Oscilloscope:
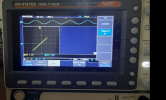
There is a very minimal loss in HF in one channel, frequency response plot below, but I am not sure if I will ever get a new Play Back head for the deck in mint condition.
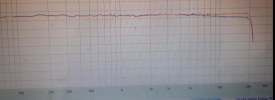
A good head will have a nice response all the way till 22k.
I wanted to create a thread with respect to the work performed in a BX300 which would be useful for rest/fellow members who are into DIY and can take up the repair job on their own.
Interest in Tapes & Decks:
My uncle in Salem used to own a shop in the first floor of Maruti complex, Opp New Bus Stand Salem. He used to retail tapes, CDs and records.
Back in those days he had built his own tape deck and also assembled speakers with Bolton Drivers, we used to play tapes and enjoy music in our farm house in Salem. I was a kid back then and would fiddle with the decks now and then when he goes away, afraid I might get scolding for fiddling with his stuff.
Over period of age I lost interest in Tapes and moved to Digital media completely.
I used to discuss with @Hassan Khani about Tamil CDs and stuff, he sort of like kindled the lost interest in tapes and some how I started getting an urge to buy a tape deck and listen to the tapes which I had. This started with the Sansui D-100.
Later I moved on to other decks from Nakamichi, based on feedback from @Hassan Khani, and yes they do sound very good.
The pain being finding them in a good condition.
Would also like to thank @NakTech the technical guru for these tape decks and would value his suggestions and advice, still remember the day I was taking apart my first Sankyo mechanism with him in video call. Also got to know @Technics_Fan fellow member of our forum who resides near my place. We used to have late night calls discussing about the technicalities, really thankful to him for his time and support for the same.
@Hassan Khani is a very patient and nice person to talk to, we had discussions ranging couple of hours each day, some tracking through service manual, and others about technicalities alignment etc. It was a pleasure getting introduced back into the analog world, without his guidance I would have never entered the tape route, neither got a deck to listen to the tapes.
Tools Required:
WHS-300 Alignement Gauge
Test Tapes
Oscilloscope
Mirror Tape
Tone Generator/PC Based/Mobile Based - provided you can verify the Sine Wave in the Oscilloscope to see if it is fine.
Torque Meter
To calibrate a tape deck to spec you would need all seven tools listed above.
The BX-300 I got had the following issues.
1. The buttons in front panel were sloppy to respond and sometimes would be non-responsive completely.
2. The record mode would not function
3. Once issue 2 was fixed it would record one channel but the other channel would erase with no recording at all.
4. Input sliders would not attenuate the input signal to zero.
5. Counter LED would not light up remains off always
6. Pinch rollers damaged leading to tape path issues
7. The Back tension belt was eaten
The mechanism when removed is easier to work on, in the BX300, the front fascia needs to be removed or moved in a 45 degree so that the mechanism can pulled out.
The Sankyo Mechanism usually has the following molex connectors:
1. Play Back Head
2. Erase Head
3. Record Head
4. Power supply for Reel, Cam, DD Drive
5. Leaf Switch Molex Connector
It is easy to go through the schematics and make your way you, it has a clear picture on how the molex connectors are connected and the colour wiring description for the same.
Mechanism Removed Outside:
Back Tension Belt Eaten:


I had remove the pinch rollers and other the head block assembly to clean up the mess and install a new back tension belt.

Front Part of the mechanism with most parts removed.
Picture of the mechanism after cleaning dirt and grime.

The leaf switches used for Cam Control were also rusty and oxidised, had cleaned them with high grit sandpaper 5000 grit.
Condition of the Leaf Switches:

Condition of the leaf switches post cleaning:

Condition of input sliders:

These sliders control the input volume attenuation and also the output volume control.
Post Cleaning:

The Innards of the Front Panel were also dusty and I had it cleaned.

Tape Type Selector Switches:


These motors have the dead spot syndrome as highlighted by Umesh as well.
I still find it best to have the motor replaced complete rather than restore it.
The motors can be cleaned by removed the shaft out and using a Dremel tool, to clean the commutator and the brushes.
Pic of commutator before rework:

After polishing it with Dremel:

The same procedure will apply for the CAM motor as well.
To get the reel motor outside you need to remove the flywheels and the DD drive assembly outside.
The cam motor is the easiest to access, you can remove it by removing a screw in the front and one in the rear holding the CAM motor in place.

Ensure you get CAM Gear Marked as the position should stay in place when you put it back.
Picture of the mechanism once you put everything back, I have cable tied the stray hanging wires.


Note: The back tension belt is installed in place, I have removed the Idler Tyre and performed the Idler Gear Mod.
The hubs have to be changed to use the Idler Gear instead of the the Idler tyre.
The DD drive shafts are lubricated with oil supplied by my friend Chandrukasirajan, the characteristics are very similar to the one used by Nakamichi - Anderol.
Once this was done I moved over to the electronic issues:
1. The buttons in front panel were sloppy to respond and sometimes would be non-responsive completely [Replaced Logic IC]
2. The record mode would not function [Replaced Logic IC]
3. Once issue 2 was fixed it would record one channel but the other channel would erase with no recording at all. [Replaced Analog Switching IC]
4. Input sliders would not attenuate the input signal to zero. [The sliders ground pin was damaged so signal would never attenuate to zero ended up replacing the sliders].
5. Counter LED would not light up remains off always [Replaced counter drive IC]
6. Pinch rollers damaged leading to tape path issues [New pinch rollers used]
7. The Back tension belt was eaten [Replaced Back Tension Belt]
Picture of the deck post rework, I also painted the top cover lid matt black as it was very rusty earlier.

Calibration instructions are detailed in service manual.
Usually the play back torque is adjusted a torque meter, play back torque is 50gm and the back tension is around 6 to 8gm.

To align the azimuth you can also use the XY Mode in Oscilloscope:

There is a very minimal loss in HF in one channel, frequency response plot below, but I am not sure if I will ever get a new Play Back head for the deck in mint condition.

A good head will have a nice response all the way till 22k.


