Cabinet Build For GR Group Buy Kits

Hello all


so here are some Work in progress pics

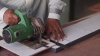
The cabs were cut at my vendors facility using FELDER automated precision machinery

Double front and rear baffles were used
Extensive bracing was done and cab design was changed from the stock one provided by GR research
(sincere thanks to Mr Khushro Jilla for the design inputs)
I think we used a total of 32 screws per cab

the Empty cabinet weighs 9 kgs PER cab ( 18kgs for the pair of bookshelves )

No rez ( the 1 inch thick damping material )
was cut on a reciprocating saw for clean cuts

Internal wire is 16 gauge multistrand silver plated OFC
Mogami

I made 4 pairs of cabs for friends ( joshua,sridhar and madurai1974 and myslef

My personal cab does not use the stock binding posts
I have changed them to something better
(pics later)


P.S thanks to Joshua for the lovely solderable gold plated lugs
(The crimp-able ones i have never liked)

P.S : most of all my thanks to Mr Danny Richie for making this available at a super cost

The facility


My work


( my personal cab design is a bit more complex - those pics later )

No rez


All of us friends will be going all out and have planned a lick-able high gloss scarlet red paint job
(fingers crossed for that )
will upload pics when done

edit : spoke to danny who gave me a few tips
will get those done and repost pics
 
Last edited:
Hi Guys
I am in the process of putting the No rez on side walls and realised I ordered only 1 sheet and it is not sufficient to put on all 3 walls (2 sides and back) for my X-Ls Encore Floor standers. Can anyone recommend some alternative which can go along with No Rez. Do we need to tightly pack all the three walls with No Rez leaving the braces or leaving gaps would be alright?

After measuring it multiple times, I concluded that the sheet will be insufficient to completely cover all the inside walls for the X-LS Encore, so I took a hard decision to use normal foam (of about 1 inch thickness) wherever it was needed. After sticking it all up, what remained uncovered was:

Speaker 1:
top baffle (between the front baffle and bracing structure for top baffle, as well as this bracing to back baffle)

Speaker 2:
bottom baffle -- between front baffle and bracing

Luckily for me, magma had some NoRez left over from his builds so all my inner surfaces are covered.

I fitted the x-overs (permanently), and temporarily fitted drivers and binding posts and powered it up briefly - it made some agreeable noise:)

Speakers now handed over to magma for final painting.

Some tips for folks who are yet to make the NoRez cut:

1) repeat your measurements twice to cross check

2) make old newspaper cutouts of the measurements and test fit

3) cutting the NoRez: is tough because the bitumen-like black damping layer is quite hard. Use a fresh paper-cutting blade. Mark the cutting lines with a medium marker pen. Cut through the paper layer, then carefully cut the damping layer. Don't cut deep, just aim to cut through the damping layer. After you cut through the damping layer, place the NoRez on a flat surface with an edge - like a wooden stool. Align the cutting line to the edge of the stool. Put one more layer on top of the NoRez - say a thick magazine. Align this edge too. Use the paper blade to cut through the foam part of the NoRez in one swift motion, using the edge of the stool and the edge of the magazine as guide.

4) Cutting round holes: you need to be accurate in cutting off the damping layer of NoRez for the round hole for the ports. But it is OK to be inaccurate while cutting the foam part since you can easily push in the plastic pipe into the foam.

5) Binding posts: do a test fit of the binding post into the cutout in the baffle. If the inner surface of the binding post is flush with the inner surface of the baffle, you don't have to cut out round holes in the NoRez for the binding post. Just make a small cut out for the input cable to pass through. In my case, since the rear baffle is extra thick (one and half inch), there is lot of gap between the inner surface of the binding post and the inner surface of the baffle.

6) Don't throw away the small pieces of NoRez left over after your cut. They can be carefully arranged to cover smaller surfaces.
 
Here's a picture showing the cut NoRez (for the side baffles).

01cutnorez.jpg


Here's the NoRez fixed on one speaker:

05xovertestfitafternore.jpg


A peek into the x-over. Note the damping on bottom baffle (below the two twisted wires) is a quilt patchwork. The other side is even more colourful:) :

06xoverscreweddown.jpg
 
I too had a lot of difficulty cutting the NoRez. Manage to mess the cuts on a couple of pieces before getting it right. The bitumen layer at the back of the No-Rez is difficult to cut.

I used a
My carpenter said that he could cut into just the bitumen sheet at the back of NoRez using a electric circular saw, gave it a shot and it worked out nicely. After which used a sharp knife to cut the sponge.

I also used an online Panel Cut Optimizer to reduce wastage:

Free Online Panel Cut Optimizer

Here are a couple of pics of the Nor-Rez being cut and piled:
 

Attachments

  • P1011986.jpg
    P1011986.jpg
    21.2 KB · Views: 181
Last edited:
Can anyone recommend some alternative which can go along with No Rez. Do we need to tightly pack all the three walls with No Rez leaving the braces or leaving gaps would be alright?

No Rez in a combination of bitumen sheet for damping and spongy material for absorbing the standing waves. For proper effect, the entire cabinet must be covered with No Rez. If you do not have sufficient quantity, a combination of Bitumen sheets and firm sponge/Glasswool/Recron (did I spell it right?) can be used IMO.
 
No Rez in a combination of bitumen sheet for damping and spongy material for absorbing the standing waves. For proper effect, the entire cabinet must be covered with No Rez. If you do not have sufficient quantity, a combination of Bitumen sheets and firm sponge/Glasswool/Recron (did I spell it right?) can be used IMO.

Thanks Captain, I am too short of No Rez since I went for the Floor stander. I'll cover the top part completely with No Rez for both the speakers and towards the bottom, for the remaining area, I'll use bitumen sheets with Glasswool/sponge etc.
 
Thanks Captain, I am too short of No Rez since I went for the Floor stander. I'll cover the top part completely with No Rez for both the speakers and towards the bottom, for the remaining area, I'll use bitumen sheets with Glasswool/sponge etc.

While doing my first build of the N2X even I fell short of the NoRez. I wrote to Danny and this is what he replied.

N2X Build
 
Hey guys, could you please post a snaps of the front baffle of the speakers showing the radius that Danny had mentioned on the inner side of the woofer hole? It would really help.

Does the radius and round over mean the same thing or are they different?

Also, is a similar radius or round over required for the front baffle of the subwoofer as well?

And if we choose to double the thickness of the subwoofer cabinet walls, would we need to change the dimensions of the radius or round over of the inner side?

Thanks!
 
Hey guys, could you please post a snaps of the front baffle of the speakers showing the radius that Danny had mentioned on the inner side of the woofer hole? It would really help.

.....
Thanks!
Not sure what you are asking, see the link which i had given in post 21. The pictures of my build is available there including the front baffles.
 
Not sure what you are asking, see the link which i had given in post 21. The pictures of my build is available there including the front baffles.

Thanks, I meant what Danny mentions here in Magma's LS-Encore build:
X-LS Encore Build from India
Welcome to AC.

One thing I noticed is that the through hole for the woofer lacks a radius on the back side. This is actually very crucial. If not done then it negatively effects the woofers response. And if the front baffle gets thicker then the radius on the back side needs to increase as well.

I made note of it now in Red on the cabinet plans. http://gr-research.com/pdf/X-LS Encore box.pdf

I am not sure if that is applicable to N3 as well. I am guessing Danny means for us to have a round over and/or radius (I don't know the difference :() of the inner side of the woofer hole, so was looking for confirmation of that and some snaps if it had been done by some of the early starters.

Cheers!
 
Join WhatsApp group to get HiFiMART.com Offers & Deals delivered to your smartphone!
Back
Top