You are using an out of date browser. It may not display this or other websites correctly.
You should upgrade or use an alternative browser.
You should upgrade or use an alternative browser.
Tymphany custom OEM surplus drivers group buy
- Thread starter linuxguru
- Start date

soundnovice
Active Member
A simple pencil design is enough for small full range drivers. I don't think much can be expected with any complex box design
Siva appears to have gotten busy. He isn't logged in since 6th evening. I had pinged him on 7th but obviously he hasn't seen it. Unable to reach him even on telephone; neither call nor SMS. Hope everything is well at his side.
Folks, just bear with me - I'm down with a viral, but should be better before the weekend. I hope to clear the backlog of shipments for those who've already paid, before accepting fresh orders - which I'll reopen ASAP, say by next week.
Atanu's measurements of the T/S parameters show these to be remarkably close to the published T/S params at Parts Express. Those who're using sims and spreadsheets can therefore rely on the T/S parameters being accurate - this would open up the possibility of doing advanced and non-traditional designs if the sims allow. It's probably worth looking at OB and mini-resonator type cabinets also.
Atanu's measurements of the T/S parameters show these to be remarkably close to the published T/S params at Parts Express. Those who're using sims and spreadsheets can therefore rely on the T/S parameters being accurate - this would open up the possibility of doing advanced and non-traditional designs if the sims allow. It's probably worth looking at OB and mini-resonator type cabinets also.
musiklava79
Active Member
A Preview - foam core board Mini Karlsonator using single Tymphany 3.5" driver. Only one enclosure completed so far. The second one will be ready in a couple of days.
The best sounding of the foam core board designs I've built so far!


linuxguru keeps mentioning the Mini K so often that I had to try out this design. Let's hope the snapshots will help him feel better and hasten his recovery!!
The best sounding of the foam core board designs I've built so far!


linuxguru keeps mentioning the Mini K so often that I had to try out this design. Let's hope the snapshots will help him feel better and hasten his recovery!!
A Preview - foam core board Mini Karlsonator using single Tymphany 3.5" driver. Only one enclosure completed so far. The second one will be ready in a couple of days.
The best sounding of the foam core board designs I've built so far!
@musiklava
There are so many different versions of mini karlsonators on the diyaudio forum that I am confused which dimensions are suitable for Tymphany and the one that you built it. It would be helpful if you can point me to the foam board cut dimensions for the 10mm thickness.
musiklava79
Active Member
@musiklava
There are so many different versions of mini karlsonators on the diyaudio forum that I am confused which dimensions are suitable for Tymphany and the one that you built it. It would be helpful if you can point me to the foam board cut dimensions for the 10mm thickness.
Hi manniraj,
I was actually planning to post all the details and snapshots in the FC thread after I completed the full build. Nevertheless...
I built the 0.4x scale Mini K that was posted by xrk971 in diyaudio. you'll find the details here -
Mini Karlsonator (0.53X) with Dual TC9FD's - Page 16 - diyAudio
I followed the plans that were posted here -
Mini Karlsonator (0.53X) with Dual TC9FD's - Page 56 - diyAudio
Post #552, 556 and 559. Just ignore the plans for the wing in Post #552. It was altered in Post #556.
There's an interesting variation of the same plans that shows the angles of various panels here -
Mini Karlsonator (0.53X) with Dual TC9FD's - Page 110 - diyAudio
Post #1096
There are many snapshots posted by different members that show the construction steps. These can act as a guide. Here is one posted by the OP himself showing the steps (Post #1147)
Mini Karlsonator (0.53X) with Dual TC9FD's - Page 115 - diyAudio
Have you already bought the 10 mm thick FC board? If so, you'll have to alter all panel sizes to allow for the 10 mm thickness. As far as my memory serves me, I don't recall any instance of 10 mm FC board being used. The original plans are for 5 mm thick FC boards. So effectively, the internal dimensions will change as will the outer dimensions in the same proportions.
I think you should try out the full-size scale drawing on graph paper by factoring in the FC board thickness and you'll get an accurate measurement of the panel sizes for cutting. You can then use this scale drawing for tracing the layout diagram on the side panel. Also, if you've decided to use 10 mm thick FC board, I'll also suggest that you do the baffle panel section by section, because it may be difficult to bend the thick board. You can cut the complete baffle panel, the horizontal vent piece and the vertical rear partition in three parts. That will make it easier for you to glue them to the side panel. Use a set square from a student geometry box to ensure that the panels are 90 degrees to the side panel when you glue the sections. You can hold the panels in place by using masking tape when you glue the sections.
Regards,
ML
PS :- I forgot to mention this. You don't need to glue an additional panel at the back of the driver cut out. The 10 mm board is thick enough!!
 hyeah:
Last edited:
Ok I did a single mini karlsonator today and I must admit that its not easy with the cuts/angles as per the dimensions of the 0.53x version. I heard it over my Yamaha RX-571 and the stereo/music in pure direct mode is sweet, clear and good base for its size. But I felt like it could be difficult to make with wood for its size and minute angles when compared to my Frugal Horns build ")
Here are the pictures.
Here are the pictures.
Attachments

Last edited:
musiklava79
Active Member
Hi manniraj,
That was fast work indeed!! :clapping:
Even I didn't finish my build in one day flat! It looks very well executed. Are you planning to do the second enclosure too? Give the drivers some time to break in and you'll get some good SQ from these speakers. It's not too hard to work in the close spaces once you get a hang of how to do it.
How did you glue the panels? Obviously with a glue gun since you finished so quickly! It looks neatly done. Just make sure that there're no leaks.
That was fast work indeed!! :clapping:
Even I didn't finish my build in one day flat! It looks very well executed. Are you planning to do the second enclosure too? Give the drivers some time to break in and you'll get some good SQ from these speakers. It's not too hard to work in the close spaces once you get a hang of how to do it.
How did you glue the panels? Obviously with a glue gun since you finished so quickly!
It looks neatly done. Just make sure that there're no leaks.
Last edited:
Hi manniraj,
That was fast work indeed!! :clapping:
Even I didn't finish my build in one day flat! It looks very well executed. Are you planning to do the second enclosure too? Give the drivers some time to break in and you'll get some good SQ from these speakers. It's not too hard to work in the close spaces once you get a hang of how to do it.
How did you glue the panels? Obviously with a glue gun since you finished so quickly!
I got the foam core boards from the store which I posted earlier in the thread. I got hold of only one white and the other one is actually slightly different one with a black color normally used for notice boards. I got a silicon gel from the same store and glued it directly without any glue gun. I made sure that there are no gaps and if any filled it up with silicon and extra gaps with the foam board. Obviously the MDF one will usually look and work great, so not decided to stick to the foam board but once the time permits would prefer to do the wood build and use it with my HT system
")
Anyone for an OB using the Tymphany? Here's a proven design:
Fast, fun, Inexpensive OB project - Page 46 - diyAudio
Now, if only there's a local source for the Peerless woofer:licklips:
Fast, fun, Inexpensive OB project - Page 46 - diyAudio
Now, if only there's a local source for the Peerless woofer:licklips:
Sorry folks, still down with the viral but browsing the forums occasionally. Here's a link to a posting at diyAudio about the DIY Audio Ottawa event earlier this month:
DIY Audio Ottawa 21-22 Feb 2015 - Page 12 - diyAudio
If you look at the photos, there's at least one pair of large Cornu spirals (in rectangular form factor - a bit more challenging than the default square Cornus), as well as a small bookshelf with the Kevlar-cone Tymphanys (maybe an advanced folded MLTL or horn, can't make out from the pic).
Now, if only there's a local source for the Peerless woofer:licklips:
All the posts pertaining the Peerless drivers have been branched out as a separate thread. Members may continue their discussions regarding Peerless drivers there: http://www.hifivision.com/diy/57189-peerless-drivers-ob-speakers.html
Last edited:
Update: I've resumed shipping the drivers, and will continue clearing the backlog this week.
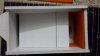
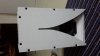
I also received the first pair of the production version of the MLTL cabinet, based on the folded TABAQ, with modifications for 2x 12-ohm Tymphany drivers (I'll call this the TYMPHAQ2 for convenience). I've assembled one unit for testing with 2x drivers in parallel and BSC network (same as the earlier one for the TABAQ with a single 6-ohm driver - 0.75 mH || 5 ohm || 0.47uF). My initial audible impression of the first prototype is that the bass extension is more solid in the TYMPHAQ2 compared to the TABAQ, and the response seems to be flatter without any audible brightness in the mids or highs - i.e. more accurate overall. It also gains on power handling (60W rms vs. 30W rms) and distortion at any given power (cone displacement runs about 30% lower at any given power, since there are two drivers).
Pics show the TYMPHAQ2 without and with the front dust baffle installed:


Those in or near Chennai who are interested in the cabinets may PM or email me at siva dot chander at gmail dot com. These weigh about 4 kg each (without drivers/BSC) and are bulky, so I can't easily ship them out, but they may be picked up locally at Chennai. Additional cabinets should be available within a week or two.
I also received the first pair of the production version of the MLTL cabinet, based on the folded TABAQ, with modifications for 2x 12-ohm Tymphany drivers (I'll call this the TYMPHAQ2 for convenience). I've assembled one unit for testing with 2x drivers in parallel and BSC network (same as the earlier one for the TABAQ with a single 6-ohm driver - 0.75 mH || 5 ohm || 0.47uF). My initial audible impression of the first prototype is that the bass extension is more solid in the TYMPHAQ2 compared to the TABAQ, and the response seems to be flatter without any audible brightness in the mids or highs - i.e. more accurate overall. It also gains on power handling (60W rms vs. 30W rms) and distortion at any given power (cone displacement runs about 30% lower at any given power, since there are two drivers).
Pics show the TYMPHAQ2 without and with the front dust baffle installed:
Those in or near Chennai who are interested in the cabinets may PM or email me at siva dot chander at gmail dot com. These weigh about 4 kg each (without drivers/BSC) and are bulky, so I can't easily ship them out, but they may be picked up locally at Chennai. Additional cabinets should be available within a week or two.
keith_correa
Well-Known Member
Siva, the boxes look very good!!
Can you share more information?
CSA and length of the line?
Position of the midpoint between the drivers from inner top?
Terminus size?
Stuffing?
Can you share more information?
CSA and length of the line?
Position of the midpoint between the drivers from inner top?
Terminus size?
Stuffing?
Buy from India's official online dealer!