Dear friends,
With music streaming maturing and becoming almost defacto option for many, the latency plays a big role in enabling good quality playback. Many number of solutions are available and generally Linux is regarded as the best OS though some great windows solutions are available, but, windows needs humungous effort.
Much has been done on the linux front, especially with SBCs (Single-Board Computer) like raspberry pi becoming very popular.
Many readymade solutions like Volumio, MoOde Audio, Picoreplayer, Dietpi etc are available for raspberry pi including its own native OS combined with mpd players that needs some knowledge of linux to do.
Diretta developed by a Japanese individual is not new and has been around for a few years, but has caught attention in the last 2 to 3 years. It is not a playback solution, but provides a very low latency solution handover of music bits from the source to the DAC. It is purely ethernet driven and runs on IPV6 protocol.
For more details of its topology, visit https://www.diretta.link/
Diretta is not open source and is only available as an embedded option to install within gentooplayer (https://gentooplayers.com/) and Audiolinux (https://www.audio-linux.com/) or with some other hardware streamers like SoTM and others (all quite expensive).
But they at present have an option to try it for free (trial) on Rapberry pi 5 and will only work on USB DACs. The playback is restricted to 44.1khz files being a trial.
Following are the steps to try it for free.
Hardware:
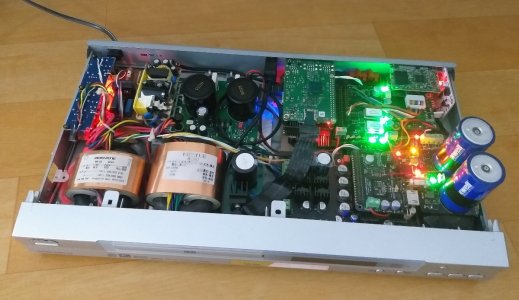
1. Raspberry pi 5
2. Laptop or a PC running Windows 10 or 11
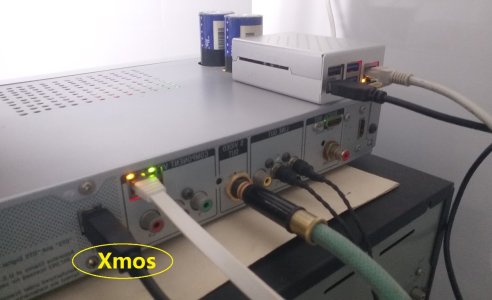
3. USB to ethernet adapter (Optional), You can also use your laptop’s in-built ethernet adapter
4. An ethernet cable (preferably crossover cable) to connect the raspberry pi directly to USB/ethernet adapter connected to the laptop
5. USB DAC is mandatory
Software Must:
Download the following two files from https://www.diretta.link/preview/
diretta_RaspberryPi5_limited - image file
DirettaASIOdriver_2_143_2 - An executable file that you need to run on your windows laptop and follow the instructions there-in
Download Balena Etcher - https://etcher.balena.io/
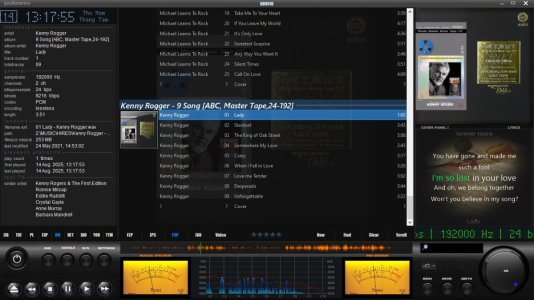
Download Foobar2000 - https://www.foobar2000.org/download (You can either download and install a full version or just download and run a portable version)
or Download trial version of JRiver Media Center - https://jriver.com/download.html
JRiver is better as it already comes with inbuilt support for ASIO drivers.
Installation: Do it the same order as below
1. Write the diretta_RaspberryPi5_limited image to a microSD card using Balena Etcher (it will throw an error after running the verification process, ignore it).
2. Connect the USB cable between the USB 2 port of raspberry pi and the USB port of your DAC and power on the DAC and select the input option as USB in the DAC. If you DAC has a display, it will show a connection established.
3. Insert the SD card into the pi 5 and power it on. When you see both green and red light lit-up after a minute or so, it means the pi has booted successfully.
4. Whichever ethernet port you will be using on your laptop, for it uncheck all except IPV6 in its network adapter properties. This step is important, though not mandatory as Diretta will only use the IPV6 pipeline. You may also do the folliwing......Inside the “Advanced” window, untick the “automatic metric” and put “100” in the field “Interface metric”. Once it is done, click on ok and close all open windows.

5. You may choose to stay connected to your router via wifi if you plan to play files from network (NAS). If you are only going to play files from your laptop hard drive or a pen drive, you maybe disable or disconnect from wifi. I recommend disable wifi and play music files locally.
6. Next run an ethernet cable between the above used ethernet port (IPV6) of your laptop and the raspberry pi’s ethernet port.
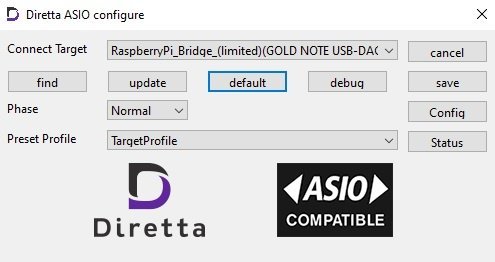
7. Now install the DirettaASIOdriver_2_143_2 file in the laptop. After installation, run the Diretta ASIO Configuration file (you can search for it in the windows search button). When it opens, click the Find button and then the Connect Target drop down menu to select the raspberry pi as the target. For additional settings, you can click the Config button and see.
8. If you have successfully reached till above, then you are all set to play music files
9. Install Foobar and install ASIO component from its repository. You can download the ASIO component for foobar from the link below and install it. https://www.foobar2000.org/components/view/foo_out_asio
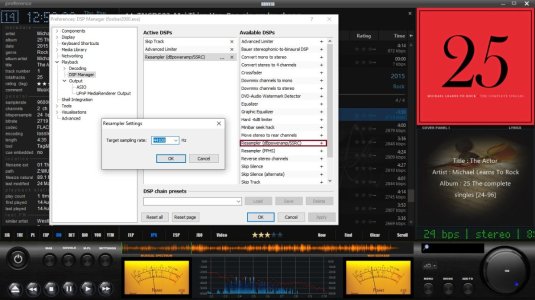
10. Once ASIO is installed, restart foobar (it will normally start automatically). Now if ASIO component is properly added, in the Device Output option (under Library/Configure/Output), choose Diretta ASIO as the output. You can also set priority to realtime in the ASIO Setting option.
11. Now import your playlist or select the music files of your choice and play and experience Diretta.
12. If you have installed JRiver, so dont need any add-ons, under Output, choose Diretta ASIO.
Here is a schematic in its simplicity

Hope this helps.
Do post your queries and comments if you could try it out.
With music streaming maturing and becoming almost defacto option for many, the latency plays a big role in enabling good quality playback. Many number of solutions are available and generally Linux is regarded as the best OS though some great windows solutions are available, but, windows needs humungous effort.
Much has been done on the linux front, especially with SBCs (Single-Board Computer) like raspberry pi becoming very popular.
Many readymade solutions like Volumio, MoOde Audio, Picoreplayer, Dietpi etc are available for raspberry pi including its own native OS combined with mpd players that needs some knowledge of linux to do.
Diretta developed by a Japanese individual is not new and has been around for a few years, but has caught attention in the last 2 to 3 years. It is not a playback solution, but provides a very low latency solution handover of music bits from the source to the DAC. It is purely ethernet driven and runs on IPV6 protocol.
For more details of its topology, visit https://www.diretta.link/
Diretta is not open source and is only available as an embedded option to install within gentooplayer (https://gentooplayers.com/) and Audiolinux (https://www.audio-linux.com/) or with some other hardware streamers like SoTM and others (all quite expensive).
But they at present have an option to try it for free (trial) on Rapberry pi 5 and will only work on USB DACs. The playback is restricted to 44.1khz files being a trial.
Following are the steps to try it for free.
Hardware:
1. Raspberry pi 5
2. Laptop or a PC running Windows 10 or 11
3. USB to ethernet adapter (Optional), You can also use your laptop’s in-built ethernet adapter
4. An ethernet cable (preferably crossover cable) to connect the raspberry pi directly to USB/ethernet adapter connected to the laptop
5. USB DAC is mandatory
Software Must:
Download the following two files from https://www.diretta.link/preview/
diretta_RaspberryPi5_limited - image file
DirettaASIOdriver_2_143_2 - An executable file that you need to run on your windows laptop and follow the instructions there-in
Download Balena Etcher - https://etcher.balena.io/
Download Foobar2000 - https://www.foobar2000.org/download (You can either download and install a full version or just download and run a portable version)
or Download trial version of JRiver Media Center - https://jriver.com/download.html
JRiver is better as it already comes with inbuilt support for ASIO drivers.
Installation: Do it the same order as below
1. Write the diretta_RaspberryPi5_limited image to a microSD card using Balena Etcher (it will throw an error after running the verification process, ignore it).
2. Connect the USB cable between the USB 2 port of raspberry pi and the USB port of your DAC and power on the DAC and select the input option as USB in the DAC. If you DAC has a display, it will show a connection established.
3. Insert the SD card into the pi 5 and power it on. When you see both green and red light lit-up after a minute or so, it means the pi has booted successfully.
4. Whichever ethernet port you will be using on your laptop, for it uncheck all except IPV6 in its network adapter properties. This step is important, though not mandatory as Diretta will only use the IPV6 pipeline. You may also do the folliwing......Inside the “Advanced” window, untick the “automatic metric” and put “100” in the field “Interface metric”. Once it is done, click on ok and close all open windows.
5. You may choose to stay connected to your router via wifi if you plan to play files from network (NAS). If you are only going to play files from your laptop hard drive or a pen drive, you maybe disable or disconnect from wifi. I recommend disable wifi and play music files locally.
6. Next run an ethernet cable between the above used ethernet port (IPV6) of your laptop and the raspberry pi’s ethernet port.
7. Now install the DirettaASIOdriver_2_143_2 file in the laptop. After installation, run the Diretta ASIO Configuration file (you can search for it in the windows search button). When it opens, click the Find button and then the Connect Target drop down menu to select the raspberry pi as the target. For additional settings, you can click the Config button and see.
8. If you have successfully reached till above, then you are all set to play music files
9. Install Foobar and install ASIO component from its repository. You can download the ASIO component for foobar from the link below and install it. https://www.foobar2000.org/components/view/foo_out_asio
10. Once ASIO is installed, restart foobar (it will normally start automatically). Now if ASIO component is properly added, in the Device Output option (under Library/Configure/Output), choose Diretta ASIO as the output. You can also set priority to realtime in the ASIO Setting option.
11. Now import your playlist or select the music files of your choice and play and experience Diretta.
12. If you have installed JRiver, so dont need any add-ons, under Output, choose Diretta ASIO.
Here is a schematic in its simplicity
Hope this helps.
Do post your queries and comments if you could try it out.