Full Range Standmount using Boston HQ48414P driver

aashish351

Well-Known Member
Joined
Oct 14, 2009
Messages
585
Points
63
Location
Gurgaon
Hi All,

DIY audio is a strange addiction. Despite failed & average attempts, you keep going at it. Here is the latest one I have started. It started with spotting a sale thread of the Philips Hi-Q type driver from Boston Acoustics (HQ48414P) by FM Analogadikt. I thought I would lay low on DIY for some time after the moderate to negligible success of my 3" full range TL project and a very poorly attempted open baffle, but, there is something about full-range single-driver crossover-less speakers that simply appeals to me a lot. To ensure the relative success of this project, I have completely relied on the design/construction details from the suggested chapter of Philips "Building Hi-Fi Speakers" book. This was kindly shared by FM analogadikt as part of the driver sale and he has been extremely helpful in clarifying any doubts I have had along the way. The driver model used by Philips for the project is the MC9710 which is supposed to be same as the HQ48414P. Here are the specification of the Boston driver (you can also check out the sale thread for the pictures of driver http://www.hifivision.com/sale-owner/58043-3-pairs-boston-8-full-range-drivers.html):

RMS power 25 watts
Max power 40 watts
Impedance 8 Ohms
SPL @ 1W/1m 93 dB

The portion of the book I received is sufficient and excellent at describing how to go about the cabinet build and I have been following it almost to the script. The only difference is that I am using 18mm MDF instead of 15mm as suggested in the book. But the internal dimensions are the same as recommended. So are the port dimensions, place of mounting driver and port etc. I might experiment with the stuffing a little based on the end result. The design allows for screwing the front baffle on battens using a foam gasket so that it can be opened for changes to stuffing or service. And the battens based design is very intelligent as it allows screws to be inserted from inside (except the baffle) which keeps the exterior look clean.

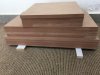
The dimensions of the finished box will be 546 x 336 x 314 (HWD). I am also constructing a suitable height stand with the leftover MDF. Some initial pictures are attached here. The remaining in larger size will be posted as a Google photos album link soon as the project moves along.

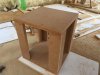
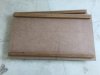
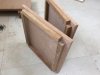
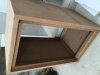
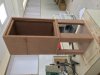
The first picture is of course the MDF cut into the required panels for two boxes. The second picture is the stand roughly 350mm high taking the total height of the speaker to 900mm to keep the driver at ear level. The stand top and bottom plate dimensions are the same as the enclosure to keep the profile same. But I will finish the stands in plain black and the enclosures in a better way (still to decide). The third & fourth picture is of the sides and bottom panels with battens fixed and the last one is these panels fixed together. Next will be the back and lastly front baffle. I am waiting for the terminals and port tubes to be delivered for making accurate cutouts before getting those panels fixed.

Cost of the project so far:
Drivers: 1000
MDF Sheet: 1350
Terminals, Port tubes, Foam Gasket: 1000 (Diyaudiocart)
 

Attachments

  • IMG_0140.jpg
    IMG_0140.jpg
    20.2 KB · Views: 913
  • IMG_0142.jpg
    IMG_0142.jpg
    16.9 KB · Views: 902
  • IMG_0144.jpg
    IMG_0144.jpg
    13 KB · Views: 892
  • IMG_0145.jpg
    IMG_0145.jpg
    13.2 KB · Views: 900
  • IMG_0146.jpg
    IMG_0146.jpg
    13.4 KB · Views: 906
I loved your first two sentences! Cause they are so true.

congratulations on your built in advance. They surely looks to be sounding great as well.
If it is okay with you and Analogadikt, you may share the same book to people interested in making one.

Waiting for the next phase of the story and photos.
 
Thanks Sumanta! I will ask FM analogadikt about the text. I also searched and found a complete version on Scribd. It is a different edition i think but essentially the same book, 'Building HiFi Speakers' by M.D. Hull.

In the meantime... Attached is the picture of the current total work. Sorry there is no option to rotate on the forum. Will make the album soon.

I can't proceed till I receive the port tubes and terminals. After which, the rectangular cutout will be made on the rear walls. I will send the front baffles to a lathe shop for Driver and Port Tube cutouts. I will then do a loose fitting of driver, port, terminals to make sure there is no major gap. Followed by finishing by painter. The stands have been already started - plain black enamel. Steps: sanding, wood putty, sanding, two coats of paint.
 

Attachments

  • IMG_0150.jpg
    IMG_0150.jpg
    14.6 KB · Views: 880
Thanks Sumanta! I will ask FM analogadikt about the text. I also searched and found a complete version on Scribd. It is a different edition i think but essentially the same book, 'Building HiFi Speakers' by M.D. Hull.

Thanks, it will be useful for someone who wants to make a cabinet speaker.
I still am enjoying free sounds:) in my OBs.

How will you isolate speakers from the stand and then from the ground?
 
I think a felt mat or flat rubber feet between speaker and stand. And adjustable spikes or subwoofer type rubber feet for stands.
 
Point contact isolators are better.
You probably can stack records within those stands, helps both ways.
 
Hi aashish351

I wanted to try speakers with full rangers and the sales thread by FM Analogadikt was good starting point for it.

I have got the cabinets built by a carpenter based on dimensions in book given by FM Analogadikt.
Foam sheets,terminals,Port tube (made out of PVC pipe) were sourced locally.
The cabinet finishing is balance for which i have ordered vinyl laminate sheets from diyaudiocart.

I now realize that i could have gone ahead with painting in place of laminate to save on cost and avoid cuttings of vinyl laminate involved.
Meanwhile i have loose fitted the drivers on the cabinets and playing them through Fiio E5 headphone amplifier :) as i still have to buy amplifier.

Even with this low powered amp the cabinets are able to produce sound in a quite room. Placed on the floor near wall the bass is too much i feel.

Thanks for the pictures of the stand,it will be next thing to be done once i am finished with the cabinet exteriors and buying amp.
 
No further development except, the enamel paint finishing on stands (see album below). I don't like the result. The painting of stands in this way was also a trial and I will have to consider more costly options - veneer, PU spray paint, duco, cloth covering (as in PA speakers).

The baffles have gone for driver and port tube cut outs on a lathe machine. Will add the pictures to the album once I get them back.

Full size photo album of the build is shared here: https://plus.google.com/photos/1123...ms/6149399455209839201?authkey=CMD0uOL6xY3jTA
 
Drivers = Rs.990.

Baffle cut out on a lathe exactly as per your dimensions = Rs.500

The saddening and disappointing expression on your face when you put the two together to realize you gave wrong dimensions = Priceless.

Yes, it wouldn't have been my DIY build project if there were no blunders. The cut outs are a good 5-6mm larger that means I gave the diameter a good 10-12 mm more than it was (see the second last picture in the album: https://plus.google.com/photos/1123...ms/6149399455209839201?authkey=CMD0uOL6xY3jTA).

My options:
1) I have some MDF left which has enough length for new baffles but the width of the left over MDF is 3-4mm less on either side (last picture). It will still rest on the battens but the overlap is less. I will discuss with carpenter if the overlap is enough for screws.

2) Reduce the width and length of new baffle a bit more (enough for screws). Fix the new (narrow) baffle on top of the old baffle (new one outside) and get correct dia cut outs made. It will become a double thickness baffle (36mm!!).

3) Take a square MDF piece (large enough to have enough overlap) and make the correct dia cut out. Fix it on the back of the old baffle. Increase the wrong cut out on the old baffle equal to the driver out dia so that it can sit within it.

I hope I have been able to explain the options. Which of these should offer the least compromise in the design?
 
good build
nice !!!
i like

mistakes are pretty normal
the jugaad is now the fun part


driver cost 900 bucks

the rest of the stuff will end up costing what 10 times that ?
 
Hi aashish351

I wanted to try speakers with full rangers and the sales thread by FM Analogadikt was good starting point for it.

I have got the cabinets built by a carpenter based on dimensions in book given by FM Analogadikt.
Foam sheets,terminals,Port tube (made out of PVC pipe) were sourced locally.
The cabinet finishing is balance for which i have ordered vinyl laminate sheets from diyaudiocart.

I now realize that i could have gone ahead with painting in place of laminate to save on cost and avoid cuttings of vinyl laminate involved.
Meanwhile i have loose fitted the drivers on the cabinets and playing them through Fiio E5 headphone amplifier :) as i still have to buy amplifier.

Even with this low powered amp the cabinets are able to produce sound in a quite room. Placed on the floor near wall the bass is too much i feel.

Thanks for the pictures of the stand,it will be next thing to be done once i am finished with the cabinet exteriors and buying amp.

You are welcome. Try to put them on sturdy chairs to hear how it might sound with stands. Also, I am guessing you have not built any Baffle Step Compensation circuit. Do you hear a harshness or aggressiveness in mid-range/vocal?
 
I loved your first two sentences! Cause they are so true.

congratulations on your built in advance. They surely looks to be sounding great as well.
If it is okay with you and Analogadikt, you may share the same book to people interested in making one.

Waiting for the next phase of the story and photos.

You can PM me your mail ID so I can mail this cab details to you. Or if you want to look at all the 17 projects in the book, you can download it from the source Aashish has identified.

@ Aashish,

You are making great progress. Try playing around with cab damping.

Regards,
 
Congrats dear and thanks for sharing your project details.

This is nice to see another DIY lover.

I am also trying to built one set of floor standing 3way speakers but enable to get source of good budget drivers and xovers for the same. I would be thanks full in anybody can help me out on that.

Enjoy..
 
You are welcome. Try to put them on sturdy chairs to hear how it might sound with stands. Also, I am guessing you have not built any Baffle Step Compensation circuit. Do you hear a harshness or aggressiveness in mid-range/vocal?

Sorry to hear about your baffle cuts outs.

If i were in your kind of situation i would have gone ahead with option 1 , the gap can always be filled with some filler material.


about your question on harness in vocal:

I listened to Anoushka Shankar's album Traces of you & the stringed instruments in it sounded aggressive to me. Vocal sounded nice to me, i had listened to billy joel ,diana krall songs. Then I guess the upper midrange is aggressive. am i correct?
But then the the sounds of instruments like cymbal and bells were sounding weaker.
pls note i had placed cabinets very close to wall while music playback and i listened it playing thru less than a watt headphone amp.

I have not built any BSC circuit.
 
ImageUploadedByTapatalk1432050214.422666.jpg

The narrow front baffle loose fixed on battens to see how it will sit. The carpenter says there is enough overlap for screws (12 mm each side). And top and bottom is full 20mm overlap with battens. What do you all think?- should I reduce the top and bottom also to make the slit look same on all four sides or this is better?
 
Last edited:
It is a matter of personal taste. Do what you like. If you are planning a cloth grill there are two scenarios. One is a frame the size of your baffle with overlapping cloth that will show the thickness of your sidepanels. In the second option the cloth grill frame shall be as per the outer dimensions and hide the panel edges.

Regards,
 
I'm liking the way it is looking right now. I will have to make a grill as the driver is not really a work of art! So the grill will be such that it slides in the slit on the left and right just covering the baffle not the border. But this is for later.

The baffle is now ready with cut outs (pics below). ImageUploadedByTapatalk1432128991.835769.jpg
ImageUploadedByTapatalk1432129021.414063.jpg
I have not opted for flushing because the driver flange is 8-9mm which means the baffle groove will have only 8-9mm thickness left to hold the driver. I will consider putting a layer of veneer / felt/ ply to achieve flushing.
 
Order your Rega Turntables & Amplifiers from HiFiMART.com - India's reputed online dealer.
Back
Top