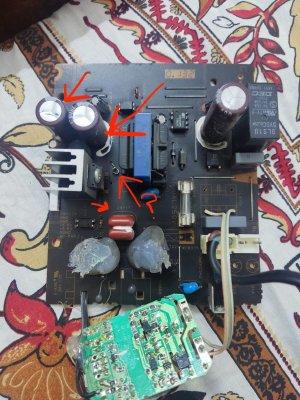
There are two caps on your video2 board. I purchased a cheap LC tester and had removed the two caps to test them. Those are film caps and very unlikely to fail in models like yours. Earlier Yamaha avrs used to have a single cap with IIRC 400v rating. Now there are 2 caps with the same rating in series and hence the rating becomes 800v. In your case you are not using those caps because you have another module taking mains supply directly bypassing the in-built SMPS.how did you test your caps on the power board?
because my situation is similar to the problem stated here : https://sterlingit.com.au/yamaha-am...g-on-rx-v3800-rx0v1900-and-many-other-models/
See this post
Help required to repair Yamaha AVR RX-V667
My Yamaha AVR Model RX-V667 started powering off automatically since few days back. It is very random. Sometimes it lasts for 3 hours and sometimes just for few minutes. The power off is due to some in-build protection based on microprocessor power control. I downloaded the service manual and...
")