
Hello Everyone,
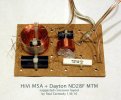
As to the next step in DIY hobby, I have decided to build 2-way bookshelf. I started searching for a proven design, most difficult thing is to get the parts used in the proven designs which is very difficult in Indian market. First I decided to go for parts express C-Note, suddenly waveguide tweeter gone out of stock in India, which put fullstop in that plan. Later after extensive searching I found Swope MTM is the design to go as my next project (parts available in India ).
).
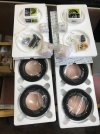
(Initially my plan was to go for TM version of the Swope which is simple and good for a beginner like me, After ordering and post receiving all the parts somehow I decide to go for MTM version and take the challenge. So bought another pair of drivers and its related crossover components.
I am planning to sell the unwanted unused crossover components in a separate sale thread, please look at it as well...
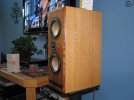
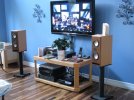
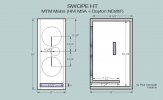
So now it is Swope MTM
I didn't find any thread for the same, but if someone has tried it before please give your valuable feedback...
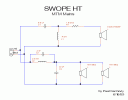
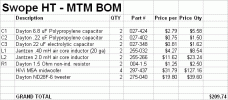
I am attaching related documents and links for the design.
1. Direct link to designer page here
2. Build thread by Designer here
As to the next step in DIY hobby, I have decided to build 2-way bookshelf. I started searching for a proven design, most difficult thing is to get the parts used in the proven designs which is very difficult in Indian market. First I decided to go for parts express C-Note, suddenly waveguide tweeter gone out of stock in India, which put fullstop in that plan. Later after extensive searching I found Swope MTM is the design to go as my next project (parts available in India
).(Initially my plan was to go for TM version of the Swope which is simple and good for a beginner like me, After ordering and post receiving all the parts somehow I decide to go for MTM version and take the challenge. So bought another pair of drivers and its related crossover components.
I am planning to sell the unwanted unused crossover components in a separate sale thread, please look at it as well...
So now it is Swope MTM
I didn't find any thread for the same, but if someone has tried it before please give your valuable feedback...
I am attaching related documents and links for the design.
1. Direct link to designer page here
2. Build thread by Designer here


.jpeg")

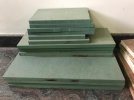
") . Going to rely on gasket tapes to reduce the wobble.Thankfully all the speakers that I doing now are surrounds and atmos (on 12mm ply sheets).. so not much of a worry about achieving a square or exact same volume on identical speakers. But, for serious builds, I would consider using dowels to get the square alignment in the absence of clamps.
. Going to rely on gasket tapes to reduce the wobble.Thankfully all the speakers that I doing now are surrounds and atmos (on 12mm ply sheets).. so not much of a worry about achieving a square or exact same volume on identical speakers. But, for serious builds, I would consider using dowels to get the square alignment in the absence of clamps.
.jpeg")

.jpeg")
.jpeg")