Gijo George
Active Member
Hi Guys
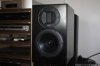
Trying to assemble the N2X kit from GR Research. XO's are ready with the first one done by Borg. Cabinets will be ready by today evening for painting. Giving it to a paint shop to get the Piano black finish. Few pics given below.
View attachment 5657
Need some advise on the soldering. Is the above soldering fine or do I need to redo it.
View attachment 5658
View attachment 5659
View attachment 5660
View attachment 5661
Thanks
Last edited:
 . All the other solder joints on that XO came out fine. Except this one coz it had four wires (inductor & cap leads and 2 speaker) in a cluster. Tied a small flexible copper wire around the four to hold it in place before welding it. But didn't get it right.