This post is an attempt to make people know about UNIX and also build a Raspberry PI streamer with the following attributes
What you need
I mentioned earlier that it is child's play using these devices. But the problem most people face is that they have never used Linux before. Even macbook users (mostly) don't know that most commands that work on Raspberry PI will work in their macbooks. Probably they have never used the terminal program or used online documentation known as Man Pages.
So without wasting time, let us first talk about installing the OS. Raspberry PI devices are made by Raspberry PI Foundation in association with Broadcom. They have dedicated engineers working on this. Apart from this there is a big pool of volunteers who work on this. The good thing is the kernel is mainlined. So the best choice of OS is always the official OS from Raspberry PI foundation. Let us download the OS from here
I see many users here referring to third party images from Volumio, Moode, Dietpi as Operating Systems for RPI. In reality these are official Raspberry PI debian OS bundled with many tools to configure the OS using a web browser. The problem with this approach is it takes time to develop and test. By the time these distributions are rolled out, the Raspberry PI image rolled out in this image is now an old image missing many updates. They however do serve a purpose. They make Raspberry PIs accessible to many who don't have the time or the fire in the belly to try out something new. Once you have downloaded the image from the above link, we need to burn it using any imaging software. It totally depends on which OS you are currently using. I will list for 3 type of users. Windows, Mac OS and Linux. I'm going to simplify a lot because it takes lot of effort to write. If you don't understand please ask. It will be easier to teach and learn that way. You need to put your micro sd card in a card reader and connect the card reader to your computer. Some card readers are usb based. Some computers come with a built in card reader.
Windows
Download any image burning software. Balena Etcher, Rufus and many others. You can also use the official imager from Raspberry PI. It is available for Windows, Mac and Linux. Follow this url https://www.raspberrypi.com/news/raspberry-pi-imager-imaging-utility/
Once you have downloaded and installed, you just need to run the program and follow onscreen instructions.
Linux and MacOS
You can download the raspberry PI imager from the link posted for windows. That is is the easy way if you are not familiar with Unix.
For those really want to know how to write data from one device to another, it is through a program known as dd. dd stands for disk to disk. All it requires is the input device and the output device and it will copy data from the input device to the output device. You can also give things like block size and a some kind of progress indicator.
In our case the input disk is the raspberry image that we downloaded. Let us assume that you downloaded this in /home/mbhangui/Downloads (linux) or /Users/mbhangui/Downloads (MacOS). We now need to run the terminal program. In the terminal program you run the below commands. I'm showing the terminal prompt as '$'. In your case the prompt displayed could be different.
Linux
MacOS
In both the cases (Linux and MacOS) the second command is unxz -c ... | dd of=. unxz is a program that can compress or decompress. When we use the -c option it uncompresses the raspberry pi image to the standard output. In the unix world all programs get a standard input which is your keyboard, standard output which is your display and standard error which is also your display. In unix you can build a chain where one command does it's special thing and passes on finished output to another command. This is every different than Windows where you write a big application which does everything. Unix is like a super hospital where you have doctors highly specialized in their fields. Any treatment might require a team of doctors to fix the patient. A windows hospital in contrast will be a hospital having one doctor who is a pathologist, gynecologists, surgeon, psychiatrist, radiologist all rolled into one. In the above case unxz program uncompresses the raspberrypi image to standard out (which is your display). The Pipe | symbol in unix redirects the input to the program on the right side of the pipe. In this case it is the dd program. So, in effect, we have redirected uncompressed image to the dd program which writes to the device specified by of=.
Now some pictures of my build. The case was donated by @KiranPS . The case is awesome. I was lucky he discarded this case for another display with better aspect ratio. So now this wonderful case is mine. The waveshare display was donated by @chander. This is a 400x1280 resolution (extremely strange resolution where width is smaller than height). This causes issue for many apps which require minimum of 600 as the height. But for my case where I use cantata as the main gui, this is not an issue. We will talk about setup in the next post.
Front side of the streamer with 400x1280 waveshare display

Top view

Rear view

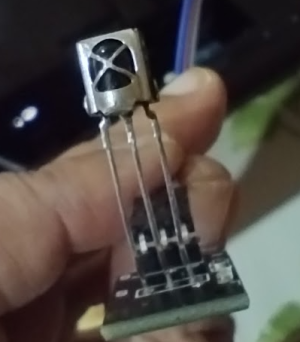
HX1838 VS1838 NEC Infrared IR Remote Control Sensor

IR sensor inserted inside the case from the bottom

IR sensor in action
 photos.app.goo.gl
The steamer in action, booting up, using the gui to play and control music. The song information comes like a blurb on all my devices and my laptops. So whatever computer is switched on in the house it will tell you the music that is being played in the house (you can call me crazy).
 photos.app.goo.gl
- Touch screen based. You can do everything using the touch screen. Play a song, pause it, shutdown the machine. Increase or decrease the screen brightness. Stream Spotify or Apple Music, Play songs from your local hard drive or any drive available on your Network
- Connect a IR receiver Diode to the GPIO pin and control your music playback using any spare remote that you have. You can use your TV remote, Apple TV remote, cd player remote or any damn remote you may be having. If you have any TV tuner cards that you used in your HTPC, then you can also use the USB IR receiver. If you don't have a USB IR, no problem. We will buy a IR sensor costing just Rs 32.00 like this. There is nothing more handy than using an actual remote to control music playback. Using app based control isn't as easy as using a real remote.
- Control Music From this Raspberry PI devices on all existing allo, volumio, moode players that you may be having with devices from PI2AES, Allo, HifiBerry, etc.
- Have a power button to turn on and off the devices. The power button will be connected to the RPI's GPIO pins to properly shutdown or wakeup the device.
- This device will have many things tuned to lower the noise floor. This will be important if you are going to connect an I2S or USB dac to this device In such cases it is important to turn off onboard wireless and bluetooth.
What you need
- Any raspberry PI. Preferrably model 3 and above
- A new micro sd card. It should be minimum class 10. Class 10 is a sd card that can atleast of doing IO rate of 10 megabytes per second (80 mega bits per second). You will also require a card reader to burn the image.
- Any spare remote that you have lying around (TV, CD, apple, etc)
- An IR sensore like HX1838 VS1838 NEC Infrared IR Wireless Remote sensor. You can get it for Rs 32 at robu.in
- A LCD display. I'm using LCD display gifted by Chander. It is 7.9" from waveshare. You can get any HDMI based display that works with RPI. Check evelta.com for different models.
- A two way power button with led. It should have six terminals at the back. We require two way because we want both startup and shutdown. Here is how this looks like this.
I mentioned earlier that it is child's play using these devices. But the problem most people face is that they have never used Linux before. Even macbook users (mostly) don't know that most commands that work on Raspberry PI will work in their macbooks. Probably they have never used the terminal program or used online documentation known as Man Pages.
So without wasting time, let us first talk about installing the OS. Raspberry PI devices are made by Raspberry PI Foundation in association with Broadcom. They have dedicated engineers working on this. Apart from this there is a big pool of volunteers who work on this. The good thing is the kernel is mainlined. So the best choice of OS is always the official OS from Raspberry PI foundation. Let us download the OS from here
I see many users here referring to third party images from Volumio, Moode, Dietpi as Operating Systems for RPI. In reality these are official Raspberry PI debian OS bundled with many tools to configure the OS using a web browser. The problem with this approach is it takes time to develop and test. By the time these distributions are rolled out, the Raspberry PI image rolled out in this image is now an old image missing many updates. They however do serve a purpose. They make Raspberry PIs accessible to many who don't have the time or the fire in the belly to try out something new. Once you have downloaded the image from the above link, we need to burn it using any imaging software. It totally depends on which OS you are currently using. I will list for 3 type of users. Windows, Mac OS and Linux. I'm going to simplify a lot because it takes lot of effort to write. If you don't understand please ask. It will be easier to teach and learn that way. You need to put your micro sd card in a card reader and connect the card reader to your computer. Some card readers are usb based. Some computers come with a built in card reader.
Windows
Download any image burning software. Balena Etcher, Rufus and many others. You can also use the official imager from Raspberry PI. It is available for Windows, Mac and Linux. Follow this url https://www.raspberrypi.com/news/raspberry-pi-imager-imaging-utility/
Once you have downloaded and installed, you just need to run the program and follow onscreen instructions.
Linux and MacOS
You can download the raspberry PI imager from the link posted for windows. That is is the easy way if you are not familiar with Unix.
For those really want to know how to write data from one device to another, it is through a program known as dd. dd stands for disk to disk. All it requires is the input device and the output device and it will copy data from the input device to the output device. You can also give things like block size and a some kind of progress indicator.
In our case the input disk is the raspberry image that we downloaded. Let us assume that you downloaded this in /home/mbhangui/Downloads (linux) or /Users/mbhangui/Downloads (MacOS). We now need to run the terminal program. In the terminal program you run the below commands. I'm showing the terminal prompt as '$'. In your case the prompt displayed could be different.
Linux
Run the command fdisk -l to list all disks connected to your computer. Look for a disk which has /dev/mmcblk0 or /dev/mmcblk1. Some card readers will give you a device like /dev/sdb, /dev/sdc, etc.
$ fdisk -l
The above command will print all disks. You can first run the above program without any SD card attached to your computer. Then run the above command with the SD card attached. The new device will be your SD card device. Let's say this is /dev/mmcblk0. So this is what we need to do to burn the image
$ cd /home/mbhangui/Downloads
$ unxz -c 2023-12-05-raspios-bookworm-arm64.img.xz | dd of=/dev/mmcblk0 bs=4M conv=fsync status=progress
$ sync
MacOS
Here we need to run diskutil command instead of fdisk
$ diskutil list
Let's say the device for your sd card was found as /dev/disk2. Then we just need to use /dev/rdisk2. If your new device is /dev/disk3, then we need to use /dev/rdisk3. We use the 'r' prefix to access the raw device.
$ cd /Users/mbhangui/Downloads
$ unxz -c 2023-12-05-raspios-bookworm-arm64.img.xz | dd of=/dev/rdisk2 bs=4m conv=fsync status=progress
$ sync
In both the cases (Linux and MacOS) the second command is unxz -c ... | dd of=. unxz is a program that can compress or decompress. When we use the -c option it uncompresses the raspberry pi image to the standard output. In the unix world all programs get a standard input which is your keyboard, standard output which is your display and standard error which is also your display. In unix you can build a chain where one command does it's special thing and passes on finished output to another command. This is every different than Windows where you write a big application which does everything. Unix is like a super hospital where you have doctors highly specialized in their fields. Any treatment might require a team of doctors to fix the patient. A windows hospital in contrast will be a hospital having one doctor who is a pathologist, gynecologists, surgeon, psychiatrist, radiologist all rolled into one. In the above case unxz program uncompresses the raspberrypi image to standard out (which is your display). The Pipe | symbol in unix redirects the input to the program on the right side of the pipe. In this case it is the dd program. So, in effect, we have redirected uncompressed image to the dd program which writes to the device specified by of=.
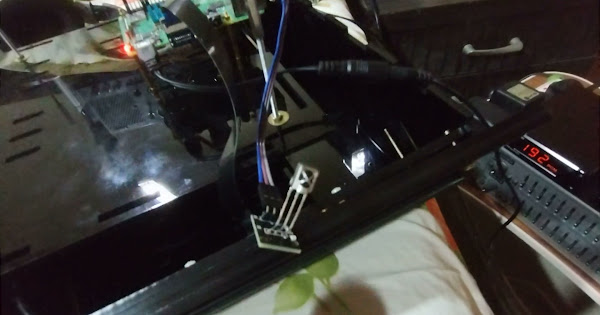
Now some pictures of my build. The case was donated by @KiranPS . The case is awesome. I was lucky he discarded this case for another display with better aspect ratio. So now this wonderful case is mine. The waveshare display was donated by @chander. This is a 400x1280 resolution (extremely strange resolution where width is smaller than height). This causes issue for many apps which require minimum of 600 as the height. But for my case where I use cantata as the main gui, this is not an issue. We will talk about setup in the next post.
Front side of the streamer with 400x1280 waveshare display
Top view
Rear view
HX1838 VS1838 NEC Infrared IR Remote Control Sensor
IR sensor inserted inside the case from the bottom
IR sensor in action
New video by Manvendra Bhangui
photos.app.goo.gl
The steamer in action, booting up, using the gui to play and control music. The song information comes like a blurb on all my devices and my laptops. So whatever computer is switched on in the house it will tell you the music that is being played in the house (you can call me crazy).
New video by Manvendra Bhangui
photos.app.goo.gl