3 Way Speakers with Separate Enclosures for Bass & Mids

Update.
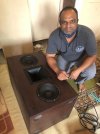
Along with the crossover chambers of my another project I made some progress in this built too. Today I assembled the Plate for Binding Post on the Back side of the Sub Enclosures. This will have my logo engraved on it.

IMG_20200815_125327.jpg

IMG_20200815_125342.jpg

The Center hole is yet to be drilled. I did not have the required size drill bit to drill this hole. So I will purchase the same on Monday and the work will resume.
 
Update
Speaker Binding post have been assembled.

Tools used for drilling. A 25 mm Hinge Boring Drill Bit & 1 mm Wood Drill Bit (Yes, another inventry in tools. I purchased 12mm, 14mm & 16 mm wood drill bits from Makita)
IMG_20200823_151655.jpg

IMG_20200823_151721.jpg
I have made this counter with the Hinge Boring Drill Bit so that the nuts of binding posts will easily fit inside it
IMG_20200823_151731.jpg

IMG_20200823_151840.jpg

Final Fitment Photos
IMG_20200823_151922.jpg

IMG_20200823_151932.jpg
 
Update
Speaker Binding post have been assembled.

Tools used for drilling. A 25 mm Hinge Boring Drill Bit & 1 mm Wood Drill Bit (Yes, another inventry in tools. I purchased 12mm, 14mm & 16 mm wood drill bits from Makita)
View attachment 48901

View attachment 48902
I have made this counter with the Hinge Boring Drill Bit so that the nuts of binding posts will easily fit inside it
View attachment 48903

View attachment 48904

Final Fitment Photos
View attachment 48905

View attachment 48906
The attention to detail all around is amazing..
 
Awesome build Sadik, watching it unfold with great interest. Makes me wish you were in Bombay :)

"I have chosed HDF as the construction material having thickness 25mm, The Finish enclosure will be veneered. I have chosen a off white shade veneer and decided later to stain it with our choice of shade. The Veneer is glued to HDF before cutting. It was glued & then pressed on a 100 TON hydraulic press and left overnight for the glue to dry. Its like 10 trucks stacked one above the other on the glued sheet."

Few questions, why did you choose HDF over MDF & specifically 25mm? Instead of veneer can automotive paint be used?

well made !

that looks like an 18 inch Faitalpro driver...;)
 
Awesome build Sadik, watching it unfold with great interest. Makes me wish you were in Bombay :)

"I have chosed HDF as the construction material having thickness 25mm, The Finish enclosure will be veneered. I have chosen a off white shade veneer and decided later to stain it with our choice of shade. The Veneer is glued to HDF before cutting. It was glued & then pressed on a 100 TON hydraulic press and left overnight for the glue to dry. Its like 10 trucks stacked one above the other on the glued sheet."

Few questions, why did you choose HDF over MDF & specifically 25mm? Instead of veneer can automotive paint be used?

The choice was of the customer, He felt it will help in absorbing the cabinet vibrations as it is dense than MDF. & I guess it will make a difference (on a good side) Yes you can use automotive paint, but you need to follow a proper procedure, surface preparation is the key to achieve the perfect hi end gloss.

well made !

that looks like an 18 inch Faitalpro driver...;)

Its 15 Inch Beyma

It's a treat to watch them :)
keep up the good work, and all the very best

I want to be an inspiration for our DIY community in India. The reason for sharing each and every detail on wood work is because may be my projects would give our DIYers an idea how a particular wood work is carried out (I mean the process for each operation)

I know there are may talented minds in our country among them are many good speaker designers who make wonderful designs. (I am not one of them, You can call me a skilled carpenter with proper & advanced power tools and knowledge of using them) So comming the point. Our designers make speaker enclosures but due to lack of proper knowledge in wood working & power tools, most of them are unable to achive that hi end look on their enclosures. May be by reading my ideas or tips on wood working they will find a proper way to achive that finish / accuracy on enclosures.

Many of the DIY guys will say look doesn't matters, all it matters is the sound & being a diyer I completely agree with it, but when you make the same enclosure with great finish and astetics it will take your design to another dimension.

Note to all my fellow DIY'ers please do not take my post in wrong direction, I am only referring to wood working skills / process.
 
@sadik
Have you done a two-tone approach with wood finish.
Edges with real wood say 3/8 to 5/8 and the rest wood veneer (3mm backing).
Will this even work on speaker cabinets? Just curious

Cheers,
Raghu
 
The choice was of the customer, He felt it will help in absorbing the cabinet vibrations as it is dense than MDF. & I guess it will make a difference (on a good side) Yes you can use automotive paint, but you need to follow a proper procedure, surface preparation is the key to achieve the perfect hi end gloss.


Its 15 Inch Beyma


I want to be an inspiration for our DIY community in India. The reason for sharing each and every detail on wood work is because may be my projects would give our DIYers an idea how a particular wood work is carried out (I mean the process for each operation)

I know there are may talented minds in our country among them are many good speaker designers who make wonderful designs. (I am not one of them, You can call me a skilled carpenter with proper & advanced power tools and knowledge of using them) So comming the point. Our designers make speaker enclosures but due to lack of proper knowledge in wood working & power tools, most of them are unable to achive that hi end look on their enclosures. May be by reading my ideas or tips on wood working they will find a proper way to achive that finish / accuracy on enclosures.

Many of the DIY guys will say look doesn't matters, all it matters is the sound & being a diyer I completely agree with it, but when you make the same enclosure with great finish and astetics it will take your design to another dimension.

Note to all my fellow DIY'ers please do not take my post in wrong direction, I am only referring to wood working skills / process.

Very very well put across sadik bhai :)

Every speaker manufacturer has a sound designer and a industrial designer on the project who looks after the aesthetics. Both are important, and I don't see any reason why one should disregard looks in terms of sound quality. Iam a stickler for good looks, and have akways loved your wood working skills. Please keep up your good work, and please keep sharing.
 
@sadik
Have you done a two-tone approach with wood finish.
Edges with real wood say 3/8 to 5/8 and the rest wood veneer (3mm backing).
Will this even work on speaker cabinets? Just curious

Cheers,
Raghu

I have my own speaker project which is currently at halt because the priorities are this project and "Trueno" project. That Project the Edges will be Real wood say Teak and rest is Veneer. Please check the below link.
3 Way Passive Speakers
I will update this thread once i am a little bit free from these projects.

Very very well put across sadik bhai :)

Every speaker manufacturer has a sound designer and a industrial designer on the project who looks after the aesthetics. Both are important, and I don't see any reason why one should disregard looks in terms of sound quality. Iam a stickler for good looks, and have akways loved your wood working skills. Please keep up your good work, and please keep sharing.

I too believe the same, A good product really deserves a good looks. Thank You
 
Here is an update after a very very long time. The enclosures are shifted to their permanent residence and driver fitment has been finished.
Here are few clicks
IMG-20201213-WA0006.jpg
IMG-20201213-WA0019.jpg
IMG-20201213-WA0007.jpg
IMG-20201213-WA0020.jpg
IMG-20201213-WA0011.jpg
IMG_20201213_135330.jpg
IMG_20201213_135409.jpg

Still final Assembly is pending. The enclosures will be placed one above the other as below.
Front New.jpg
 

Attachments

  • IMG-20201213-WA0008.jpg
    IMG-20201213-WA0008.jpg
    84.2 KB · Views: 29
Here is an update after a very very long time. The enclosures are shifted to their permanent residence and driver fitment has been finished.
Here are few clicks
View attachment 52857
View attachment 52858
View attachment 52859
View attachment 52856
View attachment 52855
View attachment 52860
View attachment 52861

Still final Assembly is pending. The enclosures will be placed one above the other as below.
View attachment 52862
Very nice work sadik bhai looking superb # very nice high end audio equipment
 
Update:

Wiring of Connectors and fitment of acrylic plate is done. The Top connectors will be used in active setup & the Bottom connectors are for passive. Right now the wiring of active connectors is pending.
IMG_20201216_200556.jpg
IMG_20201216_200637.jpg

The bass enclosures are placed on it final place. Above them the Mid enclosure will be placed and above mid there will be another bass enclosure
IMG_20201216_200711.jpgIMG_20201216_200731.jpg
 
Wharfedale Linton Heritage Speakers in Walnut finish at a Special Offer Price. BUY now before the price increase.
Back
Top