Another Cabinet build for GR Research X-ls Encore kit

AmitKumar

Active Member
Joined
Sep 27, 2010
Messages
481
Points
43
Location
Bangalore
Dear FMs,

This is basically a continuation from this http://www.hifivision.com/diy/48485...ake-cabinets-gr-research-x-ls-encore-kit.html thread which I started to seek recommendations from members on the making cabinets. After some debate I decided to start a new thread as the objective now is to showcase the actual cabinet build as well as to seek your recommendations on the further build up of the cabinets.

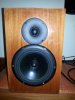
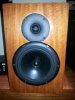
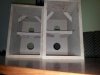
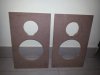
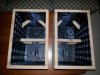
After some research and running around I was able to source half sheet of Greenply MDF and a half sheet Veneer(Decorative Ply) about 2 weeks back. After multiple follow ups with multiple carpenters one carpenter agreed to start the work in the last week end. This time the carpenter only cut the mdf and made boxes of the same, he decided to not to cut the veneer(decorative ply) at this stage even though I told him to do so multiple times. He told that he will cut the veneer only once the mdf cabinets are ready. By doing this way he is confident of better finishing.

Now some pictures of the work done till now:
 

Attachments

  • GR REsearch Amit1.jpg
    GR REsearch Amit1.jpg
    12.1 KB · Views: 208
Last edited:
What is next:

1) I will need to take the front baffles to a near by carpentary shop who will do the holes for mounting the drivers and tweeter on the same. will do so by tuesday or wednesday of this week.
2) Our esteemed FM OMishra used something called as silicon sealant in his cabinets, need to understand the need and importance of the same and should decide if i should be using the same.
3) There was some confusion about the bitumen sheets while sourcing locally, so i decided to be on safer side and ordered the bitumen sheet from Bijin's website diyaudiocart.com and the delivery was pretty quick. I thought of pasting the bitumen sheets by wednesday of this week but will depend on the decision on point 3.
4) Need to finalise on the other dampening materials to be used on the top of bitumen sheet. As of now i am thinking of using Foam. Or any other material that you would like to recommended.

Once the above 4 process are completed then i will take the cabinets for final finishing with pasting of Veneer(decorative ply). Then i will assemble the speaker kit into the same or will take somebody's help to do the same. polishing will be at the last stage after the Speaker/cabinets are tested are tested

Waiting for you comments/recommendations on above.
 
Amit, the cabinets are coming out very well. I think silicon sealant may be available at any of the hardware shops are the same shop where you brought your MDF. I think its supposed to be used for air tight fixing and you can apply this for all the joints from inside the cabinet. I got similar kind of a sealant along with my kit and I did the same. It helps in closing any open gaps in the cabinets and should be better than fevicol for fixing. In fact I used the similar kind of sealant which came along with my Zaph kit for fixing the cross over board to the side panel of the cabinets. It will take some time for drying up but once dried its rock solid.
 
I suggest you complete all the carpentry and polishing work and then mount the crossover and drivers. Mounting and dismounting and then again mounting the drivers can be avoided.
 
What is next:


2) Our esteemed FM OMishra used something called as silicon sealant in his cabinets, need to understand the need and importance of the same and should decide if i should be using the same.


be carful when using adhesives and sealents
SOme give off vapours that are known to damage the surrounds of drivers

silicone is normally safe
but the industrial grade used in in case of metals does give off vapours as it dries

I met Mr. Murthy of Tools and Trade, He has been discussed in our forum multiple times, his speaker cables and interconnects are famous in our forum. though his main business is into different kind of tools and hardware items. He recommended me to use Annabond industrial grade silicon sealant, here is the picture:
 

Attachments

  • Annabond.jpg
    Annabond.jpg
    17.9 KB · Views: 162
I wanted to utilize the Cristmas holiday to full extent. Went out to nearby shop to get the holes done for driver and tweeter. That holes vendor the did the holes, however he told he cannot make the holes edges round from the rear side. now i need to find somebody who can make the edges of the holes round from the rear side. time being there is no countersink in the MDF, the same will be adjusted in the Veneer(decorative ply). Rest of the day went in lining up of bitumen sheets against the walls of the enclosure. now time for some pictures.
 

Attachments

  • GR REsearch Amit4.jpg
    GR REsearch Amit4.jpg
    10 KB · Views: 166
  • GR REsearch Amit5.jpg
    GR REsearch Amit5.jpg
    22 KB · Views: 167
Last edited:
Amit, IMO rounding is not going to do much good. What you need is either a 45 deg. angled cut OR a scallop. Whatever you do, make sure you drill the holes for mounting the woofers first. The immediate area around the holes is not to be included in the angle cut or scallop.
BTW, how thick are the baffles?

The baffle thickness is 18mm as of now, after adding a layer of 4mm veneer it will become 22 inches. I am doing the rounding part manually, I have done little bit of rounding in the back side of baffle, will post the picture tomorrow and seek suggestions on the same.

sorry my knowledge if english is very basic, what is this scallop?
 
what is this scallop?
Like this:

23uuhjkl007.jpg


Edit: Check this.
 
Last edited:
tried to round off the inner edges of the driver holes. spent about an hour yesterday and about 40 mins today. with almost no tools. just used some good quality paper kind of stuff used for rubbing, dont know the technical term. Not sure if it sufficient. can sit once or twice again if you guys recommend. now time for the pictures.
 

Attachments

  • 20131226_213643.jpg
    20131226_213643.jpg
    10.7 KB · Views: 177
Last edited:
tried to round off the inner edges of the driver holes. spent about an hour yesterday and about 40 mins today. with almost no tools.
Ouch!!! Congratulations on your patience and perseverance. Nicely done. :clapping:

I THINK it's OK but can you put the driver in place and take a pic of the back where you chamfered the hole? And the next time [or this time too], just buy a coarse wood file. The one with a convex surface at one side. It will cut through MDF like butter. If you use the file, it should not take you more than 15 min to get a nice chamfer.
 
Last edited:
I THINK it's OK but can you place the driver in place and take a pic of the back where you chamfered the hole?

I will place the driver in the hole, will take the picture and will upload today evening.

Actually i went to buy the coarse wood file from a nearby hardware store. But he had only the paper file. so i bought the paper file and started the work with the same.

Planning to buy the PU foam today for lining against the walls of the cabinets on the top of bitumen sheets. I thought of using the poly fibre but using the Foam for this as the same is easy to use. will use the poly fibre at later stage for mild stuffing or to cover the crossover. Any comments on the same are warm welcome?
 
Finally with great motivation and guidance from the forum members this project is more or less complete. just used them for about 3 to 4 hours as of now. time being i can tell that they are better than my existing speakers but we can make a reasonable judgement only after some burn in.
 

Attachments

  • GR REsearch Amit7.jpg
    GR REsearch Amit7.jpg
    11.3 KB · Views: 93
  • GR REsearch Amit8.jpg
    GR REsearch Amit8.jpg
    11.6 KB · Views: 95
Buy from India's official online dealer!
Back
Top