You are using an out of date browser. It may not display this or other websites correctly.
You should upgrade or use an alternative browser.
You should upgrade or use an alternative browser.
First DIY: 5.1 HT speakers and table top subwoofer amplifier. Budget-Rs50,000/-
- Thread starter Kevano
- Start date
Lets up the game. Lets use some fancy shancy power tools.
Setting up an improvised work bench in a very spacious workshop in a suburban Mumbai building

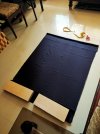
Initial setup - Clamped two panels on either side of the center work panel to secure it.
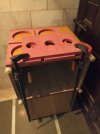
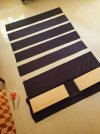
Final setup - Despite the center work panel feeling secure it began to move upwards when the router reached the top part of the circle cut out. So put another panel on the top to restrict the upward movement and replaced the left panel with a bigger panel to make it more secure. This worked out and began chamfering. Since I'm doing this for the very first time I decided to make small passes. After chamfering the first work piece replaced it with the next one. After all five were done, lowered the bit for the second pass. Made 5 passes to achieve the final result.
Setting up an improvised work bench in a very spacious workshop in a suburban Mumbai building

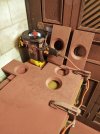
Initial setup - Clamped two panels on either side of the center work panel to secure it.

Final setup - Despite the center work panel feeling secure it began to move upwards when the router reached the top part of the circle cut out. So put another panel on the top to restrict the upward movement and replaced the left panel with a bigger panel to make it more secure. This worked out and began chamfering. Since I'm doing this for the very first time I decided to make small passes. After chamfering the first work piece replaced it with the next one. After all five were done, lowered the bit for the second pass. Made 5 passes to achieve the final result.

Last edited:
keith_correa
Well-Known Member
Well done!
Number of clamps required are slowly increasing. 6 clamps used to glue the back panel. Earlier max was 4 clamps that were used to glue the carcass. 4 back panels with attached speaker wire glued. 1 in clamps.
Also the back panel was over sized by 2mm and will be flush trimmed with the router to get a perfect fit.
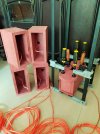
Also the back panel was over sized by 2mm and will be flush trimmed with the router to get a perfect fit.

Last edited:
Why should the build process have purely functional industrial looking pictures? Let's make it artistic.....
I present, Panel Art.....
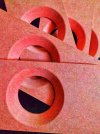
BTW, today's work. Hand sanded the upper rim with 120 grit sandpaper to have rounded edges. Was sceptical if I could do a good job of it, but was pleasantly surprised to see I managed to pull it off quite well.
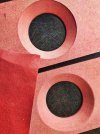
I present, Panel Art.....

BTW, today's work. Hand sanded the upper rim with 120 grit sandpaper to have rounded edges. Was sceptical if I could do a good job of it, but was pleasantly surprised to see I managed to pull it off quite well.

Last edited:
keith_correa
Well-Known Member
Overkill is better! It's not mindnumbing or physically taxing to do so might as well do it. You'll sleep better at night!Do we really need use silicon sealent to seal the edges?
As the saying goes; good night, air tight errrrr I mean sleep tight.You'll sleep better at night!
SIDEWINDER18X
Well-Known Member
Hi ! How is the quality of these Stanley FatmaxTwo top, bottom and side panels of the LCRS glued in foreground. Three clamped and left to dry.
View attachment 62311
F clamps ..... I am curious about the ratcheting mechanism of these sliding jaws ...
Applying water based PU matte clear coat to seal the MDF. Typically the cheaper wood sealant is used but since I will be needing clear coat and the minimum quantity available is 1 ltr which is a lot for this project, using it for sealing purpose. Have applied one coat to the interior of the carcass and front and back of the baffle.
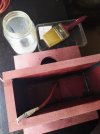
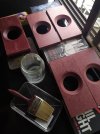
Will apply clear coat to the sides and back after the baffle is glued and the height edges of the enclosure are rounded.


Will apply clear coat to the sides and back after the baffle is glued and the height edges of the enclosure are rounded.
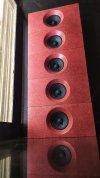
Alright, this was quite tricky. I wanted to have a smooth finish on the chamfered part. Used a brush to apply the clear coat. After 5 coats and sanding in between coats, I got a smooth finish on just one. Thought of trying the foam roller on the rest four and finally this worked. Phewww...... The learning here is that once you have the grain pretty much smoothened out after say 3 coats, use the roller for the final coat/coats. Applied 3 coats on the flat part of the baffle and sanded it between second and third coat. Had got a reasonably smooth finish here so didn't use roller. Did two coats on the back of the baffle panel without sanding.
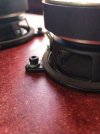
Screwed up the driver to the baffle panel. Thing to keep in mind here is that since the driver hole is chamfered make sure to properly calculate the pilot hole and screw length. I had to use washers to get the math correct.
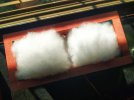
Using leonard audio transmission line software, got the figure of 34gms of polyfill requirement for this enclosure. I made three parts of the polyfill; 18, 8 and 8 gms. Set the carcass on the back panel and teased the polyfill and made a bed of 18gms sitting on the back panel. Then teased and made rectangular layers and layered it one above the other to make two chunks of polyfill as show in the picture with the remaining two 8gm chunks. Did this to have a cavity for the driver and to have as uniform a density as possible. Two coats of clear coat have been applied on the carcass interior before this process.
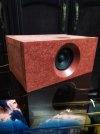
This is a big moment for me. In wood working, making a box is one of the early lessons one learns, so seeing 6 individual panels transforming into a box for the very first time is an immensely satisfying experience. There's quite a bit of work to be done but nevertheless, we have a box !!!

Screwed up the driver to the baffle panel. Thing to keep in mind here is that since the driver hole is chamfered make sure to properly calculate the pilot hole and screw length. I had to use washers to get the math correct.

Using leonard audio transmission line software, got the figure of 34gms of polyfill requirement for this enclosure. I made three parts of the polyfill; 18, 8 and 8 gms. Set the carcass on the back panel and teased the polyfill and made a bed of 18gms sitting on the back panel. Then teased and made rectangular layers and layered it one above the other to make two chunks of polyfill as show in the picture with the remaining two 8gm chunks. Did this to have a cavity for the driver and to have as uniform a density as possible. Two coats of clear coat have been applied on the carcass interior before this process.

This is a big moment for me. In wood working, making a box is one of the early lessons one learns, so seeing 6 individual panels transforming into a box for the very first time is an immensely satisfying experience. There's quite a bit of work to be done but nevertheless, we have a box !!!

Last edited:
sarathssca
Member
Hi Kevano,
Could you please share the current status and progress of the project ..
Could you please share the current status and progress of the project ..
Buy from India's official online dealer!
Similar threads
- Replies
- 35
- Views
- 9K
- Replies
- 28
- Views
- 46K
D


