GloTone Nuance - My "Inverted" SET Tube Amp

FlaCharlie

Member
Joined
Jun 22, 2023
Messages
22
Points
18
Location
Gainesville, FL
Thought I'd post a thread about the "inverted" SET ( iSET ) amp that I mentioned in my earlier thread about my Boogie Factor 1626 preamp.


Most of the discussion about Single Ended Triode amps (and tube amps in general) seems to center on the type of output tube that's being used. Traditionally, the output tubes used in SETs are all directly heated. Many consider direct heating to be the most important ingredient in the whole "SET magic" recipe.

The most commonly used are the 45, 2A3 and 300B as well as some transmitting types. In addition to being directly heated, these tubes share certain characteristics - they are built as triodes (not triode strapped pentodes), relatively difficult to drive and expensive.

Despite the traditional emphasis on output tubes, many people feel that the sonic qualities of the first tube in the signal path is of primary importance. So the use of a directly heated input tube might actually contribute more of that directly heated magic than the output tube.

Directly heated small signal tubes are low mu and can't provide enough drive on their own to drive the DHT output tubes that are most commonly used. So most conventional SETs use indirectly heated input / driver tubes with higher mu, sometimes on their own and sometimes in combination with a DHT input tube. This typically results in a 3 stage amp, sometimes with all three on the amp chassis and sometimes with one stage on a separate preamp chassis.

The "inverted SET" concept uses a configuration which turns tradition on its head. The idea here is to use output tubes that are easy to drive and relatively inexpensive. Most output tubes with those characteristics are indirectly heated. When the output tube is easy to drive, the use of low mu input tubes that are directly heated is more practical. And, instead of 2 gain stages prior to the output tube, a single gain stage design is possible.

So this concept dovetails with the philosophy that simpler designs with a lower parts count produce a more pure outcome. I'm a firm believer in that but perhaps it's just because simple is all I'm capable of understanding. While this amp is pretty basic, I must confess that it could be built even simpler. In the spirit of DIY, a few things were added just because I wanted to try them.

So, with an iSET, the magic of direct heating and its influence on the overall sonic character is still a primary ingredient but it's somewhat simpler and much less expensive to implement.

I'm not very familiar with tubes which were only produced in Europe but no doubt there are some that are easy to drive and suitable. I like to use oddball tubes but I'm also cheap and importing uncommon tubes from Europe can get expensive.

Instead, I chose an oddball output tube that's more readily available in the US, the 6N6G. Definitely an under the radar tube yet not exactly rare or particularly expensive. I used this tube before in a Magnavox 175/185 PP console amp that I modded previously. I'll comment more on the 6N6G later.

Since the iSET concept puts so much emphasis on the input tube, most of my on and off breadboarding (over a period of about 9+ months) was spent trying numerous input triodes and a couple of triode strapped pentodes, which were all directly heated.

While some small signal DHTs are rare and expensive there are quite a few which are relatively common and reasonably priced . . . cheap even. I probably tried at least 10 different types. They all sounded quite nice but the one I kept coming back to was the 26. Of course, these are no longer being produced (as far as I know) yet they seem to be plentiful. Apparently, they were the 12AX7 of the 1930s. As with all of these antique types, the early globe styles are increasingly rare and a more expensive, especially if you insist on buying NOS. The coke bottle shaped ST, not so much. Strong testing used examples of the globe style are still fairly reasonable, though.

One thing I like to do is to use recycled and repurposed parts and materials. For example, the chassis of my Boogie Factor 1626 preamp was built from a bamboo kitchen drawer organizer.

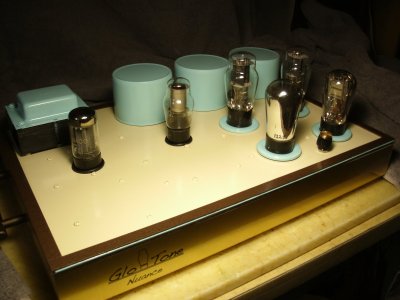
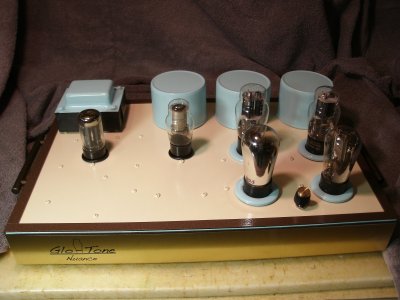
In keeping with that approach, the chassis I used here is a wooden drawer that I picked up at a local store called The Repurpose Project for a few bucks. No handle had ever been attached so it may have never been used. Gold-ish bronze handles ($1 each from the same source) were added to make it easier to move around. The covers for the output transformers and choke came from the grocery store - they're Blue Diamond Almond cans. The rings around the bases of the 26s and 6N6Gs are plastic curtain grommets that I found at a local thrift store for under $1.

I wanted this build to have more visual appeal than my previous builds. You would think that would be easy, since some of them have zero visual appeal. Not sure if I succeeded in terms of "appeal" but it's definitely more colorful than my earlier builds. I was shooting for a kind of 'art deco' color scheme and less of an industrial vibe.

While I had settled on the general theme early on, the cosmetic details took a while to finalize. The bottom of a cheap drawer doesn't get much attention when it comes to fit and finish since it's normally not visible. Of course, this is now the top of the amp so it was painted and I tried to match the trim color to the bronze handles as much as possible.

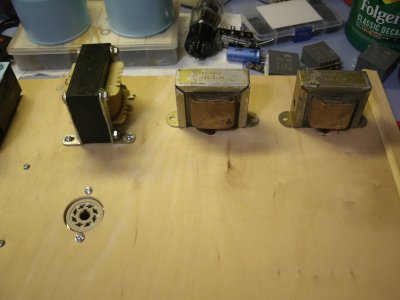
Here are some pics . . . . starting with an in-progress shot showing the unfinished chassis . . .
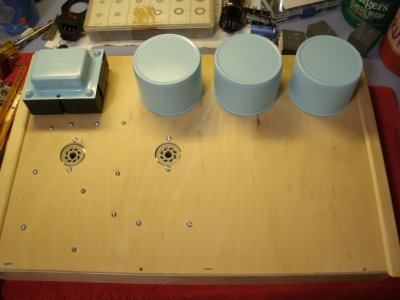
GEDC0411.jpg

And here's some finished pics . . .
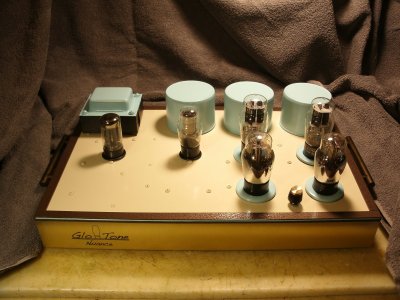
Nuance wGlobes.jpg
Nuance Front wGlobes.jpg
Nuance Front wST.jpg

Nuance Rear.jpg

The color in the top (finished) pic is a bit more accurate, it's a little more on the green side of blueish green in person, despite the color being called Gloss Blue Ocean Breeze. The color on the top deck is Navajo White, an off-white that's warm but too yellowish - so not quite cream colored.

Having named my 1626 preamp the Boogie Factor, I thought I'd name this one too. Given the sonic combination of warmth, detail, depth, fluidity and subtlety exhibited by the combination of the 26 and the 6N6G, I decided to name this the Nuance.

GEDC0521 (1).jpg

The logo was created with the same ancient Appleworks all-in-one program that I use to draw schematics on an equally ancient Mac Mini. The program can't be run on newer Macs. The original was kind of jaggy so I sent it to a place that "vectorizes" images which cleaned it up enough to be usable. The front plate was created by a local trophy shop.

I'll get into some of the technical aspects and post schematics in another post . . .
 
Last edited:
Thought I'd post a thread about the "inverted" SET ( iSET ) amp that I mentioned in my earlier thread about my Boogie Factor 1626 preamp.


Most of the discussion about Single Ended Triode amps (and tube amps in general) seems to center on the type of output tube that's being used. Traditionally, the output tubes used in SETs are all directly heated. Many consider direct heating to be the most important ingredient in the whole "SET magic" recipe.

The most commonly used are the 45, 2A3 and 300B as well as some transmitting types. In addition to being directly heated, these tubes share certain characteristics - they are built as triodes (not triode strapped pentodes), relatively difficult to drive and expensive.

Despite the traditional emphasis on output tubes, many people feel that the sonic qualities of the first tube in the signal path is of primary importance. So the use of a directly heated input tube might actually contribute more of that directly heated magic than the output tube.

Directly heated small signal tubes are low mu and can't provide enough drive on their own to drive the DHT output tubes that are most commonly used. So most conventional SETs use indirectly heated input / driver tubes with higher mu, sometimes on their own and sometimes in combination with a DHT input tube. This typically results in a 3 stage amp, sometimes with all three on the amp chassis and sometimes with one stage on a separate preamp chassis.

The "inverted SET" concept uses a configuration which turns tradition on its head. The idea here is to use output tubes that are easy to drive and relatively inexpensive. Most output tubes with those characteristics are indirectly heated. When the output tube is easy to drive, the use of low mu input tubes that are directly heated is more practical. And, instead of 2 gain stages prior to the output tube, a single gain stage design is possible.

So this concept dovetails with the philosophy that simpler designs with a lower parts count produce a more pure outcome. I'm a firm believer in that but perhaps it's just because simple is all I'm capable of understanding. While this amp is pretty basic, I must confess that it could be built even simpler. In the spirit of DIY, a few things were added just because I wanted to try them.

So, with an iSET, the magic of direct heating and its influence on the overall sonic character is still a primary ingredient but it's somewhat simpler and much less expensive to implement.

I'm not very familiar with tubes which were only produced in Europe but no doubt there are some that are easy to drive and suitable. I like to use oddball tubes but I'm also cheap and importing uncommon tubes from Europe can get expensive.

Instead, I chose an oddball output tube that's more readily available in the US, the 6N6G. Definitely an under the radar tube yet not exactly rare or particularly expensive. I used this tube before in a Magnavox 175/185 PP console amp that I modded previously. I'll comment more on the 6N6G later.

Since the iSET concept puts so much emphasis on the input tube, most of my on and off breadboarding (over a period of about 9+ months) was spent trying numerous input triodes and a couple of triode strapped pentodes, which were all directly heated.

While some small signal DHTs are rare and expensive there are quite a few which are relatively common and reasonably priced . . . cheap even. I probably tried at least 10 different types. They all sounded quite nice but the one I kept coming back to was the 26. Of course, these are no longer being produced (as far as I know) yet they seem to be plentiful. Apparently, they were the 12AX7 of the 1930s. As with all of these antique types, the early globe styles are increasingly rare and a more expensive, especially if you insist on buying NOS. The coke bottle shaped ST, not so much. Strong testing used examples of the globe style are still fairly reasonable, though.

One thing I like to do is to use recycled and repurposed parts and materials. For example, the chassis of my Boogie Factor 1626 preamp was built from a bamboo kitchen drawer organizer.

In keeping with that approach, the chassis I used here is a wooden drawer that I picked up at a local store called The Repurpose Project for a few bucks. No handle had ever been attached so it may have never been used. Gold-ish bronze handles ($1 each from the same source) were added to make it easier to move around. The covers for the output transformers and choke came from the grocery store - they're Blue Diamond Almond cans. The rings around the bases of the 26s and 6N6Gs are plastic curtain grommets that I found at a local thrift store for under $1.

I wanted this build to have more visual appeal than my previous builds. You would think that would be easy, since some of them have zero visual appeal. Not sure if I succeeded in terms of "appeal" but it's definitely more colorful than my earlier builds. I was shooting for a kind of 'art deco' color scheme and less of an industrial vibe.

While I had settled on the general theme early on, the cosmetic details took a while to finalize. The bottom of a cheap drawer doesn't get much attention when it comes to fit and finish since it's normally not visible. Of course, this is now the top of the amp so it was painted and I tried to match the trim color to the bronze handles as much as possible.

Here are some pics . . . . starting with an in-progress shot showing the unfinished chassis . . .

View attachment 78601

And here's some finished pics . . .
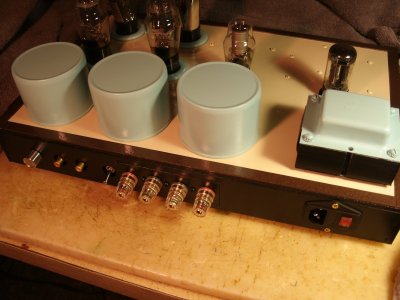
View attachment 78602
View attachment 78603
View attachment 78604

View attachment 78606

The color in the top (finished) pic is a bit more accurate, it's a little more on the green side of blueish green in person, despite the color being called Gloss Blue Ocean Breeze. The color on the top deck is Navajo White, an off-white that's warm but too yellowish - so not quite cream colored.

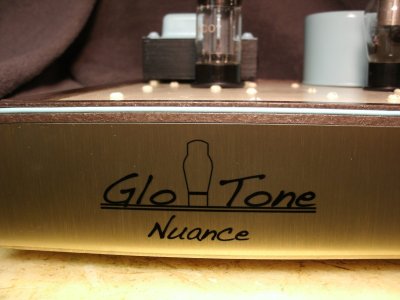
Having named my 1626 preamp the Boogie Factor, I thought I'd name this one too. Given the sonic combination of warmth, detail, depth, fluidity and subtlety exhibited by the combination of the 26 and the 6N6G, I decided to name this the Nuance.
View attachment 78607

The logo was created with the same ancient Appleworks all-in-one program that I use to draw schematics on an equally ancient Mac Mini. The program can't be run on newer Macs. The original was kind of jaggy so I sent it to a place that "vectorizes" images which cleaned it up enough to be usable. The front plate was created by a local trophy shop.

I'll get into some of the technical aspects and post schematics in another post . . .
Loved reading the account @FlaCharlie, particularly the use of recycled stuff and repurposing the drawer!
Hope you are planning on evolving the name and logo some more. The amp looks pretty cool and the blue green is nice against the pale yellow.
I hope your idea of side handles catches on with heavy audio equipment manufacturers 😄 it should be made mandatory for anything weighing over 10 kg in the interest of public health!
waiting to hear your impressions of how it sounds.
 
Last edited:
Loved reading the account @FlaCharlie, particularly the use of recycled stuff and repurposing the drawer!
Hope you are planning on evolving the name and logo some more. The amp looks pretty cool and the blue green is nice against the pale yellow.
I hope your idea of side handles catches on with heavy audio equipment manufacturers 😄 it should be made mandatory for anything weighing over 10 kg in the interest of public health!
waiting to hear your impressions of how it sounds.
Thanks! I'm always on the lookout for materials that might be used to build amps.

And as I get older (I'm 71 and have been weakened a bit by health issues) I'm definitely more conscious of the weight of amps and my ability to move them around. Speakers can be an even bigger problem, though.

I actually had a typo in the earlier post. It should read: The color of the top deck is Navajo White, an off-white that's warm but NOT too yellowish - so not quite cream colored. It looks more yellowish in some of the pics due to the lighting used. The second "finished" pic is the most accurate.

I'll post more later . . .
 
I had always avoided directly heated preamp tubes because of their reputation for noise and hum. And, I admit, I didn't even try to use AC heating here, I went with DC right off the bat. For most of their time on the breadboard I heated them using a simple, cheap, "black box" solution - a little 3.3v Meanwell SMPS with some filtering added. This worked fine but over a period of many months I noticed that the output voltage started to very slowly drop. The Meanwells are somewhat adjustable so I just turned them up a bit but eventually they would drop again.

So, I decided to go with a simple traditional DC filament supply. I've since learned that a SMPS needs to have its current spec de-rated significantly. The one I was using was rated for 3A and the filaments of the 26 draw 1.05A each, so 2.1A total. I've been using some with higher amperage ratings in my current project without issues.

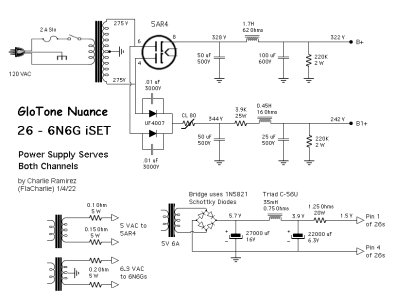
As usual, I'm using scrounged junkbox parts as much as possible. The power transformer was sourced from a broken Webcor reel to reel tape recorder that I found years ago. Dilapidated tape recorders can be an excellent source of transformers and tubes. In order to keep it running cool and stress free the PT provides B+ only. I'm using separate transformers for all the filaments / heaters with dropping resistors to dial in the voltages.

I originally used a 6CA4 (EZ81) rectifier but I switched to a 5AR4 (GZ34) towards the end of the breadboard phase. This was partly to get a few more B+ volts and partly because it's an octal whose size is closer to that of the other tubes.

All the power supply caps are DC Link type films, Kemets and a Panasonic.

The other tube used in the power supply is a 0D3 VR (voltage regulator) which supplies the input tubes. I had some in my tube stash but I had never built anything with them so I thought I'd try it. I'm not sure if it offers any technical advantage but the purpleish glow sure looks cool!

The VR tube did result in some added complexity, besides just being there itself. I like to use indirectly heated rectifier tubes due to their slow start but the 0D3 was taking a fairly long time to "fire" and it made a barely audible thump when it did, which made me nervous. The solution was to split the power supply into two branches, both of which run off the same PT HV secondary.

One branch of the power supply uses the 5AR4 to power the output tubes and give them a slow start. The other branch is SS rectified using UF4007s and snubber caps. A CL80 thermistor is used to limit inrush current a bit. The SS branch supplies power to the input tube plates via the 0D3 VR tube, which starts right up now.

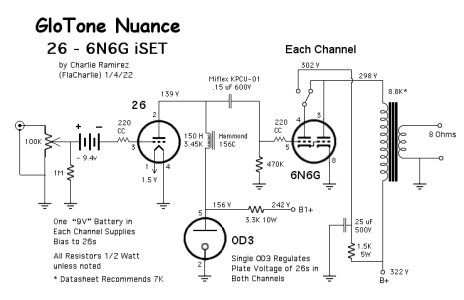
The plates of the 26s are loaded using inexpensive Hammond 156C plate chokes. Someone suggested that I use plate chokes instead of resistors in order to maximize drive to the output tubes. The 156C can handle up to 8 mA of current so they work well in this application.

The 26s are heated with DC from a single filament transformer, a bridge I made from Schottky diodes and a simple C-L-C filter. Typically, directly heated tubes have separate filament transformers for each tube because the filament also serves as the cathode. In this case, the two 26s use battery bias on the grid so the filaments are not tied to a "cathode" bias resistor. This allows them to be heated by a single filament transformer. So it's simpler and cheaper to implement.

My Boogie Factor preamp also uses a battery grid bias scheme but, in that case, a single battery is used to bias both 1626s.

Here, I used a slightly different version in which each tube is biased with it's own battery which is in series with the grid. During the breadboard phase I tried both methods. I was unable to hear any difference between the two so I thought I'd try this method. In normal use, the battery doesn't draw any current so it's lifespan is the same as its shelf life.

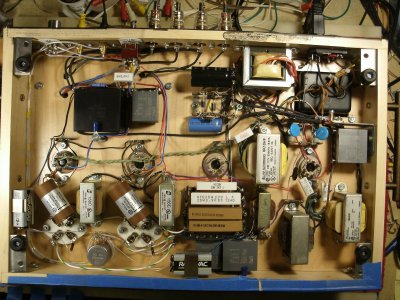
Here's a pic of the wiring:

Nuance Under Chassis.jpg

When I start construction I'm always tempted to try a few things that I didn't do on the breadboard. Sometimes it works out well, sometimes not.

One change that worked . . . All the wiring from the RCAs to the Precision Electronics volume pot and the wiring to the batteries and then from the batteries to the 26 grids is pure silver. It runs through teflon tubing. I remembered buying some of it from a jewelry supplier soon after I got into tube gear with the intention of making some interconnects out of it but I got sidetracked. It's sold by weight and not that expensive. I used a tiny bit on the input of a PP 6B4G amp that I built years ago and maybe a bit somewhere else. Since I had plenty, I decided I might as well go all in with it on this project.

Of course silver tarnishes when exposed to air and the bit that was sticking out of the roll was black after almost 20 years. Silver oxide is conductive, however, unlike copper oxide. Inside the roll it was mostly shiny and I only had to discard a tiny bit that had a slightly brownish tinge. The lengths that I had previously slipped into teflon tubing 20 years ago were still nice and bright so I'm not worried about oxidation going forward.

Not sure that it offers any sonic advantage over copper or not. Some say silver wiring in the signal path brings out more detail but since I never did any A-B testing I can't say for sure. Detail is excellent, though.

One change from the breadboard didn't work out so well . . . I figured I'd try some of the shielded wire I'd accumulated (big spools) from the recycling place.

I was using shielded twisted pairs on the 6.3v heaters for the 6N6Gs. That wire uses a foil type shield. I used a single conductor shielded cable that uses a woven type shield in several other spots. It's aircraft wire that was donated to the recycling place by a local Gulfstream private jet maintenance facility. I'm not sure if the insulation is teflon or what, but it doesn't melt.

I even rigged up a way to shield the silver signal wires, although they really weren't very close to anything else. I ran the pair from each channel through (OK, you can laugh) plastic straws. The two straws were then wrapped in adhesive backed copper that I've used to shield the controls and pickup cavities of my bass guitars.

I figured it would make for a super quiet amp. WRONG! Nothing but problems. Hum city.

Funny how my breadboard, with clip lead wires running willy nilly everywhere, was quiet but when I consciously tried to make the build as quiet as possible it totally backfired. Well, not so funny, actually.

Anyway, I tore out ALL the shielded wire and pulled the silver signal wire out of the straws and just ran them along the side in the corner. Now it's fine. I used standard twisted pair on the 6.3v heaters. For the B+ run, the DC filament supply to the 26s and the input PS supply ground I used military spec wire - silver plated copper with teflon insulation.

The coupling caps are the Polish Miflex KPCUs which I really like. Earlier I was using the Russian K40Y-9 PIOs, which also sounded quite nice. They were a tad warmer but not quite as detailed. I also tried some of the Russian FT-2 teflons which I've liked a lot in some previous builds. They have a reputation for taking a long time to break in, though. Great clarity and detail but not particularly warm. The Miflex KPCUs seemed to have a good mix of warmth and detail.

Details on those oddball 6N6G output tubes and schematics to follow . . .
 
Last edited:
I had always avoided directly heated preamp tubes because of their reputation for noise and hum. And, I admit, I didn't even try to use AC heating here, I went with DC right off the bat. For most of their time on the breadboard I heated them using a simple, cheap, "black box" solution - a little 3.3v Meanwell SMPS with some filtering added. This worked fine but over a period of many months I noticed that the output voltage started to very slowly drop. The Meanwells are somewhat adjustable so I just turned them up a bit but eventually they would drop again.

So, I decided to go with a simple traditional DC filament supply. I've since learned that a SMPS needs to have its current spec de-rated significantly. The one I was using was rated for 3A and the filaments of the 26 draw 1.05A each, so 2.1A total. I've been using some with higher amperage ratings in my current project without issues.

As usual, I'm using scrounged junkbox parts as much as possible. The power transformer was sourced from a broken Webcor reel to reel tape recorder that I found years ago. Dilapidated tape recorders can be an excellent source of transformers and tubes. In order to keep it running cool and stress free the PT provides B+ only. I'm using separate transformers for all the filaments / heaters with dropping resistors to dial in the voltages.

I originally used a 6CA4 (EZ81) rectifier but I switched to a 5AR4 (GZ34) towards the end of the breadboard phase. This was partly to get a few more B+ volts and partly because it's an octal whose size is closer to that of the other tubes.

All the power supply caps are DC Link type films, Kemets and a Panasonic.

The other tube used in the power supply is a 0D3 VR (voltage regulator) which supplies the input tubes. I had some in my tube stash but I had never built anything with them so I thought I'd try it. I'm not sure if it offers any technical advantage but the purpleish glow sure looks cool!

The VR tube did result in some added complexity, besides just being there itself. I like to use indirectly heated rectifier tubes due to their slow start but the 0D3 was taking a fairly long time to "fire" and it made a barely audible thump when it did, which made me nervous. The solution was to split the power supply into two branches, both of which run off the same PT HV secondary.

One branch of the power supply uses the 5AR4 to power the output tubes and give them a slow start. The other branch is SS rectified using UF4007s and snubber caps. A CL80 thermistor is used to limit inrush current a bit. The SS branch supplies power to the input tube plates via the 0D3 VR tube, which starts right up now.

The plates of the 26s are loaded using inexpensive Hammond 156C plate chokes. Someone suggested that I use plate chokes instead of resistors in order to maximize drive to the output tubes. The 156C can handle up to 8 mA of current so they work well in this application.

The 26s are heated with DC from a single filament transformer, a bridge I made from Schottky diodes and a simple C-L-C filter. Typically, directly heated tubes have separate filament transformers for each tube because the filament also serves as the cathode. In this case, the two 26s use battery bias on the grid so the filaments are not tied to a "cathode" bias resistor. This allows them to be heated by a single filament transformer. So it's simpler and cheaper to implement.

My Boogie Factor preamp also uses a battery grid bias scheme but, in that case, a single battery is used to bias both 1626s.

Here, I used a slightly different version in which each tube is biased with it's own battery which is in series with the grid. During the breadboard phase I tried both methods. I was unable to hear any difference between the two so I thought I'd try this method. In normal use, the battery doesn't draw any current so it's lifespan is the same as its shelf life.

Here's a pic of the wiring:

View attachment 78634

When I start construction I'm always tempted to try a few things that I didn't do on the breadboard. Sometimes it works out well, sometimes not.

One change that worked . . . All the wiring from the RCAs to the Precision Electronics volume pot and the wiring to the batteries and then from the batteries to the 26 grids is pure silver. It runs through teflon tubing. I remembered buying some of it from a jewelry supplier soon after I got into tube gear with the intention of making some interconnects out of it but I got sidetracked. It's sold by weight and not that expensive. I used a tiny bit on the input of a PP 6B4G amp that I built years ago and maybe a bit somewhere else. Since I had plenty, I decided I might as well go all in with it on this project.

Of course silver tarnishes when exposed to air and the bit that was sticking out of the roll was black after almost 20 years. Silver oxide is conductive, however, unlike copper oxide. Inside the roll it was mostly shiny and I only had to discard a tiny bit that had a slightly brownish tinge. The lengths that I had previously slipped into teflon tubing 20 years ago were still nice and bright so I'm not worried about oxidation going forward.

Not sure that it offers any sonic advantage over copper or not. Some say silver wiring in the signal path brings out more detail but since I never did any A-B testing I can't say for sure. Detail is excellent, though.

One change from the breadboard didn't work out so well . . . I figured I'd try some of the shielded wire I'd accumulated (big spools) from the recycling place.

I was using shielded twisted pairs on the 6.3v heaters for the 6N6Gs. That wire uses a foil type shield. I used a single conductor shielded cable that uses a woven type shield in several other spots. It's aircraft wire that was donated to the recycling place by a local Gulfstream private jet maintenance facility. I'm not sure if the insulation is teflon or what, but it doesn't melt.

I even rigged up a way to shield the silver signal wires, although they really weren't very close to anything else. I ran the pair from each channel through (OK, you can laugh) plastic straws. The two straws were then wrapped in adhesive backed copper that I've used to shield the controls and pickup cavities of my bass guitars.

I figured it would make for a super quiet amp. WRONG! Nothing but problems. Hum city.

Funny how my breadboard, with clip lead wires running willy nilly everywhere, was quiet but when I consciously tried to make the build as quiet as possible it totally backfired. Well, not so funny, actually.

Anyway, I tore out ALL the shielded wire and pulled the silver signal wire out of the straws and just ran them along the side in the corner. Now it's fine. I used standard twisted pair on the 6.3v heaters. For the B+ run, the DC filament supply to the 26s and the input PS supply ground I used military spec wire - silver plated copper with teflon insulation.

The coupling caps are the Polish Miflex KPCUs which I really like. Earlier I was using the Russian K40Y-9 PIOs, which also sounded quite nice. They were a tad warmer but not quite as detailed. I also tried some of the Russian FT-2 teflons which I've liked a lot in some previous builds. They have a reputation for taking a long time to break in, though. Great clarity and detail but not particularly warm. The Miflex KPCUs seemed to have a good mix of warmth and detail.

Details on those oddball 6N6G output tubes and schematics to follow . . .
That’s extreme attention to detail as I can only imagine! I am hoping the amp sounds really good as it should.
 
That’s extreme attention to detail as I can only imagine! I am hoping the amp sounds really good as it should.
Thanks! That's one of the advantages of breadboarding. It's simple to make changes to the circuit and listen to them without actually building an amp. So by the time I get around to building it I've actually already been listening to the amp for months.
 
OK, here's the scoop on the oddball output tubes I'm using . . .

The 6N6G is an octal version of the 6B5, which was developed in 1935 by a company called Triad. Here's an extremely detailed writeup on the technical aspects. This goes way beyond the information contained in a typical tube data sheet. Most of this makes my head spin but I find this tube to be quite interesting.


It's a dual, dissimilar, triode. The input triode is configured as a cathode follower and is directly connected to the output triode. So, yeah, technically this is a 3 stage amp but since the cathode follower stage doesn't provide any gain it's only 2 stages in terms of gain / amplification.

Another feature of the 6N6G is that the biasing is done internally, which is rather unique and simplifies setup. I'm not aware of any other tube that does this. The cathode is Pin 8, just as it is with many common pentode output tubes. It connects directly to ground and no cathode resistor or cathode bypass cap is needed. That's because each tube has its own internal resistor. As a result, each tube is biased independently. Just connect power to the plates, ground the cathode pin and feed it a signal. Super simple.

Power output with 300v on the plates and a 15v input is 4 watts, according to the data sheet. Slightly higher B+ (325v max) and drive voltage yields 5.2 watts. So more power than the 45 (1.6 to 2 watts) and a bit more than the 2A3 (3.5 watts) but not as much as the 300B, which usually puts out ~7 or 8 watts in most designs. Since the output section is a triode, not a pentode, no negative feedback is necessary.

One suggestion I got was that I should try running the plate of the 6N6G input section directly from the plate of its output section instead of from the B+, which is the standard method. This results in a slightly lower output and a bit tighter bass, so I assume it must be adding some local feedback. The input section plate can also be run from an UL tap if your OT has one.

Running the input section plate from B+ sounded fine too, though, so when I built it I incorporated a switch on the back panel to allow either method to be used. That way I can get a little more power if needed for use with less efficient speakers.

I also put a balance control on the back panel since I'm often not centered between the speakers while listening.

While it's not a well known tube, the 6N6G is not hard to find or expensive, at least in the US. I've found NOS examples on eBay for as little as $10 and I've never paid more than $25.

Obviously, other easy to drive output tubes can also be used in an iSET configuration, including some European tubes that I'm unfamiliar with. More common tubes that come to mind are the 6BQ5 / EL84, the 6V6 and the 7591 / 7868. These are not triodes, however, so negative feedback would be necessary unless you wire them in triode. In triode they would likely put out bit less power than the 6N6G though.

When used single ended, the 6N6G wants to see a load of 7k. When I assembled the breadboard I used a pair of output transformers from a Voice of Music console stereo amp but I ordered a pair of 15w 8k Edcors, which took about 3 months to arrive. Edcors are very popular with American DIYers but Edcor doesn't keep them "in stock" so you have to wait until they decide to build a batch.

After adding the Edcors I let the amp play for a few days in the shop without listening to it, which was not easy. I probably put around 36 hours on them before giving them a serious listen.

They are really nice and, as expected, they do go lower in the bass. Of course they are much larger than the VMs. The Edcors weigh in at 2lbs 9.5oz (1.18kg) while the VMs are only 14.5oz (0.41kg).

But, for this amp, I actually preferred the little VMs, which is not what I expected. The VMs seem more extended on top and the mids are more detailed and liquid. They reproduce the subtle textures of strings and horns better.

A lot of the difference is in the soundstage. The 26s, and most all of the DHT input tubes I tried, excel when it comes to soundstage. It seemed to be a bit wider with the VMs but they're especially better in terms of depth - more 3D. The difference in detail is most evident in the way instruments seem to inhabit their own space. The effects of reverb on more modern recordings, or natural room sound on more traditional jazz, is much more evident. The reverb decay is longer. This is especially evident on a jazzy drum solo or when a song ends with a cymbal hit. The treble seems more detailed and even delicate at times.

With the Voice of Music OTs the bass wasn't quite as deep or dynamic, but I don't find it lacking for most music. If I feel the need to add bass I can simply add a sub or use an active crossover to bi-amp. Best of both worlds.

Don't get me wrong, the Edcors were impressive. But when I A-B'd them I noticed the difference. The VMs produced more foot tapping and head bobbing, they just swing more.

I doubt the VMs are really anything special compared to other similar OTs. The reason I used them is because their primaries measured ~8.85k, which was closer to the 7k listed on the 6N6G data sheet than anything else I had in my stash.

They just look like any other little OT pulled from an old console stereo. Pretty ugly. I could have tried to paint them but I figured hiding them under the almond cans would be better.

Here's an "under the covers" pic:
Nuance Bare OTs.jpg

The Edcors are a technically better match, at 8k (nominal, they measured 7.74k) so I don't know what accounts for the sonic differences. Perhaps it's just the smaller core, which makes me wonder if the smaller Edcors might also share some of the same qualities as the VMs. These Edcors are the 15w versions, GXSE15-8-8K. Or maybe using a slightly higher primary impedance works better in this design?

I'm using the Edcors in my current project and they really shine there. Another reminder that synergy is something that's real and often unpredictable.

The transformers weren't the only surprise.

I'm astounded at the difference between the ST (coke bottle) shape version and the globes. For some reason I expected that the globes, being the older design, would be more euphonic and the ST more "accurate", but it's actually the opposite and it's not subtle at all. The STs are just wonderfully liquid while the instrument separation / soundstage is just plain spooky with the globes.

Anyway, here are the schematics:

GloTone Nuance PS.jpg
GloTone Nuance Schematic.jpg
 
Join WhatsApp group to get HiFiMART.com Offers & Deals delivered to your smartphone!
Back
Top