Here is my creation-
I always believe that A Tube amplifier should provide feast to the eyes and ears together and hence opted for a vintage theme amplifier,with Beautiful Padauk side flanges and Teak frame for the Vu meter.. Apart from using self wound OPTs and PT, It gives immense pleasure to say that Everything from metal working to woodworking has entirely been done by me,and the results are extremely gratifying., This is A diy Push pull 7 watt per channel amplifier, using Pcl86 tubes.. The circuit is based on the Baby Huey circuit with my modifications. The unique usage of shunt feedback make the output pentode behave like a triode.. In short, this push pull amplifier is claimed to have a sound of a SET, and i have to accept that the claims are true after doing extensive listening..The bass is ample, mids are airy with Very natural Timbre,The highs are clean and clear,with no harshness at all. The project was started as a prototype and based on a audiophile friend's interest,It was later customised,as per his requirments.
Some features to add:
1.I have set the operating point at 80 percent of the maximum tube dissipation ( this will ensure longevity of the tubes)
2. Individual Bias pots have been kept to exactly keep the push pull operation to null Dc. Even if one tube wears off, one can get any tube and still match it to the other one, without worrying about matching pair
3. A switchable option for zero feedback ( global).( Airy vs Tighter bass- to suit individual needs) Technically, the damping factor Changes.
4. Active ventilation with silent DC fan, The transformer box will double up as a thermal conduit to exhaust hot air and keep the chasis cool ( several reports say that cooling the Transformer, as well as the tubes will increase the life considerably)
5. A Vu meter, which is Calibrated for Logarithmic response..
Some build notes
A.. I first made the Power Transformer and OPT transformer before doing the prototype
B. Aluminium 1.5mm thick sheer metal was bought and bent to dimensions.
C. 3 coats of spray paint done with fine sanding inbetween.
4. The unique shaped Wooden side panel is Padauk, a wood whose colour and texture i like. With thorough polishing and sanding,The grains stand out nicely.,and it reminds one of a musical instrument rather than a Amplifier.
Many Thanks to Yvesm,the original designer of Baby Huey Circuit, And Evert Liewes, My Mentor and Guru from Portugal, who like a father figure patiently taught me Everything from scratch( from plotting a load line to making a OPT)

Side flanges in Padauk
The extreme right switch is the feedback defeat
P2P wiring, Individual bias pots are visible
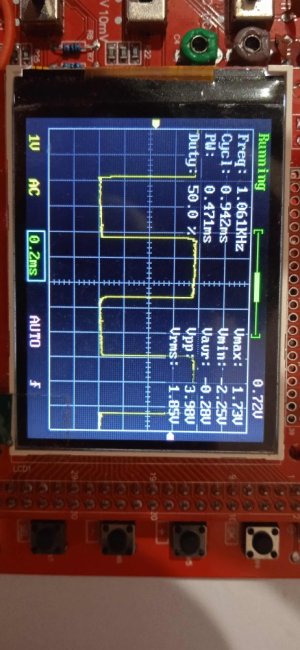
Clean 1khz square wave
I always believe that A Tube amplifier should provide feast to the eyes and ears together and hence opted for a vintage theme amplifier,with Beautiful Padauk side flanges and Teak frame for the Vu meter.. Apart from using self wound OPTs and PT, It gives immense pleasure to say that Everything from metal working to woodworking has entirely been done by me,and the results are extremely gratifying., This is A diy Push pull 7 watt per channel amplifier, using Pcl86 tubes.. The circuit is based on the Baby Huey circuit with my modifications. The unique usage of shunt feedback make the output pentode behave like a triode.. In short, this push pull amplifier is claimed to have a sound of a SET, and i have to accept that the claims are true after doing extensive listening..The bass is ample, mids are airy with Very natural Timbre,The highs are clean and clear,with no harshness at all. The project was started as a prototype and based on a audiophile friend's interest,It was later customised,as per his requirments.
Some features to add:
1.I have set the operating point at 80 percent of the maximum tube dissipation ( this will ensure longevity of the tubes)
2. Individual Bias pots have been kept to exactly keep the push pull operation to null Dc. Even if one tube wears off, one can get any tube and still match it to the other one, without worrying about matching pair
3. A switchable option for zero feedback ( global).( Airy vs Tighter bass- to suit individual needs) Technically, the damping factor Changes.
4. Active ventilation with silent DC fan, The transformer box will double up as a thermal conduit to exhaust hot air and keep the chasis cool ( several reports say that cooling the Transformer, as well as the tubes will increase the life considerably)
5. A Vu meter, which is Calibrated for Logarithmic response..
Some build notes
A.. I first made the Power Transformer and OPT transformer before doing the prototype
B. Aluminium 1.5mm thick sheer metal was bought and bent to dimensions.
C. 3 coats of spray paint done with fine sanding inbetween.
4. The unique shaped Wooden side panel is Padauk, a wood whose colour and texture i like. With thorough polishing and sanding,The grains stand out nicely.,and it reminds one of a musical instrument rather than a Amplifier.
Many Thanks to Yvesm,the original designer of Baby Huey Circuit, And Evert Liewes, My Mentor and Guru from Portugal, who like a father figure patiently taught me Everything from scratch( from plotting a load line to making a OPT)
Side flanges in Padauk
The extreme right switch is the feedback defeat
P2P wiring, Individual bias pots are visible
Clean 1khz square wave
Last edited: