We are booting distros like Volumio/MoOde and other mpd based linux distros off SD card with digione and other raspberry pi based transports, with the music files residing on a separate drive.
There have been issues of library management, crashing of library, slow rebuilding process etc.
With the opening of the boot interface in Raspberry Pi-2B v .12, 3A+, 3B, CM3, 3B+and CM3+, we can now have everything within a single USB mass storage device (a large capacity pen drive or even a very large capacity hard disk including SSD drives.
With 3B+ and CM3+ the support is out of the box, whereas with the others listed above a little tweak using a SD card is needed.
Soon default boot might be extended to Pi 4 also.
Advantages:
Fast boot
All partitions on a single disk
Much faster access time
Upgrade to SSD for even faster access
Direct or network transfer of files from Windows, Mac and Linux based machines
What all is needed:
A raspberry pi with mass storage boot support, 3B+ is the best as the support is out of the box.
MoODe OS as USB boot is permanently disabled in Volumio (you will have to use Berryboot to boot Volumio off USB drives which is a bit complex)
For other Raspberry pi's, follows the below procedure. Those with 3B+ can directly jump to Step 2:
Step 1: Enabling USB boot on Raspberry Pi-2B v .12, 3A+, 3B, CM3
I am not giving full details, but is explained clearly in the following link
How to enable USB host mode for Raspberry Pi
Step 2: Creating MoOde bootable disk with from pen drive/hard drive
Stuff Needed:
1. Balenaetcher: Download from here
2. A formatted pen drive or hard disk (NTFS of FAT 32)
3. A PC/laptop running windows 7, 8 or 10 with BIOS boot option
4. MoOde OS: Download from here
5. Unzip the MoOde image to extract the iso file.
Procedure: The usual for writing MoOde to SD card
Run Balenaetcher as administrator (right click the mouse and "Run As Administrator" option or change the credentials permanently within the file properties)
In the next screen browse and select the downloaded MoODe iso image and the pendrive/hard disk as the target disk and flash. When using hard drive you will get a message that the target is too large, but ignore and flash.
After the process completes, remove the pendrive/hard disk from the laptop.
Step 3: Booting off MoOde from digione
A detailed first boot-up guide is available in this link: MoOde Setup
Connect the pendrive/hard disk to any USB port on the raspberry pi on the digione and power it on.
If you have an ethernet cable, connect that also to the digione with one end going to your router.
If you do not have ethernet cable, then we will have to use the MoOde AP mode via wifi.
After powering on without ethernet cable, wait for 2/3 minutes for the 1st boot to complete.
If you have connected ethernet cable, then you can see the green light on the ethernet port blinking to indicate that handshake has taken place.
With no ethernet cable:
After 3 minutes of boot time, search for MoOde SSID in the available wifi networks. If you do not see, wait for couple more minutes and it will show-up.
Once you see the MoOde SSID, connect to it. The default password is moodeaudio.
Once connected, you can access MoODe headless at the ip address 172.24.1.1 which you have to key-in on your browser.
You can now setup wifi if you do not have ethernet access at all or simply continue to control MoOde in AP mode without doing anything except possibly changing the default password.
To use in AP mode permanently , one of your control devices like your mobile, tablet or laptop has to be in MoOde SSID network and will not be able to use you home network to access internet.
Also in AP mode, for network access the device has to be connected to the MoODe wifi only.
With ethernet cable:
With ethernet cable connected, you can directly access MoODe by typing http://moode, moode.local or the IP address (which you can obtain from your router) in the browser. Please not that only IP address method is supported in android phones.
Now you can go about configuring other features of MoODe like adding your digione as output, enabling other features like Bluetooth, UPNP, Airplay etc.
During configuration of various options in MoODe, you can either choose the 'Expand the SD storage option' to fully use all the unallocated space in your pen drive or hard disk or leave it to another method I am suggessting.
Partitioning:
After configuring MoOde without expanding the storage, shut down MoOde, power off digione and then remove the hard disk/pendrive.
Download Minitool Partition Wizard free edition: Download from here
Install Minitool Partition Wizard on your computer.
Connect your MoOde hard disk / pendrive to your computer's USB port and open Minitool Partition Wizard.

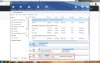
Your moOde hard disk will have 3 partitions - boot (FAT32) 256MB (used); rootfs (Ext4), and the remaining space of your drive listed as 'Unallocated', In the above pic it shows NTFS-927.8GB as I have partitioned it.
Now right click on the unallocated space while in 'Partition Wizard" and format it as NTFS if using a hard drive and either NTFS of FAT 32 if using a pen drive. Ignore Windows warning of partition cannot be viewed in Windows.
File Transfer:
Now close Partition Wizard and safe eject the hard disk/pen drive and connect it back to digione and boot.
Now for file transfer, click Network in the windows laptop under explorer.
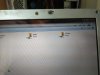
It should be visible under your network as follows:


The SD Card is the default MoODe folder and the numbered one (01d63e....) is the NTFS folder created by us in Minitool Partition Wizard. Under MoODe it will be listed as USB.
Now you can copy over music files from your computer to this folder which you created and then update the library in MoOde to play them.
But remember network copying will be slow and is more useful for adding songs once in a while.
If you already have say a large database of songs which you want to add the first time, network copying could be painful and for one tile large copy, use any of the following methods:
Fast copying of files:
The caveat is that even though you have an NTFS partition, it cannot be read by windows as the default table has been made in Linux to write MoODe.
Following are some options:
1. To install software to read/write Linux partition table: The only option to do with ext4 table support is the Paragons "Linux File System for Windows'. This paid software will give read/write access to the NTFS parttion on the MoOde hard drive, but sadly the write speeds are still quite slow, but atleast you will not face network crash issues and faulty writes.
2. To run linux under VM Ware: You can install VM Ware and run a linux OS within that environment without leaving Windows. This too will enable reading anf writing to the NTFS partition, but still will be comparatively slow.
3. Wubi is a superb tool, but unsupported under Windows 7 and above without major tweaks which are quite complex and can even break Windows install. It will copy at native speeds though.
4. The Best and Safest Option:
Build a Linux live bootable pen drive. Just create a bootable Ubuntu pen drive with Rufus Download from here.
You can download the Ubuntu Desktop Download from here and burn the ISO to a pen drive with Rufus.
Now boot from the pen drive by setting boot option within your BIOS. If you have UEFI enabled, then also enable legacy boot.
The Ubuntu will ask you want to install or test. For us test is enough and Ubuntu will boot into its own GUI interfaced desktop.
Now connect you MoOde hard disk to the laptop and copy the music files over to the NTFS partition within Ubuntu. It will give you native copy speeds with full USB 3 support.
Shut down your laptop, remove the Ubunti pen drive and the MoODe hard disk.
Now you can boot back into windows and run MoOde off raspberrypi with all your music files in it.
Any files you add in the future can be done either over the network or if too large, use the above Ubuntu method.

Ubuntu desktop

The MoOde hard disk (NTFS partition) within Ubuntu

The NTFS partition appears as USB in digione MoODe screen
Sorry for this long and tiring post. Hope it is useful as many here are using Allo based transports.
There have been issues of library management, crashing of library, slow rebuilding process etc.
With the opening of the boot interface in Raspberry Pi-2B v .12, 3A+, 3B, CM3, 3B+and CM3+, we can now have everything within a single USB mass storage device (a large capacity pen drive or even a very large capacity hard disk including SSD drives.
With 3B+ and CM3+ the support is out of the box, whereas with the others listed above a little tweak using a SD card is needed.
Soon default boot might be extended to Pi 4 also.
Advantages:
Fast boot
All partitions on a single disk
Much faster access time
Upgrade to SSD for even faster access
Direct or network transfer of files from Windows, Mac and Linux based machines
What all is needed:
A raspberry pi with mass storage boot support, 3B+ is the best as the support is out of the box.
MoODe OS as USB boot is permanently disabled in Volumio (you will have to use Berryboot to boot Volumio off USB drives which is a bit complex)
For other Raspberry pi's, follows the below procedure. Those with 3B+ can directly jump to Step 2:
Step 1: Enabling USB boot on Raspberry Pi-2B v .12, 3A+, 3B, CM3
I am not giving full details, but is explained clearly in the following link
How to enable USB host mode for Raspberry Pi
Step 2: Creating MoOde bootable disk with from pen drive/hard drive
Stuff Needed:
1. Balenaetcher: Download from here
2. A formatted pen drive or hard disk (NTFS of FAT 32)
3. A PC/laptop running windows 7, 8 or 10 with BIOS boot option
4. MoOde OS: Download from here
5. Unzip the MoOde image to extract the iso file.
Procedure: The usual for writing MoOde to SD card
Run Balenaetcher as administrator (right click the mouse and "Run As Administrator" option or change the credentials permanently within the file properties)
In the next screen browse and select the downloaded MoODe iso image and the pendrive/hard disk as the target disk and flash. When using hard drive you will get a message that the target is too large, but ignore and flash.
After the process completes, remove the pendrive/hard disk from the laptop.
Step 3: Booting off MoOde from digione
A detailed first boot-up guide is available in this link: MoOde Setup
Connect the pendrive/hard disk to any USB port on the raspberry pi on the digione and power it on.
If you have an ethernet cable, connect that also to the digione with one end going to your router.
If you do not have ethernet cable, then we will have to use the MoOde AP mode via wifi.
After powering on without ethernet cable, wait for 2/3 minutes for the 1st boot to complete.
If you have connected ethernet cable, then you can see the green light on the ethernet port blinking to indicate that handshake has taken place.
With no ethernet cable:
After 3 minutes of boot time, search for MoOde SSID in the available wifi networks. If you do not see, wait for couple more minutes and it will show-up.
Once you see the MoOde SSID, connect to it. The default password is moodeaudio.
Once connected, you can access MoODe headless at the ip address 172.24.1.1 which you have to key-in on your browser.
You can now setup wifi if you do not have ethernet access at all or simply continue to control MoOde in AP mode without doing anything except possibly changing the default password.
To use in AP mode permanently , one of your control devices like your mobile, tablet or laptop has to be in MoOde SSID network and will not be able to use you home network to access internet.
Also in AP mode, for network access the device has to be connected to the MoODe wifi only.
With ethernet cable:
With ethernet cable connected, you can directly access MoODe by typing http://moode, moode.local or the IP address (which you can obtain from your router) in the browser. Please not that only IP address method is supported in android phones.
Now you can go about configuring other features of MoODe like adding your digione as output, enabling other features like Bluetooth, UPNP, Airplay etc.
During configuration of various options in MoODe, you can either choose the 'Expand the SD storage option' to fully use all the unallocated space in your pen drive or hard disk or leave it to another method I am suggessting.
Partitioning:
After configuring MoOde without expanding the storage, shut down MoOde, power off digione and then remove the hard disk/pendrive.
Download Minitool Partition Wizard free edition: Download from here
Install Minitool Partition Wizard on your computer.
Connect your MoOde hard disk / pendrive to your computer's USB port and open Minitool Partition Wizard.
Your moOde hard disk will have 3 partitions - boot (FAT32) 256MB (used); rootfs (Ext4), and the remaining space of your drive listed as 'Unallocated', In the above pic it shows NTFS-927.8GB as I have partitioned it.
Now right click on the unallocated space while in 'Partition Wizard" and format it as NTFS if using a hard drive and either NTFS of FAT 32 if using a pen drive. Ignore Windows warning of partition cannot be viewed in Windows.
File Transfer:
Now close Partition Wizard and safe eject the hard disk/pen drive and connect it back to digione and boot.
Now for file transfer, click Network in the windows laptop under explorer.
It should be visible under your network as follows:
The SD Card is the default MoODe folder and the numbered one (01d63e....) is the NTFS folder created by us in Minitool Partition Wizard. Under MoODe it will be listed as USB.
Now you can copy over music files from your computer to this folder which you created and then update the library in MoOde to play them.
But remember network copying will be slow and is more useful for adding songs once in a while.
If you already have say a large database of songs which you want to add the first time, network copying could be painful and for one tile large copy, use any of the following methods:
Fast copying of files:
The caveat is that even though you have an NTFS partition, it cannot be read by windows as the default table has been made in Linux to write MoODe.
Following are some options:
1. To install software to read/write Linux partition table: The only option to do with ext4 table support is the Paragons "Linux File System for Windows'. This paid software will give read/write access to the NTFS parttion on the MoOde hard drive, but sadly the write speeds are still quite slow, but atleast you will not face network crash issues and faulty writes.
2. To run linux under VM Ware: You can install VM Ware and run a linux OS within that environment without leaving Windows. This too will enable reading anf writing to the NTFS partition, but still will be comparatively slow.
3. Wubi is a superb tool, but unsupported under Windows 7 and above without major tweaks which are quite complex and can even break Windows install. It will copy at native speeds though.
4. The Best and Safest Option:
Build a Linux live bootable pen drive. Just create a bootable Ubuntu pen drive with Rufus Download from here.
You can download the Ubuntu Desktop Download from here and burn the ISO to a pen drive with Rufus.
Now boot from the pen drive by setting boot option within your BIOS. If you have UEFI enabled, then also enable legacy boot.
The Ubuntu will ask you want to install or test. For us test is enough and Ubuntu will boot into its own GUI interfaced desktop.
Now connect you MoOde hard disk to the laptop and copy the music files over to the NTFS partition within Ubuntu. It will give you native copy speeds with full USB 3 support.
Shut down your laptop, remove the Ubunti pen drive and the MoODe hard disk.
Now you can boot back into windows and run MoOde off raspberrypi with all your music files in it.
Any files you add in the future can be done either over the network or if too large, use the above Ubuntu method.
Ubuntu desktop
The MoOde hard disk (NTFS partition) within Ubuntu
The NTFS partition appears as USB in digione MoODe screen
Sorry for this long and tiring post. Hope it is useful as many here are using Allo based transports.