Recently, I completed making of my second AV rack, the first rack with fixed glass shelve heights, was made in SS304 around two years back. It is due to the limitation of fixed shelve heights that forced me to look into different type of constructional features to avoid any sort of welding distortion and also look at different material of construction (MOC) to avoid resonances, vibrations and make the rack rigid, which at the same time will allow the flexibility of varying the shelf heights to accommodate / place different gear as per the requirement, convenience and allow change of gears by virtue of upgrades without having to change the rack. Aesthetics and the expandability were the other areas to be considered while making of this rack.
In the process, searched and studied various racks/ designs on the sites and the ones made by the members here and finalized the one (shown in the photos below) as it was meeting my mentioned requirements. Quite a few members have done this rack and are similar to the one sold by Mapleshade, thanks to the members and this wonderful forum :clapping: for the loads of information and ideas, which has inspired me to take up this DIY route yet again.
In the spirit of DIY, I thought of sharing this with you all, so as to help the members planning racks or are planning one in future.
I started making this almost 3-4 months back, but could not expedite due to the work schedule, March year ending delivery pressures and also lost lots of time in sourcing the wooden planks.
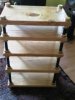
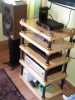
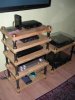
ConstructionThe vertical posts are threaded made of 30 mm dia., and are readily available in the hardware shops and come in the standard lengths of 1 meter.
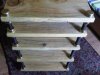
The nuts, end caps and the feet are made of 50mm dia brass rod. They are machined to suit the wooden plates and the studs. The brass nuts (they are purposely kept round to make them look elegant and less mechanical enhancing the aesthetics of the rack. For tightening the nuts, smaller holes were drilled on the sides as seen in the photos.
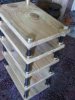
The wooden planks used for shelf are made of one piece and no joints are used; they are cut from the log to achieve wider and thicker panels, dimensionally they are 600 x 400 and 2 thick. Later, they are leveled, finished to exact dimensions, the holes are drilled to accommodate the studs dimension.
Finish
Studs - The threaded rods (studs) are blackodised for protection from rusting and as well for that dark black look which should look good in contrast to the color of the brass hardwares and give that deserved look.
Brass Hardwares - The brass nuts, end caps and the feet with spikes were machined and buffed to matt finish.
Wooden plates After proper sizing with chamfering of corners and the holes to suit the stud dimensions, they were applied with necessary transparent coats of polish and lacquer to maintain the uniformity while retaining and revealing the grainy structure of the wood, which I love to see in any wooden piece of furniture and that feels natural.
Cost - I am yet to do mathematics, will share the same as soon as I am ready with it.
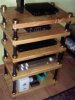
Result - I am extremely happy with the way it has come up; it is simple, solid, rigid, vibration free, elegant and more than anything else my gear is happy.
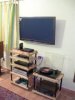
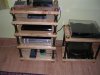
Check the following photos (excuse poor quality as they are taken on mobile, will try to post more clear pictures soon)with some of the gears happily seating on the rack, they deserved this luxury anyways, specially my Luxman amp. You can also see in the last photo, those lovely speaker stands by our own magma.
This post is in continuation of tradition of sharing the information, hands on experience and knowledge acquired while in the DIY process. Thanks for reading and happy listening")
Best regards.
In the process, searched and studied various racks/ designs on the sites and the ones made by the members here and finalized the one (shown in the photos below) as it was meeting my mentioned requirements. Quite a few members have done this rack and are similar to the one sold by Mapleshade, thanks to the members and this wonderful forum :clapping: for the loads of information and ideas, which has inspired me to take up this DIY route yet again.
In the spirit of DIY, I thought of sharing this with you all, so as to help the members planning racks or are planning one in future.
I started making this almost 3-4 months back, but could not expedite due to the work schedule, March year ending delivery pressures and also lost lots of time in sourcing the wooden planks.
ConstructionThe vertical posts are threaded made of 30 mm dia., and are readily available in the hardware shops and come in the standard lengths of 1 meter.
The nuts, end caps and the feet are made of 50mm dia brass rod. They are machined to suit the wooden plates and the studs. The brass nuts (they are purposely kept round to make them look elegant and less mechanical enhancing the aesthetics of the rack. For tightening the nuts, smaller holes were drilled on the sides as seen in the photos.
The wooden planks used for shelf are made of one piece and no joints are used; they are cut from the log to achieve wider and thicker panels, dimensionally they are 600 x 400 and 2 thick. Later, they are leveled, finished to exact dimensions, the holes are drilled to accommodate the studs dimension.
Finish
Studs - The threaded rods (studs) are blackodised for protection from rusting and as well for that dark black look which should look good in contrast to the color of the brass hardwares and give that deserved look.
Brass Hardwares - The brass nuts, end caps and the feet with spikes were machined and buffed to matt finish.
Wooden plates After proper sizing with chamfering of corners and the holes to suit the stud dimensions, they were applied with necessary transparent coats of polish and lacquer to maintain the uniformity while retaining and revealing the grainy structure of the wood, which I love to see in any wooden piece of furniture and that feels natural.
Cost - I am yet to do mathematics, will share the same as soon as I am ready with it.
Result - I am extremely happy with the way it has come up; it is simple, solid, rigid, vibration free, elegant and more than anything else my gear is happy.
Check the following photos (excuse poor quality as they are taken on mobile, will try to post more clear pictures soon)with some of the gears happily seating on the rack, they deserved this luxury anyways, specially my Luxman amp. You can also see in the last photo, those lovely speaker stands by our own magma.
This post is in continuation of tradition of sharing the information, hands on experience and knowledge acquired while in the DIY process. Thanks for reading and happy listening
Best regards.