Touch Screen based low Noise Streamer using Raspberry PI

Anyone has installed the 3.5" RPi LCD(B) successfully in Moode? I have RPI 3 B with Moode (Bookwork 64 bit) installed and I am trying to use the 3.5" LCD display but no luck. I have tried multiple options available on the internet. Any help would be appreciated.

I am pretty much used to Moode interface and have had tried volumio, picoreplayer before but finally settled with Moode.
 
Did your touch display work with any other software or are you aware of anyone using Moode with touch display on different hardware combination. I know it is a difficult choice. Either you go with touch or sound quality. Most highend OS do not support touch display. Gentooplayer is one.
 
Working of your touchscreen has nothing to do with moode, shoode or anything else. It is a pure OS config. You have to configure dtoverlay for your touchscreen driver in /boot/firmware/config.txt. e.g. I have this for my touchscreen. Basically I'm using the vc4-kms-v3d driver which works for waveshare touch screens. You have to check your touchscreen manufacturer and google search for the dtoverlay to use. I have also put noaudio in that line to disable the onboard DAC output on the HDMI out.

# Enable DRM VC4 V3D driver
dtoverlay=vc4-kms-v3d,noaudio
 
Last edited:
Working of your touchscreen has nothing to do with moode, shoode or anything else. It is a pure OS config. You have to configure dtoverlay for your touchscreen driver in /boot/firmware/config.txt. e.g. I have this for my touchscreen. Basically I'm using the vc4-kms-v3d driver which works for waveshare touch screens. You have to check your touchscreen manufacturer and google search for the dtoverlay to use. I have also put noaudio in that line to disable the onboard DAC output on the HDMI out.
Thanks @mbhangui .

Yes, i have "dtoverlay=waveshare35b-v2" in config.txt.

I have performed all the steps mentioned in the URL below (under the section "For All Raspberry Pi Versions") but no luck.

 
Thanks @mbhangui .

Yes, i have "dtoverlay=waveshare35b-v2" in config.txt.

I have performed all the steps mentioned in the URL below (under the section "For All Raspberry Pi Versions") but no luck.

This will not work because droverlay=waveshare35b-vt is a proprietary driver. The problem that you have is that moode, volumio and all such distributions have taken a raspberry pi image from some particular date. So it's version is let us say 5.x.2. By installing moode you are now stuck at 5.x.2

Meanwhile the official raspberry is at 6.15.3

Then comes a company like waveshare who take a open source code for their driver, modify it and make it closed source. Because of this the driver works on on 3.x, 4.x, 5.x, 6.15.1 Everytime there is a new kernel release their driver stops working.

To make it work you can do only the following

1. Ask Waveshare to release a driver for your old kernel version 5.x.2 used by moode. To know the exact old version used by your moode applications, execute the command uname -r on terminal.
2. Ask moode to give you a moode build for the kernel version on which waveshare works. You will have to follow each and every step in the waveshare site. This will give you a particular old kernel version on which waveshare works. After installing waveshare driver you will have to do uname -r on your terminal and then ask in the moode forum on how to get moode working on your kernel version where waveshare version works.
3. Build moode yourself. I believe there is a way. But you will have to learn lot of linux.
4. Use the official opensource driver like me by using dtoverlay=vc4-kms-v3d and see if that works.

This is one of the reasons I avoid builds like volumio, dietpi, moode like a plague. None of them have released their software as a debian package. They all release their code on fixed raspberry pi versions.

In fact I had the pleasure of working with a raspberry pi engineer (in the pull requests linked below) to reverse engineer and develop the above driver and make it work with my 7.9 inch waveshare display.


and


Attachments

  • 1752232760721.png
    1752232760721.png
    94.6 KB · Views: 8
It certainly sounds to be daunting task for a person like me who has no linux knowledge. I will try the best to get it configured.

--execute the command uname -r on terminal
6.12.25+rpt-rpi-v8
 
Did your touch display work with any other software or are you aware of anyone using Moode with touch display on different hardware combination. I know it is a difficult choice. Either you go with touch or sound quality. Most highend OS do not support touch display. Gentooplayer is one.
Yes, display works fine with Raspian bullseye 32 bit. So, this rules out that there no issue with the display.
 
The easiest thing is to use
dtoverlay=vc4-kms-v3d
Instead of
dtoverlay=waveshare35b-vt

and see if it works.
 
Sure. I will give it a try.

Meanwhile, Tim Curtis from Moode has mentioned that Moode won't be able to render small screens (3.5"). Instead of trying to use the display for a cover view, I am thinking to use the display for some other controls like peppy meter etc. Lot of learnings in last few weeks while digging about the display. I will share the updates here as I make progress.
 
Update: More than a year has passed. In this time I have made significant changes to my streamer.

Update1: With the help of a local carpenter I made a housing that would house two raspberry PIs. One of them a RPI3 with a touch screen, IR receiver Diode and Power Switch connected to the GPIO pins with two small program written in C to control all music operations and powering on and shutdown of all Music related devices. The second RPI (RPI4) has PI2AES, Asus Xonar Essence One (Muses Edition) with Balanced and SE outputs and a Toppings D10b with ballanced out. So total of 3 DACs connected to the same RPI and playback being played simultaneously on all the 3 dacs.

The portable streamer can play

1. Local files on a NAS
2. Play Amazon Music
3. Play Apple Music Hi-Res using a MacMini
4. Play YT Music using google chromecast audio
5. Spotify
6. Choice of using mpd or LMS as the media server for Music

Controls available
1. Touchscreen display of Music being played with cover art and playback controls. This uses the RPI3 as the controller
2. Volume control using a small hardware connected to the USB port of the RPI3
3. A IR Remote that was trained to control all aspects of Music Playback
4. Hardware based volume control for balanced out
5. Android/IOS/Linux/MacOS app based control with album art

Connectivity.
Using two hanutech media converters and a fiber running between the media converters providing 1 gpbs speeds and a 8 port tplink gigabit switch.

Audio Routing:

Using ethernet sockets and ethernet cables using my DIY approach as detailed in https://www.hifivision.com/threads/...cable-over-ethernet-cable.97926/#post-1078014

Picture 1: The portable streamer on wheels. The whole ugly thing has wheels at the bottom can can be moved easily between rooms. All audio output is on ethernet sockets and can be quickly connected to any amplifier in my bedroom or music room using simple ethernet cables. It also has a low pass subwoofer output that is wirelessly sent to a subwoofer in the room.

1760123148314.png

1760121781744.png

Picture2: USB volume control

I capture the USB events using a small program written in C. It can increase/decrease the volume. Single Press pauses the song. A press again, unpauses the song. Press and move it clockwise to increase the rating of the song. Press and move anti-clockwise to decrease the rating of the song. Along with the rating and how I listen to the song is captured in a database. I then use AI to dish out playlist of songs that I prefer.

1760121847912.png


Picture 3: IR remote control
1760122045019.png

Picture 4: Volume Control of balanced outputs
1760122088302.png

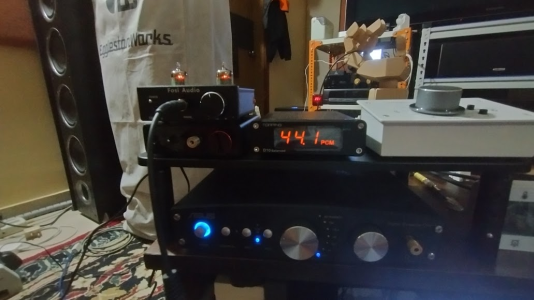
Picture 5: Headphone Amplifier
1760122140252.png

Picture 6:
Vacum tube based Headphone amplifier based on GE JAN 5654W. Here JAN stands for Joint Army Navy. This is a rugged tube that was made many years ago jointly for the US Army and Navy by GE. Below the Tube Amp there is another headphone amp Toppings L30 Headphone Amp. Apart from this there is another headphone AMP, the famous O2 amp that made companies like Schitt run for their money. The O2 and the above Asus are the ones that I prefer the most
1760122490955.png

Picture 7: The same display on the small RPI touch screen being projected on a large Monitor along with cover art. There is lot of other information that gets displayed

1. Song information (Album, artist, title, date last played, play counts, song rating)
2. Dynamic Range, Sampling Rate, Duration, etc of the song

1760122552372.png

Picture 8. Song information displayed

1760123413342.png

Picture 9. Table lamps, Floor lamps and wall lamps, Fan controlled by the portable Rig, by clicking buttons on the Raspberry PI GUI using a low energy bluetooth dongle.

1760122698374.png1760122729200.png1760122750080.png

I will put down how each of these controls can be achieved by anyone using material easily available on Amazon India. All source code written by me will be made available on my personal github account. How to wire all this and put all this together will be written in next few posts. The kernel tweaks made to achieve low latency will also be detailed. Watch out this space.
 

Attachments

  • 1760122535840.png
    1760122535840.png
    648 KB · Views: 5
Last edited:
Lesson 1: Low Latency audio, RT Kernel, Real-time scheduing

Long time ago folks played around with Real TIme Kernel to get low latency for audio. Ever since Linux 5.14 cycle, the USB sound driver exhibit lower latency when starting playback. Longtime Linux kernel sound subsystem maintainer Takashi Iwai of SUSE has worked on a clean-up to the kernel's USB-Audio driver and with an emphasis on latency reduction during audio playback. Folks have tested the latency and have been impressed. Suffice to day Bye By RT Kernel.

Do I need a realtime kernel to use realtime scheduling?​

No. Realtime scheduling is available on all Linux systems no matter what kernel they use, and current versions of JACK use it by default. A kernel built with the realtime patches (an “RT kernel”) is needed only if:

  • You want to run JACK with very low latency settings that require realtime performance that can only be achieved with an RT kernel
  • Your hardware configuration triggers poor latency behaviour which might be improved with an RT kernel
Most users do not need an RT kernel in order to use JACK, and most will be happy using settings that are effective without an RT kernel.

Next chapter we will start configuring two audio applications for RT use without using a RT Kernel. Please go through this before I post the next chapter


You can use rtcqs, a Python utility to analyze your system and detect possible bottlenecks that could have a negative impact on the performance of your system when working with Linux audio. https://codeberg.org/rtcqs/rtcqs
 
For excellent sound that won't break the bank, the 5 Star Award Winning Wharfedale Diamond 12.1 Bookshelf Speakers is the one to consider!
Back
Top