You are using an out of date browser. It may not display this or other websites correctly.
You should upgrade or use an alternative browser.
You should upgrade or use an alternative browser.
DIY Audio Rack Made From Teak Wood & Plywood
- Thread starter sadik
- Start date

RightSadik, one question, so you used teak for the 4 pillars and plywood for the trays right?
Mine pillers size is 2 inch x 2 inch, I dont know if you have observed it or not, I have made groove in pillers which is 20 mm deep and the Plywood trays rest on it. You cant make extra grooves in this piller of size 2 inch x 2 inch, making them will weeken the pillars. You may need atleast 4 inch x 3 inch pillars to make extra grooves and still be strong enough.If I drill additional 3-4 holes on the pillars near every current position of rack so that moderate height adjustment of trays are possible in future would it make the pillars weak?
I belive the Audio Gears should not be covered as they get hot while in use & it needs open area to keep itself kool & everyone will agree with this. Practically it is impossible to cover such a big rack with single cover. You can use a piece of cloth to cover the gear when not in use.Also what about dust covers? I mean I saw another FM also asked, for me where I stay on one side there is a playground and opposite side a railway station, both source of uninterrupted dust supply. Individual covers are fine but I am looking for some additional ideas.
Above statement is true that audio equipment should have free moving air, I had same problem of dust. You can never eliminate dust but you can reduce it.
I have a enclosed rack with all the equipment in it, I just open the front cover when I need to listen/watch music/movie. Someone on this forum said "don't underestimate the power of a common fan" . There is a ceiling fan pushing some air towards the enclosure. With AV receiver in it the top plate of AV receiver gets hot in summers. So I have AC and common FAN running in open space(Drawing room) while I am running my equipment.
I have the windows sealed with sponge rubber tape and there wasn't much dust inside.
I have a enclosed rack with all the equipment in it, I just open the front cover when I need to listen/watch music/movie. Someone on this forum said "don't underestimate the power of a common fan"
. There is a ceiling fan pushing some air towards the enclosure. With AV receiver in it the top plate of AV receiver gets hot in summers. So I have AC and common FAN running in open space(Drawing room) while I am running my equipment.I have the windows sealed with sponge rubber tape and there wasn't much dust inside.
Last edited:
Above statement is true that audio equipment should have free moving air, I had same problem of dust. You can never eliminate dust but you can reduce it.
I have a enclosed rack with all the equipment in it, I just open the front cover when I need to listen/watch music/movie. Someone on this forum said "don't underestimate the power of a common fan"
I have the windows sealed with sponge rubber tape and there wasn't much dust inside.
My setup is in the open living room. So limited options for dust proofing from outside, it's a old fashioned house. Understand free flowing air need, will try to make some provision for both in new design. Thanks for pitching in
Sushant Sharma
Well-Known Member
Hi Sadik
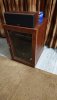
Great job with the rack. Looks very professionally made and beautiful. I made one myself late last year with the help of a more experienced friend who knows carpentery. I think it looks very similar to yours.Used a tripod of Acacia wood Legs. I ran a Bar that shut down last year so used the bar counter which was made of Pine wood to cut out the shelves. Attaching a photo.
Great job with the rack. Looks very professionally made and beautiful. I made one myself late last year with the help of a more experienced friend who knows carpentery. I think it looks very similar to yours.Used a tripod of Acacia wood Legs. I ran a Bar that shut down last year so used the bar counter which was made of Pine wood to cut out the shelves. Attaching a photo.
In 2nd image look at window(orange rubber sponge tape), it seals the door and makes cabinet dustproof(not 100%). I also have 120mm hole at top and bottom back of this cabinet and have dust filters. Earlier I thought of installing fans but later decided not to as that would pull in more dust, I have to keep front door open when in use but I am peace when the equipment is not in use for month.
Attachments
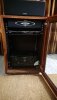
In 2nd image look at window(orange rubber sponge tape), it seals the door and makes cabinet dustproof(not 100%). I also have 120mm hole at top and bottom back of this cabinet and have dust filters. Earlier I thought of installing fans but later decided not to as that would pull in more dust, I have to keep front door open when in use but I am peace when the equipment is not in use for month.
This rubber is a good idea, I will keep in mind, my problem is I have a 3x3 rack to make for 9 devices, so front door need to be designed differently, but your idea will certainly help.
Consider sliding doors moving left and right.
Like the glass doors for regular cupboards. I mean....the door won't open out. It just slides left and right.
I have the speakers on the left and right, sliding left and right hence is a bit difficult
In 2nd image look at window(orange rubber sponge tape), it seals the door and makes cabinet dustproof(not 100%). I also have 120mm hole at top and bottom back of this cabinet and have dust filters. Earlier I thought of installing fans but later decided not to as that would pull in more dust, I have to keep front door open when in use but I am peace when the equipment is not in use for month.
One question, if it's closed at all sides, when it comes time to change connections behind the equipmenta how is it managed? You have to pull out the entire equipment out.unless you manage something similar with rubber buffer also at the back.
Consider sliding doors moving left and right.
Like the glass doors for regular cupboards. I mean....the door won't open out. It just slides left and right.
It may not be a practical choice opting for sliding doors due to some limitations.
One question, if it's closed at all sides, when it comes time to change connections behind the equipmenta how is it managed? You have to pull out the entire equipment out.
No you have to make doors on both the sides front and back. For better understanding look at the images in this link
No you have to make doors on both the sides front and back. For better understanding look at the images in this link
The link is a flight case though but I understand, let me think
The doors will never project out of the cabinet boundary. Please see the pic below. When you want to open, either both doors will be stacked to the left or right. So at any given time, only one side will be fully open.I have the speakers on the left and right, sliding left and right hence is a bit difficult
These work well based on how many rows & columns you need. If you need 3 rows & 3 columns, then it may not work

The doors will never project out of the cabinet boundary. Please see the pic below. When you want to open, either both doors will be stacked to the left or right. So at any given time, only one side will be fully open.
These work well based on how many rows & columns you need. If you need 3 rows & 3 columns, then it may not work
View attachment 31247
Indeed 3 rows and 3 columns. Also this sliding model in between the overlapping area needs to be thought of for dust protection.
TrueIndeed 3 rows and 3 columns. Also this sliding model in between the overlapping area needs to be thought of for dust protection.
HiIndeed 3 rows and 3 columns. Also this sliding model in between the overlapping area needs to be thought of for dust protection.
I designed a front lid for my DIY rack that is pivoted on the top, under the top plank. The lid, door is flush with the frame when it is down. I have handles at the bottom, so when I open the rack, the door opens outward and then slides into a slot on the top (under the top plank).
It is an elegant solution from a storage perspective but a word of warning. In our case the door stays raised all the time and then dust accumulates on the top in a grand manner. Also you need strong wood bcos otherwise the weight of the door can cause cracks in the frame near the pivots. I will post photos if you want to see the arrangement
Hi
I designed a front lid for my DIY rack that is pivoted on the top, under the top plank. The lid, door is flush with the frame when it is down. I have handles at the bottom, so when I open the rack, the door opens outward and then slides into a slot on the top (under the top plank).
It is an elegant solution from a storage perspective but a word of warning. In our case the door stays raised all the time and then dust accumulates on the top in a grand manner. Also you need strong wood bcos otherwise the weight of the door can cause cracks in the frame near the pivots. I will post photos if you want to see the arrangement
Need photos of course. Please post tgem
blackscorpio
Active Member
Another arrangement for 3 door, 3 doors are equal in dimensions, at a time only one column is accessible, two doors on one track & one on another track. The carpenter I hired did a awful job of aligning doors, there is slight gap between the middle door where it aligns with the side doors. It is a easy fix though I can use some FOAM seal used for door sealing to fix the gap. I have the AVR on the center shelf, center shelf is kept open when AVR is on.

blackscorpio
Active Member
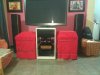
Dust proofing is a big pain. This is what I am doing for protection while not in use. Thick towels in action. Note speakers are not usually that behind, this is for demo only
That's real pain everytime, I guess.
I was thinking doing something like that for my stereo setup.
Order your Rega Turntables & Amplifiers from HiFiMART.com - India's reputed online dealer.
Similar threads
- Replies
- 28
- Views
- 47K
D